Total Pageviews

Saturday 31 August 2013

Lone Stag Christmas Card - Saturday 31st August

Good Morning Friends,

I hope you are all well this weekend and have some crafting time scheduled! Thank you for visiting and commenting on my blog, I really do appreciate it very much. I can't believe it's already the last day of August..yesterday I took the bus into Bath, where I met my friend Trish. We don't get to see each other that often and mostly keep in touch through Facebook and twitter, so when we do get to be ladies who do lunch, there is always  a lot to talk about! Trish keeps hens too, three really pretty little bantams.

Anyway back to crafts: because of my impending holiday and because I have the busiest craft month ever on my return, I have to prepare my two workshop cards for October and November before I go. Amy and I have decided to use two Indigo Blu stamps and this is one of them: The stag on a cliff. I first saw Kay from Indigo Blu demoing this stamp on TV and I just loved it there and then and having played with it, I love it even more. It's a simple design, but says so much.

This is just a really simple card I put together whilst playing...it's not going to be the one for the class, it was just me playing...


I simply matted and layered blue and silver mirri card, finishing with the white stamped card. The background was created first, by cutting some copy paper in wavy shapes (like mountain folds) and I also punch a circle for the moon. I then used these as masks on the card and shaded the edges with distress ink (Chipped Sapphire).

Finally I stamped the stag and tree with Vintage Sepia Versafine ink. The sentiment was from a set I had free with a magazine and can you believe it, I lost it whilst making the card! It's quite small and I think it got picked up with some paper and thrown away...dam!

The stamp also comes with a sentiment that forms part of the cliff:
Look out for more of my creations with this stamp!
Thanks for stopping by,
Love and Hugs,
Carole X

Thursday 29 August 2013

Sunday Stampers wk 272: Titanium - 29th August


Good afternoon Friends,

Sunday Stampers week 272...check out Hels Sheridan's very inspirational blog http://pinkleart.blogspot.co.uk

Today is time for my Sunday Stampers project for this week and Hels has set the theme of using metal, so I set about creating a tag. I have used a technique from the Ali Reeve school of craft...

First of all I covered a plain tag with double-sided adhesive paper (I actually had just the right size left over from yesterdays tree post!). Then I stuck a sheet of kitchen foil to the tag. Kitchen foil is very flimsy, so I couldn't just emboss it and using the adhesive paper strengthens it even more. If you try this, don't worry about any creases, they can't be helped and actually add to the effect. I had a little foil and adhesive left, so I stuck this to another piece of card.

I then used a cog mask and ran the tag through my GC..now, Ali advocates using boot polish for the next step, but I had some Rub n' Buff in Spanish Copper handy, so I used that instead. I just rubbed it across the tag and left it to dry.

The spare foil was enough to die cut the cogs, which I also treated with the rub n' buff.


I stamped the sentiment and steampunk bug using  Creative Expressions stamps by Sam Poole and I coated the bug with glossy accents. I used a punch for the sentiment and made some little dictionary page flowers.
The key in the bezel was made recently when I was experimenting with making jewellery using ice resin. I had some left to use up so made this little design, which will eventually end up on a chain, but I thought it went well with this. Of course if I hadn't had to use up the resin, I could easily have made this with my melt pot.

Thanks for stopping by - I haven't had the chance to make something steampunk for ages, so it was great fun to make!

Love and Hugs,
Carole X

Wednesday 28 August 2013

Tim's Tags of 2013: August - 28th August

Good evening friends,

Wow two posts in one day! Well with my back problem in July I never got last month's tag made, so I was determined to play catch up and make my tag for August!

This is Tim's tag:


This month the theme is travel/journey so the option was wide open to choose the destination that means the most to us..so what to choose? I have strong family links in the USA and we are just about to embark on our road trip; I really love our very own London..but then there's  Venice! With Tom's dad coming from there and our frequent visits to this city over the past 30 years, it does feel like a second home. As soon as we set foot in this beautiful city, I just want to absorb everything. Of course Tom and I are lucky; we know where to go to avoid the tourist traps, all the little galleries where the art is free to ponder and the alleys are tranquil.

So Venice had to be the theme for my tag for this month: it is rather a hurried project this month..I'm still battling to finish presents to take on holiday and get completely off the ground with cards for my next craft fair, but hey no panic, it'll all be fine :) !!!

I followed Tim's tutorial to colour the base of the tag, using distress inks instead of the stains he uses (I didn't have the colours). The technique puts ink on your mat, spritzes the tags and then rubs it in the colours to totally coat it.

Next I stamped Rialto Bridge (stamp by Debbi Moore) and made a mask of it. I covered it with the mask  before stamping the diamond edging stamp. The Venice stamp is also from Debbi Moore, but 'Ciao Bella' is an old wooden stamp from my stash.

The mask and Venice Lion are both made from Art Moulds using my melt pot and I had to add a bit of lace as a nod to my favourite of the islands, Burano, which is famous for its lace.


Thanks for stopping by - you can view Tim's complete tutorial at http://timholtz.com/category/12-tags-of-2013/

I'll be back tomorrow.

Love and Hugs,
Carole X

Gilding Flakes & Acetate - Wednesday 28th August

Good morning friends!

I hope you all had a super sunny weekend: I know it already seems ages ago, but it was back to work yesterday and I missed posting! We had gorgeous weather here - six of us went to Westonbirt Arboretun Sunday for the annual Tree Fest show and to have a picnic and it was just such a wonderful day. There is always a lot there - wood sculpting, crafts, falconry - we visited the show, walked in the woods and had a super picnic, I'll post some photos of the crafts people tomorrow when they are sorted out on my Mac!

Today as promised is a short tutorial on using the gilding flakes with acetate and double sided adhesive sheets

 For this technique I used black stazon ink, the Indigo Blu bare trees 1 stamp, lancashire rose gilding flakes, double-sided adhesive (Creative Expressions) and stamp-able acetate. The  baby powder is just something I like to rub on my hands when using flakes as it goes some way to stopping so many of them sticking. There are other ways to do this, but this is a simple and effective way...
 First of all stamp the image on the rough side of the acetate, then set aside a few minutes being careful not to touch the wet ink
Peel away one side from the adhesive sheet and stick your stamped image to it, stamped side facing down.
Coat the sheet with the gilding flakes, making sure that you have a complete coating and remove excess, then smooth across and press down lightly with the palm of your hand
Using the scoochie wipe away all the excel flakes (which can be returned to the container for using again), until you have a smooth surface as in the second photo below.

Turn over and you will reveal your sunlit forest!
This is the card I made with this image..photos just don't do the effect justice, you really need to give it a go!


 I made the background by colouring some card with Vintage Photo and Wild Honey distress inks, laying a mask on top and embossing it through my Grand Calibur. Then I sanded it back, which took the ink away from the debossed areas. Finally I inked the white areas with bundled sage. To finish I stamped the large leaves from the Indigo Blu Roccocco set using Vintage Photo on some of the left over inked card and added a little bronze mica powder, which I heat set. The little leaves were die cut.

Thanks for stopping by!
Love and hugs,
Carole X

Sunday 25 August 2013

Notes, recipes & things to do! - Sunday 25th August

Good morning friends!

I hope you are all enjoying the weekend - we are lucky here as the weather has stayed pretty fine and is still very warm; we are meeting up with some family members at the nearby Arboretum (Westonbirt) for a picnic, which I'm very much looking forward to!

Thank you for your comments about my necklace yesterday - we went into Bristol and I actually wore it and was thrilled when someone actually noticed it and asked where I'd bought it!

Today I am back to paper craft and feeling much more at home! I wasn't going to post any of the presents I've made to take over to  my relatives in the USA until we are over there...I am getting with them and mostly they have a British theme to them, but when Christine Emberson started to sell kits to make a recipe book for charity recently, I just had to make one for one of my family.The females all love crafts, so I know it will be appreciated.

Christine is doing a stellar job at raising money for Ronald MacDonald House, where she was able to stay whilst her son was undergoing hospital treatment. All the die cutting and papers were included, all I had to do was put it together and add my own little touches as I wished!

I decided to make this more of a note book (although the recipe that Christine sent with it will be accompanying it)...

 I first of all covered the paper I wanted to use for the  front of the book with the lace and ribbon, tucking the over lap behind; I also used  a piece from  the extra card provided to make a pen holder, which I also glued on the inside.  I then used book binding glue to cover both sides of the back and front covers of the book with the papers provided.


 I glued the pocket Christine had provided to the inside of the book and typed the words on card, before die cutting using Spellbinders Scalloped Circles. I had some labels, which I tucked inside so they can be used as desired. I also added another pocket of my own at the back of the book. Christine provided some ready cut pages and I added some more.
The really fun part was decorating the front! I inked the edges all around with Spun Sugar distress ink and used most of the die-cuts - flowers, basket that came with the kit. I wanted to add a bow, so I used ribbon from my own stash and I also added a butterfly and a button.

I stamped the words 'Notes, Recipes and Things to Do' and die cut using Spellbinders Labels Four Small.

This was a really lovely project to make and as I am in need of a little book for very best recipes, I have ordered another to make for ourselves!

Thanks for  visiting, you can visit Christine's blog and see all her wonderful inspiration at 


Have a great Sunday,
Love and Hugs,
Carole X

Saturday 24 August 2013

Elisabeth Bennett Necklace - Saturday 24th August

Good Morning Friends,

First of all, welcome to my new follower Marita, thank you so much for visiting my blog and deciding to follow me!

Thank you for your comments about my Sunday Stampers card this week, (the trees with the gilding flakes). A few of you have asked me about how it was done and as I will be making another card with the same technique some time next week, I will add in a little tutorial.

Today something a little different...recently I said that were still a couple of items I got at the Ally Pally show earlier this year, that I hadn't had the chance to 'play with' as yet. A project by Kay Halliwell-Sutton(of Indigo Blu fame) in this month's 'Craft Stamper' magazine prompted me to get one of them out of its packet...ice resin, which I bought from the Indigo Blu stand at the show.

With every issue the magazine gives a free mini-stamp and this month it's a mini version of the Indigo Blu Elisabeth Bennett stamp that I like so much. As I really liked this project and have so little time to devote to just 'playing' at the moment, I decided to not stray far from the original design and this is my version of the necklace project using the stamp and some ice resin...

Excuse the photos, I'm a paper crafter not a jewellery maker and taking photos of this was a whole new thing...I rather liked the idea of this Georgian style pendant and I had all the bits needed to make it, so I was a good excuse to use the ice resin.


 I stamped the image on linen card  and coloured it with watercolour pencils, then I painted over the top with 'Slap it on' (Indigo Blu)  to seal it and set it aside to let it dry. I wanted it to have a faded look, so tried to colour it with muted colour tones. But actually, in truth the real thing is brighter that the photos.

Once it was dry, I made up the ice-resin and dropped it in: I didn't make too brilliant a job of it, but at least if I want to try it again when I have more experience and time, I just need to replace the pendant, which I can use on a card. Then I just left it for a day or two to fully harden. I made the chain over a few evenings, from some chain maille I had in my stash.
 Once the resin had dried I rubbed acrylic paint in various colours over the bezel to distress it and when it was almost dry I rubbed off the residue with a cloth.
Finally I tied ribbons and  beads from my bead jar on to the chain and that was it. I didn't change it much at all from the original project, as I said it was just a trial...but because it was the first time I'd used it, I made up too much of the resin, so I did make a couple of other little pieces that are my own...keep watching for these!

Thanks for stopping by, back to paper craft tomorrow,

Love and Hugs,
Carole X

Wednesday 21 August 2013

Sunday Stamper wk 271- Wednesday 21st July

Good afternoon Friends,

I hope you are all having a lovely crafty day - I made two cards this morning and then had to have one of those impromptu craft room tidies because I couldn't find anything, and guess what a waste of time that was?!

My card today was made whilst having a play with the stamp we are going to use in our next workshop. Amy has managed to borrow some for us as Indigo Blu has a great loan scheme for retailers.

I made quite a few cards last year using a Dreamweaver stencil very similar to this stamp. The theme for this week's Sunday Stampers - deets here - is using the colours of sunrise/sunset, so I have used gilding flakes to create a scene of morning or evening sun peeping through the bare trees. I haven't used any particular set of gilding flakes, just my own concoction of left overs from other projects and probably  a mixture from Indigo Blu and Cosmic Shimmer Flakes!

This is a 6x6 card that I first of all matted and layered with gold matt mirri and deep blue and gold card from Graphic 45, French Country. I used some doubled sided sticky back paper (I'm sure it has a better name!) and covered one exposed side with the gilding flakes. Then I stamped the trees on to acetate with black stazon, peeled the paper from the other side of the gilded piece and adhered the stamped acetate to it. I then matted and layered on more of the gold and black card.

To finish I stamped 'Best Wishes' - an Indigo Blu stamp from my own collection - with perfect medium and heat embossed clear. Then I matted and layered to make a little tag, tied with gold ribbon.

It is impossible to see the effect of this technique online, but I hope you like it! The effect of the light from the gilding flakes through the acetate is lovely.

Thanks so much for stopping by!


Love and Crafty Hugs,
Carole X

Monday 19 August 2013

Wedding card - Monday 19th August

Good Morning Friends,

Thank you for visiting today! I really thought I had posted this card, but I've checked back and can't find it, so here it is! Apologies if you have seen it before :)

This was a commission card I made earlier this year: it's an 8x8 card matted and layered in blue and white. I used Spellbinders lables 24 and one a die from Venetian Motifs, cut in half to reach all four sides and layered with another die from this set. I used a Martha Stewart punch for the border and layered over  a sheet of card embossed with the the Heart Lattice folder designed by Sue Wilson for Creative Expressions.

I am almost at the end of the commissions I took before I decided to take a 'holiday' from it - and a good job I did with the back and hen problems! I have also been busy with a few other projects over the weekend - some presents for my family in the US(which I am going to post on here whilst I am over there) and I've been having a play with some ice resin, making a few pieces of jewellery - it's drying out, so not ready to post yet! The resin was one of two remaining items I bought at Ally Pally in April and hadn't yet used...I'm intending to use the other one in the next few weeks, so watch this space!

Before I go I wanted to share with you a couple of photos...Penny gave us a cause for concern again Saturday as she has more egg laying problems and the others were trying to peck her. We couldn't leave her in with them, so yet again she spent the night in the kitchen!  She was fine again this morning but laid another soft egg during the night and because it broke, she was all sticky, so I had to bath her...she's had lots of washes over the past few weeks and loves it. We have never had another hen that would let you fuss with her as she does. As she was so wet, I decided that she had to be dried or they might be tempted to peck again. People who show hens bath and dry them, so why shouldn't I? Anyway, we had the hairdryer on slow and cool and she loved it! All's well with them all at the moment by the way!

Tom with Penny

A little 'coiffure'!
That's all for now, thanks for stopping by!

Love and Hugs,
Carole X

Sunday 18 August 2013

Heidi - Sunday 18th August

Hello Friends,

Today is my latest design team card for Nicecrane Designs, a really sweet vintage drawing of Heidi by Jessie Wilcox. The illustrations are available pre-coloured or as digi stamps and I have chosen the latter. You can view and purchase these and so many other beautiful Vintage designs here and Ignacio's Nicecrane blog here


Well making this card brought back childhood memories of reading the book and watching the TV series, which I remember really well for some reason..probably the goats, all my childhood TV memories seem to revolve around series where animals featured...Black Beauty, White Horses, Belle and Sebastian (all of which I later discovered where old even when I watched them!) and my favourite of all, Follyfoot!

Anyway, I digress...

I chose a shaped card with an open pattern around the sides and top, which I decided to thread some gingham ribbon through. I coloured the image with promarkers and die cut using Spellbinders Labels 17. I used the little flowers from the window box die (by Tonic) that I have been using lately, die cut some leaves and cut some grass freehand, then I coloured them all with promarkers and brushed the edges with distress inks. I also die cut and punched  some extra flowers. To finish off I added some little gingham buttons.

Thank you so  much for stopping by!
 Love and crafty hugs,
Carole X

Saturday 17 August 2013

Quickest mini photo book ever! - Saturday 17th August

Good Morning Friends,

Well this was the fastest little memory book I've ever made anyway - over a couple of hours last night!

We had the most wonderful time at Highgrove yesterday..we have passed those gates many a time on our way in to Tetbury and wondered what was really behind them and now we know! Security is understandably tight, but very friendly..everyone one who worked there that we came across, from the policemen at the gate, to the security guy in the car park, waitresses in the restaurant and our oh-so-knowledgeable guide, Rennie (a lovely Scottish lady), was so friendly and happy.

There are about 12 interlocking gardens, all of them designed by Prince Charles (who we were assured does actually do some of the work when he's there!). You can tell from the designs that he visualises them as canvases, bringing in not only beautiful colours and layouts in the planting, but in the quite bright colours of the garden furniture. Every building is contstructed using materials found on the Estate or from local Cotswold stone, Welsh slate and stone from Scotland and mostly made by local craftsmen and/or young people who have formed their careers through the Princes Trust. Everything is organic; the vegetables and fruit grown are first of all used by the household and in the restaurant, then sold in the shop and other outlets. The honey from the hives is sent to a Hospice in the Cotswolds for their use. All profits go to the Prince's charities and working in the voluntary sector and having at some points in my work had close links between young people who have come to us that we have referred to The Prince's Trust, I know what great work they do. 

I'm not sure that I ever had much of an opinion about Prince Charles: we visited the garden because it is close by and we had never been. Tom loves gardens and to garden and it was part of his birthday present for this year, but I have to say that from what I saw and heard yesterday my impression of him, his knowledge and passion was a good one. We were told by Rennie that he walks the gardens with all the Guides at the start of the  opening season to go over any changes that have been made and also at the end of the season to see how visitors have reacted, in fact she said he is very interested in all staff and how Highgrove is received by the public.

 We saw the tree house where William and Harry played as children - it is massive and quite scary looking. Rennie said that as a grandmother she would be terrified to see her grand kids up there! Whilst we were being told about a fountain in one of the ponds, two of the Estate workers turned up with three huge plastic bags, each containing the biggest fish I have ever seen close up: a sturgeon and two koi. I thought I had seen some big koi, but none like these!

So to my very fast memory booklet!
 I've decided that (with the exception of our upcoming holiday) until I have all the time in the world to craft (as if that's ever going to happen), I am going to create mini books to put in a basket in the lounge to 'dip into' at will. I love scrapbooking, but I still have photos going back to our last trip over to the USA in 2009 on my computer untouched (and that was for my cousin's wedding so I'm ashamed!!)...plus our last two trips over to Tom's family in Italy! I have a large scrapbook of special photos from childhood in progress, but that's it except for the occasional layout - so from now on it's mainly mini!

I started out with the above card blank- an especially long, shaped easel card and decided to go from there. We weren't allowed to take photos, so I bought a few postcards and I knew that if I didn't do this last night, they would just be added to the pile of 'to dos'.
 First of all I stamped the cover with these leaves and flowers from Indigo Blu and coloured them lightly with distress markers. I think inked the edges with brushed corduroy distress ink. I stamped a few layers of the flowers and cut them out and covered the top layer with modge podge for a glossy finish.
 The whole thing opens out like one of the postcard books you can get and I used papers from Graphic 45's Secret Garden and French Country to decorate the panels. I also added tags from the French Country set for the journalling and cut offs from the papers to make the pockets for our tickets. The first picture shows the Azalea Walk  and the second is one of Prince Charles in paintings of  Highgrove in 1999.

The above is the back of the book: I added more pockets for the restaurant menu and information leaflet, another ticket stub and a final postcard. You can't see it very well, but it is a beautiful little house tucked away in the arboretum. It was built in 1998 for the Prince and is called The Sancutary..apparently only he is allowed to use it.

So that was our day at Highgrove....I have to run now as we are popping into Bath..I'll catch up with you all later!

Love and Hugs,
Carole X

Friday 16 August 2013

Window Workshop 2 - Friday 16th August

Good Morning Friends,

A quick post this morning, Tom has the day off and we have a tour of Highgrove Gardens booked this morning...at the moment it's raining so I'm hoping the local forecast is correct and it clears away by 10am when our tour is booked! Sadly there will be no photos..strictly no cameras or phones allowed, which is understandable with this being a Royal property that is very much in use by the future King. A shame though, I am usually snapping every petal in sight when we visit gardens so I'll be having severe withdrawal symptoms..anyway, I will let you know how we get on in tomorrow's post.

I'm glad you liked my sewing cupboard - it was so much fun putting it together!

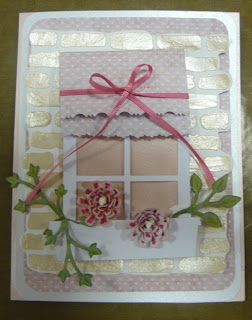
Today I am sharing some photos from our second window themed workshop - same cards, different group. Amy and I were pleased to be back in our normal room, which is bigger and lighter and much less echoey than where we were last week. Some of the ladies didn't finish the card, all to do with the drying of the paste on the brick. I had a much smaller group last week and they got through the paste stage quite quickly, but with twice as many last night it made a difference and even with the help of a heat tool, the ones who used the mask last didn't feel it was safe to put the cards together, which was a shame..but here are the super finished cards..and I have a question..see below...


My question: one of the ladies on my group, who makes gorgeous cards, has just started her own blog but she can't seem to leave comments on other blogs - when she tries the screen just goes blank. She has checked back and no comment from her - I've never come across this, have any of you and do you know how she corrects this?

Thanks so much for stopping by, have a lovely crafty day all of you!
Love and Hugs,
Carole Z X

Wednesday 14 August 2013

Sunday Stampers week 270 - Wednesday 14th August

Good afternoon friends,

I've still been making samples for our workshops using the Tonic window die, but I wanted to show that it can be so much more than a window, so for my Sunday Stampers project this week, I have turned it into a sewing cupboard!

This week Hels set the theme of using green in our projects - for full deets of the challenge and to see Hels' wonderful work just click here


First of all I covered the front of a card blank with a pretty sheet of card from a Tilda set and inked all around the edge with Bunded Sage distress ink.

I die cut the window using some green polka dot paper from the 'Tell Your Story' 6x6 pad by Teresa Collins. (I may be mistaken, but I'm pretty sure this was free with a magazine).

Then I used the rest of the paper to cut out a rectangle for base and legs.
The little squares for the drawers are waste from the die cut  window layered on white squares, which I inked around the edges with bundled sage. Before I put the layers together on the drawers I added two green brads for the handles.

The cupboard is finished off by sticking to the backing paper (again from Tilda) with 3D foam pads, I cut out the bottom central divider so the machine looks like it is sitting on a shelf.

The coat-hanger, sewing machine, mannequin and sentiment are all from a set called 'Sew Pretty', which was also free with a magazine some time ago. To finish off the card I added some border strips cut from the dotty paper, two tiny embellishment reels (from stash), which I wrapped with cotton, a lace oddment and I made a 'little' jar from acetate and filled it with 'buttons' made with some paper remnants and my hole punch..as well a ribbon bow to the coat hanger and one of the buttons I made with my melt pot for my last Sunday Stampers card!

Thank you so much for visiting, I really do appreciate it - as I do the comments that you leave.

Love and Hugs...and happy crafting!
Carole X

Tuesday 13 August 2013

Country Window - Tuesday 13th August

Good Morning Friends,

I do hope I'm forgiven for posting an autumnal card whilst we are still clinging on to summer, but I think this is my favourite from the cards I have made so far with these Tonic window and window box dies.

Before I get into the card though, a quick Penny update - we took her back to the vet last night and he was very pleased with the way she has healed. Her stitches were removed and once again she was very good, even though it must have hurt. We are still separating them at night for a few more days..Penny is sharing the main coop with Bella. We picked Bella because she is the gentlest of the others and hasn't made one attempt to peck at Penny's rear..Cara and Lacey (especially Lacey) are more likely to, so they are in the temporary coop and not at all happy about being moved out of their 5-star rooms! Never mind, it's only for another day or two.

Now for the card...

I have to admit I like making  autumnal cards most of all - I love the colours! I started off with a kraft card and inked the edges slightly with Brushed Cordurouy ink. I then added a layer of card from stash(I'm pretty sure it's from  a Tilda pad), inked the edges and added faux stitching.

I cut a rectangle of cream linen effect card and inked it all over with Vintage Photo; I did the same with another layer of cream card, but this time inked it more heavily and used a Martha Stewart punch for a decorative edge.

The window and  window box were cut with kraft card, again inked and I added another piece of card at the top of the window. For the blind I used a piece of material left over from a fat quarter. The card used for the shutters was also in a Tilda pad - I just thought it looked like shutters, so they were put to this use! I finished them off by adding a few tiny brads for handles. The leaves, flowers and pumpkins were all cut from Spellbinders dies and the little cat was in my button box.

Thank you so much for stopping by today!

Love and Hugs,
Carole  X

Sunday 11 August 2013

Hollywood Blockbuster - Sunday 11th August

Good Evening Friends,

Thank you for visiting my blog today, I hope you like what you see and will leave a comment because I really do love to read them! I have been just looking around your blogs, my fellow blog friends and loving everything I see - as always!

We've been out and about visiting Tom's family this morning and then home - hens let out in the garden, Tom out gardening and me in the craft room! Penny seems to be doing fine; she has a return to trip to the vet tomorrow evening but she looks to be healing nicely.

Because of my recent back problem I got really behind with all my craft projects that need completing before we go on holiday (in less than 5 weeks!) and of course, now my mojo has taken a leave of absence. I sat down last night and doodled some Zentangle as that usually works - but it didn't. The other thing that usually reawakens Mr Mojo is making something just for the sake of it, but there's no time for that, so I had to go forit and  take one project from my 'to do' book and just get on with it. As a result I've almost finished a Halloween photo frame to give one of my cousins in the US, when we visit. She has a toddler and they love Halloween, so I thought they could put a photo of him  in it when the Holiday comes around.  I'm afraid this is a tease..I will schedule it to post when we are on holiday!

Today I am posting the DT card I made for Emergency Crafters this month. I don't know what's happening, but the blog hasn't been updated so we've been unable to post, so I'm guessing no challenge this month and as you must all need a break from all the window cards I've been making, I thought there was no harm in posting it!

The theme was set to be summer movie blockbuster, so I used an 8x8 shaped card and inked the fancy top border with perfect medium clear and heat embossed with tinsel gold (back and front). I covered the  front of the card with gold mirri card followed by a layer of black. All the images are downloaded from Crafts-u-Print and I typed the greeting myself. I added cosmic twinkles to the front  of the card where the stars are in the sky. I also made the little popcorn box and clapperboard gift tag to go with the card.

It was quite a simple set to make when my back was giving me so much pain that I really couldn't take too long about crafting!

I hope you have all had a lovely weekend..back to work for me tomorrow, but Tom also has next Friday off and we are hoping the weather stays good, as we have a tour of Highgrove House Gardens arranged  on Friday. We are really looking forward to it as we pass the gates so often when we are heading to Tetbury to shop or wander (we were there Saturday and I have never seen so many tourists!), so it'll be nice to see the garden behind those gates..only downside is that no photos are allowed!

Bye for today,
Love and Hugs,
Carole X

Friday 9 August 2013

Sunday Stampers week 269 - Friday 9th August

Hello Friends,

Goodness twice in a day! I haven't managed to craft much these last few weeks, which meant a few weeks missing from my  favourite challenge - Sunday Stampers. For details hop over to Hels Sheridan's fabulous blog by clicking here.

This week Hels set the theme of using diamonds in our project - could be the sparkly type or the shape..so today in between running up and down to check on my poorly hen, Penny, I managed to make this little card.

I embossed some coredinations card using a Sissix folder - chosen for the little diamond shapes and then I sanded it to bring out the pattern. I stamped the diamond pattern (stamp by Crafty Individuals) on to white card using Peacock Feathers distress ink and then heat embossed with some embossing powder. I couldn't find my glittery clear one, so I mixed some tinsel green and denim to create a turquiose colour and add some sparkle. The tag was inked with peacock feathers and stamped with one of the Patchwork rubber stamps from Joanna Sheen. I chose flowers for some contrast and stamped them with a dark turquoise ink.

Finally using jade UTEE, I made a button and square using my melt pot. I made two holes in the circle to create the button and threaded some ribbon through and I punched a hole in the square, added some offcuts where I'd trimmed the coredinations card and turned it on its side to make a diamond.

So now I finally feel I'm back! Have a great weekend everyone!

Love and Hugs,
Carole X


Workshop photos - 9th August

Hello Friends,

Thank you for visiting my little corner of blogland and for leaving your comments..please do if you have time,  I love to read them.

Thanks for your best wishes for our big bundle of feathers, Penny....she is doing well and currently out in the garden with our other girls. We (or rather Tom and his brother) had to dust off and clean out our old coop last night so we could attach the temporary run to it and keep her separate in case they started pecking  at her wound. I've washed and dried her this morning and they aren't bothering her at all..more to the point the other three have a fascination with the temporary run and coop and are all inside rearranging it

I am still annoyed by the what the girl at the surgery said to me on the phone..you know I have spent my whole life around animals; during my childhood and teenage years you would most likely find me at the local stables mucking out in exchange for rides or volunteering with Riding for the Disabled and had I had one iota of scientific 'talent' I would have trained as a vet..but all the sciences, including maths may as well be ancient Greek to me and I was always destined along the arty path (not that I'm complaining). so fortunately I have learned quite a lot about chickens and their potential health problems, so I knew there was a chance of helping her..but what if I hadn't had a clue? Well I would still never condemn an animal without the vet looking at her first!

Anyway, Penny thanks you for your concern :) X


Now on to last night's workshop... we had to use a smaller room because there was a town meeting in ours, so it was a bit cramped...fortunately because of holidays and that we are running the same class twice, there were  fewer members, but we still all had a super time..it was a busy night, so I only have a few photos but as usual the ladies did a brilliant job with their cards, although some of them didn't get them finished and took them home for 'homework' !


Thanks for visiting!

Love,
Carole X