Total Pageviews

Sunday 31 March 2013

Happy Easter Day - Sunday 31st March

Good Morning Friends,

Wow..thank you all for your lovely comments on my Hen wall plaque, I was blown away...I think it's the most comments I've had to date! I was so pleased you all liked it. I made it for Sunday Stampers, but apart from the bag a few weeks ago, it was the first 'big' project I have had the chance to create lately that was pure play - just for me and I did enjoy it so much!

I hope you are all enjoying the Easter Weekend and for those of you with snow, that it is starting to disappear. We have been blessed with quite a bit of sunshine, but it doesn't get any warmer! Our brunch was lovely, everyone enjoyed it, so we can tick off another successful festive food gathering :)

Today we are going to Tom's parents' house for another family get together and a traditional Sunday lunch..so I have been making some more baskets..which I will post tomorrow, along with some photos of our hens, as my final Easter offering.

Today though, is one of the Easter cards I made for the craft fair a few weeks ago (it seems much longer). I made just ten, some fun and some more religious, and sold them all, which was great.


This card is made almost entirely with Spellbinder dies: I used Large Decorative Ovals to create the card shape and cut it using a duck egg colour polka dot card from  my 12x12 stash (I think it is by DoCrafts). The crosses were die cut with Crosses Two and it is actually white card for both crosses, but I inked them with weathered wood distress ink and to give them more of a rustic/antiqued look I also used antique linen quite roughly around the edges. The little flowers are from a punch and I cut them showing the reverse side of the same card. I didn't photograph the inside of the card, but it shows the same colours as the little flowers and reads 'Easter Blessings', which was printed from my computer.

I wish you all a very Happy Easter and see you tomorrow!

Hugs,
Carole X

Thursday 28 March 2013

Happy Hens - Sunday Stamper wk 250 - Thursday 28th March

Sunday Stampers week 250 Challenge and a give away!

Good Morning Friends,


Thank you all for visiting and leaving comments, I really do appreciate them all! As some of you saw from my WOYWW post yesterday, I was busy with my melt pot first thing in the morning. I like to make quite a few items  at a time and keep them in a box ready to use..there was a lot of flower dipping yesterday and one of the seahorses is for my next Emergency Crafters DT post for next tuesday. The turquoise seahorse sadly met an abrupt end when it fell off my desk along with  a few heavy items and smashed :( so it's back in the box for re-melting.

Whilst on the subject of the seahorse, a few of you asked me about moulds and what they are - well the ones I am using are basically for clay modelling and are readily available in craft stores. The ones I have, I have had for a while and got from The Stamp Bug, a lovely little country stamp shop, tucked away in the village of Hatherop near Cirencester. They only open Mon-Fri and we are usually near there at weekends, so we wait of their 'open weekends' - but they have a shop online with lots of lovely moulds - visit: http://www.thestampbug.co.uk


And so to my Sunday Stamper project for this week! Hels set us the challenge of adding something shiny to our creations and nowadays at the mention of something shiny I reach for the melting pot. I started out to create a canvas with a Venetian feel and made two casts from a mask and Venetian mascot mould (Lion statue), but then had a complete change of mind, so they are in my box for another time!


Enjoying my morning coffee break, looking at our hens scurrying around the garden and then racing to the back door as soon as they saw I was watching them - in the hope of a grape of blueberry treat - I decided to create something whimsical and light hearted instead and came up with this little scene...


It's a wall hanger featuring our girls..well stamps coloured in their honour! I started off by die cutting the frame with two pieces of decent weight kraft card sandwiched together for extra strength. Then I die cut a slightly smaller shape with polka dot card. The top layer is kraft card, to which added a brick effect mask whilst it was still in the die and then  stained with Picket Fence distress stain. The photo below shows this slightly better.


The hen stamp is by Magnolia. I used Spellbinders Decorative Chateau Gate as the window, which I decorated with dotty paper curtains. The flowers were made using Spiral Blossom One and the little button a cookie cutter - all given the melt pot treatment.


 I hope you like my little bit of fun! There's still time to enter and this week Hels has some goodies to give away - link from above or the photo on my sidebar to the right.

I started this post this morning and am finishing after work..yay I'm on hols for a week now! But before I'm off to make tea, a few days ago I mentioned making baskets to give my two office volunteers - filled with choccie eggs and an egg from each of our 'girls. I forgot to photograph the first one, so here is the one I gave my second volunteer today...


Thanks for stopping by and I hope you all have a lovely Good Friday - the tradition in our family is that Tom and I put on a brunch - so a busy but lovely day for us!

Carole  X


Wednesday 27 March 2013

WOYWW wk 199 - Wednesday 27th March

Good Morning Friends and fellow WOYWWers!


A quick post today as I want to squeeze in a lot of crafting on my day off from the office!

Today is the day when courtesy of Julia over at Stamping Ground, we are invited to share the contents of our desks - click the link for all the deers!

This was my desk first thing this morning...


I had already been using  my melt pot to create some little pieces for today's projects and for my 'melt pot makes' box for future use...and that's about it, not very exciting I'm afraid, but I have already created a DT project with the blue seahorse and that will be posted next Tuesday...now I'm off to make a project for this weeks 'Sunday Stampers' ...thanks for stopping by!

Love and Hugs,
Carole X

Tuesday 26 March 2013

Spring Wishes - Tuesday 26th March

Good Morning Friends,

I've been AWOL  for a few days, purely because I've been so busy that I haven't had time to sit down and write up my posts! I did spend the whole of Friday just tidying the craft room (not that you'd notice now!) and am still not happy with it! What I really want to do is take everything out and rearrange it! The truth is that I have a total re-model in my head and it won't go away - the reality is that it would take Tom and I a day just to clear it out, another day to get everything moved around (and it's only a small room) and goodness knows how long for me to get everything back where I want it. That would be a week in total with virtually  no crafting, what does a girl do? I just don't have a week when I can turn my back on it because of commissions and commitments..hey ho!!

Otherwise we have just been 'out' a lot...I never get much crafting time at weekends: Tom is stuck in an office or in meetings all week for many hours, so he understandably just wants to get out in the fresh air. That means gardening if the weather is nice, otherwise a bit farther afield - usually Bristol, Bath or Tetbury/Cirencester. I've also been making some Easter items. I thought I would make Easter gift baskets for my office volunteers and fill them with choccies and an egg from each of our hens, just as a thank you to them both for their hard work. I made the first one Sunday in yellows for Spring and gave it to Pat yesterday(she loved it), but guess what? I forgot to photograph it..I didn't even remember when we were in the office! I have the other one to make for Thursday, so I'll try and remember with that one!

Anyway, to cheer us up amidst this horrible cold, wintery weather, here is another card I made using the Wild Rose Studio, Bunny Meadow stamp.


The background paper was printed on my computer using a really pretty Spring collection from Nitwit. The stamp and Spellbinders Labels 17 die were used in our last workshop and this is one of the cards I made as a demo, colouring the image with Promarkers. I have enjoyed working with this stamp and colouring it in many diferent ways. I used a doily behind the die and die cut the flower with Ideology krafy glassine and Spellbinders Blossom 5. To finish off I added a sentiment from stash and some gingham ribbon.

Well I have to 'run' now as I'm off to work..I hope you are all keeping warm and well if you still have snow and I try to remember how much worse off than us you have been when I am groaning in the office that yet again, the heating has broken down in the library where I work!

Thanks for stopping by,

love and hugs,
Carole X

Friday 22 March 2013

Tim's Tags of 2013:March - Friday 22nd March

Tim's Tags 2013 - March

Hello Friends!

Well, my social media training day went really well yesterday...it was great to actually sit through a workshop and be encouraged to use our smartphones and tablets to tweet!

My friend and colleague from a partner Volunteer Centre, Kim was a great help - she loves doing all the foodie stuff for events, which is my pet hate - so I looked after the organising of the trainer and participants and Kim did all the food: what a perfect day!

I didn't think I was going to get my tag made this month, but I did! This is Tim Holz's Tag for us to base our creations on: you can find the details here


And this one below is mine:


Mine was totally a 'based on' as I didn't have the dies and stamps that Tim used, so I just had to 'adlib'. I had really been hoping he would use the new Easter Blueprint stamps as I have that set, but alas he chose a bunny die...but heck, I still went with the blueprint bunny!

I stamped the bunny on black card with Indigo Blu Flitterglu and then covered it with Yorkshire Dales megaflakes...it's a shame that the photo doesn't show the effect so well. I then die cut a frame using Spellbinders Labels Four Small and glued the bunny to blue glitter card before sticking it to the back of the frame.

I used a #10 Tag,which I  backed with Tim Holz Ideology Seasonal (Easter) paper, not really intending to cover it up so much, but never mind! 

Tim used a die to create the grass, but I cut mine freehand using Coredinations paper, which I sanded and to which I added a little Mustard Seed distress ink for highlights.


Before fixing the framed bunny to the label, I tied the pink ribbon around it and then tucked it in behind the grass. Finally I used some die-cut and punched flowers to decorate.

The sentiment is by Creative Expressions, die-cut using Spellbinders Fancy Tags.


Thanks for stopping by!

Love,
Carole X

Thursday 21 March 2013

TAP Tutorial - Thursday 21st March

Good Morning Friends,

A scheduled post today, I've been organising a big social networking training event at work and today's the day- thankfully, much as I enjoy social media, I don't have to teach it - we have a real expert for that - but, with the help of a colleague and friend from another Volunteer Centre, I have to make sure it all runs smoothly!

Welcome to my new follower and thank you very much for choosing to join my little corner of crafty blog-land!

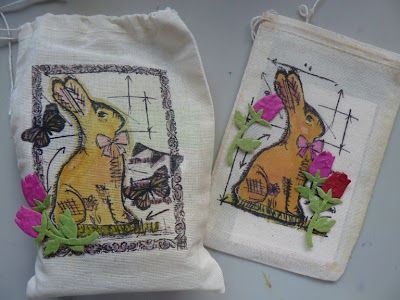
Here is the mini tutorial I promised, showing the technique used to make my stamped bag
This is to create a project with a stamped image, but you can use TAP with your inkjet printer, remembering to print in mirror image mode if your artwork contains words, or freehand drawing.

As well as a hot iron (with steam turned off), these are the basic materials and tools you need:


Your stamp(s) of choice (try to avoid too much writing if stamping, as your image will be reversed); TAP paper; stazon ink, distress inks or your choice of colouring tools - pro markers, watercolours.whatever you like, but don't make your paint medium too wet as the paper can tear; you can transfer on to card, material, canvas..anything that will take an iron.


Stamp your image on to the white side of the TAP. This paper is expensive; it works out at about £2 per A4 sheet, but I have used those cheaper Tee shirt inkjet transfer papers in the past to make Tee shirts and I really can see the quality in this. The images really do look like they have been printed, it's amazing. You just have to remember to use it with care. The bag I made was big but I managed to make the whole project with one sheet. You could of course stamp direct on to some materials, but stamping on to TAP, makes colouring the image much easier, cleaner and vibrant.

Once you have stamped the image, colour as you wish.  I used a mix of distress inks blended with a little water for this project.


Using a hot iron place the TAP on your surface with the image face down and iron evenly all over. I only did this small image for about 10 seconds, but if you peel away a corner  slowly and it shows the image transferred underneath, you should be fine. If not, put it back and iron some more.

Here is the finished bag, the white line is only showing around because I put a piece of card inside, it's not actually on the bag. This image has a little writing, so I added some colourful tulips over the words. As you can see, I also made one earlier, which I framed and also added a few butterflies. TAP is available from quite a few places, I got mine and the bags from Crafty Individuals.


Thanks for stopping by!

Love,
Carole X

Wednesday 20 March 2013

WOYWW wk 198 - Wednesday 20th March

Hi Friends,

As promised I'm back for the second post of today...just a quick visit to my craft desk for this week's WOYWW, where we are invited to share what's on our desks today, courtesy of Julia over  at Stamping Ground, just click the link for full details!


The finished projects on my desk are two Easter Bunny bags, part of a tutorial for tomorrow's blog and my tag for this month's Tim's Tags, which I will share on Friday.

The rest are new crafty gifts I received from friends and relatives for my birthday yesterday..some fab ribbons and flowers, a Papercrafts and a Spellbinders book, some Tim Holz sentiment stamps and Spellbinders dies..the really pretty egg basket will go in my craft room and probably be a display for some of my ribbons..that is once the room has had a spring clean and 're-arrangement', hopefully at the end of this week!

That's all folks, thanks for visiting my desk!

Love,
Carole X

Purple Party Girl - Wednesday 20th March

Good Morning Friends,

The thing about craft blogging is that you 'meet' so many lovely people! Thank you so much for your 'Happy Birthdays' yesterday and to Anne and Oksana for your beautiful cards! I am so pleased you liked my bag, I think I was more pleased with it than anything I have made of late, but it is so hard to really 'see' it in a photo. It's also quite a large bag, I can easily get a pack of 12x12 papers inside it, so it will come in very useful!

Today is a little LOTV stamped card...and I promise this wasn't me yesterday at the thought of going to work on my birthday...I did have a lovely day! As I'd had so many treats and we'd eaten out a lot over the weekend, I opted to stay home last night and Tom (who is a wonderful cook) made my favourite pasta dish, it was perfect!

My friends know me too well and I also had some super crafty presents, including a Tim Holz stamp, ribbons, a Spellbinder die and some drawing inks...lovely!

I made this card using up papers that had been in my stash box for ages, as I don't use glitter card much at all. The card is 6x6 and the base layer some foam backed glitter paper/card in a fuchsia colour. I stamped the image, coloured with Promarkers and  die cut using Spellbinders Labels One Small, just 'touching' the edges with some Milled Lavender distress ink. I die cut the same size label using a lilac glitter card and with the same card cut the flowers using a punch.

The rosette was made using the Tim Holz Alterations Rosette die and the sentiment is from stash. It was a simples little card to put together - just to finish off I added some stickles glitter to the dress.

Today's craft room 'work' includes finishing off a commission, making my Tag for Tim's Tags for March and photographing a little tutorial for tomorrow's blog. I will be back posting later with my WOYWW for this week though!

Love,
Carole X

Tuesday 19 March 2013

Stamped Shopper - Tuesday 19th March

Good morning friends!

Well even though I have to go to work today, I'm going to be happy because it's my birthday!!! I can't complain, I did have a fabulous weekend with lots of treats!

This week's Sunday Stamper theme set by Hels Sheridan is to include the colour brown, which I have to say is one of my fave craft colours - all the variations from creams to chocolates and coffee. Anne quite rightly pointed out that my Sunday LOTV post would have been perfect, but I have decided to post my 'stamped' bag as this week's project: I finally put the finishing touches to it Sunday night.The inks used for the main background and the butterflies are various shades of brown.

This was a project in the February issue of Craft Stamper magazine that I just loved and had to try. The images are a collage of several stamps. I stamped them on TAP - Transfer Artist Paper- using black Stazon & then coloured them with distress inks and markers: Picked Raspberry, Wild Honey, Spiced Marmalade, Mustard Seed and Vintage Photo and then transferred the image to the bag using a hot iron. Then I stamped a script background directly on to the bag, using rusty brown Stazon and a harlequin background using spiced pink all over the rest of the bag.


The stamps are mostly from Crafty Individuals, except the butterfly trio, which is Tim Holz, the flourishes, Teresa Collins, the leaf, Wendy Vecchi, single butterfly Indigo Blu and the script stamp is by Creative Expressions. I added the buttons and lace from stash and die-cut two roses using Spiral Blossom One in fabric, which I had stamped with the script and harlequin stamps. I think in total, this bag took about 5 hours, but it was my first one and I did use a lot of stamps!


Please visit again on Thursday, when I'll post a tutorial using a smaller stamp.


Thanks for stopping by!

Carole X

Monday 18 March 2013

Spring is in the air! - Monday 18th March

Hello Friends!


Well despite some snow falling between the sunny spells, Spring really was in the air at Adam Henson's Cotswold Rare Breeds Farm yesterday, lots of new life hopping, skipping and jumping everywhere...no craft projects today, but I thought I'd share a few of the hundreds of photos I took yesterday...


The charge of the light brigade!

Hungry piglets


Tom in woodland walk

Lambing Shed


So cute these baby chicks...some were hatching as we watched

A little lamb being fed in the petting shed


This little cutie is a few days old and is in the nursery pen where sheep families get to know each other before going out to the fields


A Buff Orpington Cockerel


Yes, this is Mr Henson himself!


We had a lovely day, as we always do when we visit, but this is my favourite time of  year..hard to believe that the same weekend the last two years, we were wearing Tee Shirts!

It was actually quite odd coming home last night and seeing Countryfile and new mum, ewe no 27, we'd actually seen her that morning, in fact the little lamb photo above is one of hers!

For those of you who watched 'Lambing Live' a few years ago and remember the lamb that Kate Humble delivered as was given and that she asked Adam to look after for her...she is now 3 years old and whilst a hip problem prevents her from having her own lambs, she is the sheep at the back of the lambing shed in the photo, along with other ewes not in lamb, keeping the new mum's company.

See you tomorrow, happy Monday all!
Love,

Carole X

Sunday 17 March 2013

Just Good Friends -Sunday 17th March

Good Morning Friends,

I hope you have all been enjoying the weekend, despite the weather (we've had a lot of rain)! I finally got the chance for some crafting yesterday afternoon after we got home from Cirencester, so I set to creating the bag I had been promising myself to get started on for  a few weeks. It's a project in an issue of Craft Stamper magazine. I've done the hard part and am really pleased with it, I just have to finish the embellishing before posting it on here.

My card today is made from an LOTV stamp, which I coloured with Promarkers. I then die cut it using Spellbinders Classic Rectangles and matted and layered on coffee coloured card from stash. I used the same card, embossed with an M-Bossability for the bottom half of the card and finished off with a doily, ribbons, twine and a button.

I decided not to add a sentiment, leaving it for any occasion.

Sorry for the short post today.. we are out for the day, hoping to see some little lambs and chicks at Cotswold Farm Park, despite the rain!

Happy Sunday all,
love Carole X

Saturday 16 March 2013

On the Buses! Saturday 16th March

Good Morning Blog Friends,

The weekend is here! This is one of the guy cards I made a few weeks ago, which turned out to be fortuitous  as a lady bought it from me last Saturday, to give to someone who owns his own London Bus and uses it for private hire!


The stamp is a Pilkington from Stamps Away and I used the Kickin' Rubber tyre tread M-Bossability again, this time on matt/silk gold mirror card. I found the old London bus tickets and newspaper cuttings on the internet.

The card is matted and layered on black card and finished off with bakers twine. The greeting is a Creative Expressions stamp, which is stamped with versa mark and heat embossed with gold embossing powder.

I didn't get any crafting done yesterday, but we did have a fabulous lunch at Hugh Fearnley-Whittingstalls new River Cottage Canteen in Bristol, followed by a rather wet stroll around the local shops!

Hugs,
Carole X

Friday 15 March 2013

Workshop Photos - Friday 15th March

Morning Friends!


After quite a 'mad' few weeks of workshops, last night's was the last one for a few weeks - time to take a bit of a breather, have a 'play' work on commissions and prepare for our next one on 4th April!

We were so busy last night that I only managed to grab some shots of the beautiful cards my group had made right at the end..and they are all fabulous and everyone of them took the basic design and created their own card, so they are all different. I love it that they are all so creative...so if amy of you read this ladies...you rock!


It's my birthday Tuesday, which is a work day, so I'm having a pre-birthday weekend! Tom has the day off and after a visit to the hairdresser for me, we are heading to Bristol to try out the newly opened River Cottage Canteen; tomorrow I'm hoping to at least start making a project for a cotton bag from a recent Craft Stamper Magazine and Sunday, weather permitting we are off to Adam Henson's farm for a lovely wander around the rare breeds and to see the little lambs. This has become an annual birthday trip for me and the last two years the weather has been perfect, but I don't think that's going to be the case this year :(

Have a great Friday all, will be back tomorrow!

Love, Carole X

Wednesday 13 March 2013

Sunday Stamper week 248 - Wednesday 13th March

Good Evening Blog Friends,

I have been a very bad blogger these last few weeks and am so sorry that these last few days I haven't got around to visit you all...there was so much to do in my little craft world, with the craft fair and extra workshops that I haven't had a chance to upload...a workshop tomorrow evening and then we have a few weeks break, so I can take a breath and work on some of my own projects that are piling up and I am so excited to get started on!

As yet I haven't even gotten around to my Tim's Tag for March (a project for the weekend), but I couldn't let a week go by without participating in Sunday Stampers! I have had a commission for 50 small cards, for any occasion without greeting. As I was a bit unsure of the person's taste, I said I would make a sample of ten, just to make sure that he liked what I was doing. So aside from Sunday Stampers, this is one of the samples.

For this week's Challenge Hels Sheridan asked us to use something new..or new to us. I do confess that I have bought quite a few new stamps of late...I find them as hard to resist as a box of chocolates! But for this card, I used one that is new to me, but not that I bought


This Tim Holz stamp was given to me recently by one of my lovely Blog Friends and Fellow Tim fan,
Anne (Redanne). Isn't it gorgeous? I am so grateful to Anne for gifting this to me!

I used a green paper background and stamped the script part of this stamp all over it, though it doesn't show well in the photo. I then stamped the butterflies twice with black archival ink and heat embossed with clear embossing powder. I cut out one of the butterflies to layer and give some movement.

The stamped base image was die cut using Spellbinders labels 17 and inked all over whilst the card was still in the die. To complete I add buttons and ribbon.

Thank you for stopping by and visiting me, I promise to be a better blogger next week!

Hugs,
Carole Z X

Monday 11 March 2013

Classic Wheels! Monday 11th March

Good Morning Friends...and welcome to my new follower! Thank you for joining me..I have been saying for the past week that I will visit the blogs of my new followers (if you have them) and I haven't forgotten, it's just time at the moment, or lack of it..but I will make some in the next few days!

I hope you all had a lovely weekend, especially those of you who are Mums! I didn't blog yesterday, since losing my Mum almost 6 years ago and despite having a wonderful Mum-in-Law, I do find Mothering Sunday 'difficult' now.

Anyway, on to crafting...the Craft Fair on Saturday was brilliant and I really did very well with sales, which was so pleasing. Quite a few people bought 3 or 4 cards at a time, one lady even bought a Get Well card just in case someone got ill because she liked it so much! I was really flattered by all the comments I was getting and met and chatted to some lovely people. 

I think my favourite card I have made in a while is the poppy card blogged for Remembrance Day : I actually (secretly) didn't want to part with it and told myself that if it didn't sell, I would frame it - well within minutes of the Fair opening its doors a lady bought it! Although I am always being told that I don't charge enough,  there was an exceptional amount of work in this card, so I did price it to reflect that..oh well will have to make another!

It was also really good to have so many ladies from our craft group call in to say hello and the hall is practically  next door to my friend Amy's shop so we were able to pop around and see each other too!

I only do a few Fairs a year..I used to be a member of a County Craft Guild and do them every month, but once they closed, which coincided with us caring for my Mum, I didn't do any - until a friend who is a wonderful woodturner and a local Hospice fundraiser decided to organise these fairs, which I always enjoy. Three of us always have tables together: a lady who makes lovely knits (yes I have one of her lovely bright, dressy scarves) and another lady who makes jewellery (some of her earrings have been known to come my way!), we always have nice chats and a laugh..and Tom comes along to help me too.

I was glad I made so many guy cards because they sold out and today's card is one of them...

 To make this card I took some craft foil (silver) and ran it through the GC with the KIckin' Rubber M-Bossability folder. Then I rubbed it all over with Rub n' Buff to give it a look (and feel!) of rubber. I was really pleased with the result.

The car is from a Pilkington set by Stamps Away, which I stamped with Vintage Photo and embossed with clear powder, then I die cut and inked all over with Vintage photo.

Thanks for stopping by, sorry I went on a bit today!
Happy Monday all!
Carole X

Friday 8 March 2013

A Touch of Spring & Craft Group Photos - Friday 8th March

Good Morning Friends,

I want to get quite a few 'snippets' in this post today, so please forgive for skimping on the card construction details! First of all, welcome to  my new follower, it's great to have you along! To those of you who joined me this week, I haven't forgotten and will check out your blogs, I just need to get tomorrow's Craft Fair over with!

Last night was our regular 'Out of the Blue' craft group evening and this is the card I designed for my group of ladies to make..


Amy and I use the same general idea - stamps and dies, but each make a card for our group: the theme this week was Spring/Easter and I deliberately left it sentiment 'free' so that it can be used for various occasions - I will be blogging with this stamp/die set again because I made a few demo samples but I won't bombard you with them all at once!

The stamp used is 'Garden Bunnies' by Wild Rose Studio and the main idea behind the workshop was colouring with Promarkers...and everyone did brilliantly. Last night we had some new ladies and they had never used these pens before, but were thrilled with how soon you can get excellent results with them after a brief tutorial!


Now for some other news...

Hat's off to Creative Expressions...
Do you remember my problem a few weeks ago with the new Creative Expressions glue top, where it shot off across my desk, ruining a card? After I blogged that, quite a few of you said they had a similar problem. I decided to send them a quick email, just to say I had the problem and didn't seem to be the only one...well almost straightaway I got a lovely email back from them... it looks like  more people had been in touch because they explained that the bottle is being changed back to the original...and they sent me 2 bottles and their latest book! So thank you CE, excellent Customer Service!

Thank's Christine

I also want to say a big thank you to Christine Emberson, who is the UK member of the Spellbinders Design Team and a big inspiration to my paper craft. Some of you will remember that after Christmas my faithful old Grand Calibur started chugging along and rattling inside. I contacted Spellbinders in the US and they were brilliant - repair is free, but as it was out of warranty, I would pay postage to get it to the UK repair man. I explained my GC symptoms to him, but he said I'd have to send it to him and he couldn't guarantee repair, so I was in a quandary as it's quite a heavy item to pack and post safely. In the end I decided to have a new one for my birthday later this month (although I already have it and use it!). However, I didn't want to give up on my original, so I asked Christine's opinion. As it was one of the original GC's there was a 'design fault' which can cause the screws behind the handle to work loose and Christine said this is what might have happened - and told me how to take it apart. Some of you will have seen my photo last week of the 'exposed' GC! Well I'm happy to report that it is all back in one piece now and was used at last night's workshop...whooopeee! So a big thanks to Christine for her help.

Sorry this post has been so long...I am off now to get everything packed up for tomorrow's craft fair...happy Friday all!

Hugs,
Carole X