Total Pageviews

Showing posts with label Visible Image stamps. Show all posts

Friday, 3 July 2015

The Wiz....Friday 3rd July 2015

Hello Friends!

Hope you are all well and those of you in the UK didn't get over-heated on  Wednesday, I was supposed to be at a work event and then I had the chance to take part in a working morning with a volunteer group  I've joined....the event got cancelled and by then it was too late to go out with the group. I'll tell you more about the group in a future post...but it is nothing to do with craft...it's conservation and a certain type of wildlife.

In the end I was quite pleased to be home....I shared my time between a few hours in the craft room and several more out in the 'craft shed'...by the afternoon the hens were panting, especially the youngest one. I put extra water all over the place in shady spots and gave  them cucumber and melon, which cooled them down a bit, otherwise they found shady areas under trees in  the garden and led down. By the evening they were fine. I've not seen them get that hot before, there is lots of shade so plenty of places to hide.

Wizard of Oz cards

It occurred to me that I haven't shared the project my group of ladies did at our last workshop. This was our annual special one for the local Chipping Sodbury Festival and the theme this year was 'Musicals', so we decided to use some Visible Image stamps and make a card with a Wizard of Oz theme..

This was the card my group made...an easel card featuring the Dorothy, red shoes and sentiment stamps.

I used a polka dot mask on the top layer, ran through the embossing machine, inked it with  Vintage Photo distress ink and then used Promarkers to colour the dots as a 'nod' to the rainbow.

I stamped the image, dusted with clear embossing powder and heat embossed and they drew a cloud shape, cut out and inked with  salty ocean distress ink.

As I don't own a brick road stamp, I decided to use to brick wall mask: I inked it through with a mix of wild honey and mustard seed distress inks, cut into a winding road shape and inked the edges with vintage photo.

I coloured Dorothy using my Intense pencils and cut her out. For the flowers I used a punch. I stamped the shoes on to matt metallic silver card using versamark ink and heat embossed with red glitter.


  All the ladies said they really enjoyed making it...


I thought I may as well show you the other demo cards I'd made in the same post...

The first one just uses the shoes, decorated in the same way as above. It's a CAS card, just using the gingham we associate with Dorothy's dress.


I think the next one is may favourite except for the road....I couldn't get the mask to look right with the scene, so I used a path from my Lavinia Stamps collection (it is yellower in reality than the photo) and it's okay, but not really what we associate with the movie. I used Promarkers to colour Dorothy on this one  and made the little 'hills' in the grass using masks made from paper. The grass stamp is by Stampscapes and the tree with hearts is  by Dreamees.

It wasn't until I had put it all together and looked at it that I realised I'd forgotten the rainbow! Then I painted one in using the watercolour pencils, but the card wouldn't take the water, so it looked messy...I had no choice but to take a scrap of watercolour card, paint the rainbow on that and fix it over my splodgy mess!!


Before I finish today, I want to say that I had a lovely surprise when I logged on yesterday...one of my long time and lovely blog friends, Sandee Sentiff has decided to do a weekly shout out for those followers who leave regular comments and I was her first choice. Sandee is an artist, with a big heart and great inspiration, do pop over and have a look at her beautiful creations.


Thank you very much for stopping by, I always appreciate your visits!

Love and Hugs
Carole X

Sunday, 21 June 2015

Father's Day - June 21st 2015

Hello Friends!


Well didn't we just pick the best week of weather to have a holiday in this Country!!!!! We had the best time..we are so lucky to live right on the edge of the Cotswolds..my favourite part of England and we don't have to go far to be right in it's heart, enjoying it's beauty. We have had such a 'full' week that I haven't even downloaded my photos yet, but I will share a few later in the week....Christine, if you read this...I did look out for you when we were in Stow :)

I haven't looked at a computer or iPad screen for more than a few moments for a week and it's been great, so relaxing...but I had to pop on here to share my Father's Day makes and to let you know that I will be catching up with your current posts later on.

Thank you for your comments on my Wedding project for Fran and Alex...last week I had a few messages via Facebook from friends of theirs asking me to make one, but I had to say no. It just took so long.... once I had started it I almost regretted it as it was fiddly and ever evolving, so it was truly a 'one off'....

And so to my Father's Day card and gift box: sadly I lost my own dear Dad many years ago, when I was barely out of my 20's and there were still so many chats to have and questions to ask, but luckily I have a wonderful Father-n-Law. Toni is a typical Italian, likes cars, football and good food and wine!  He also enjoys DIY and gardening, so today usually means a suitable gift card and some Prosecco for a toast. I made the card when we did our Father's Day craft workshop, but I also made a gift box.


I made the box using  black heavy card and the Sizzix mini bag die by Eileen Hull and I also made a carrying handle for the back, with some extra card and die cut a circle in the centre using Spellbinders Classic Circles.  Before putting the box together I ran through the die-cutting machine with an M-Bossabilities folder. I then rubbed it all over with silver gilding wax for an industrial look.

I made the little gift card holder for putting inside the  bag using grey card and a Sizzix Notebook Cover embossing folder,which I also rubbed with silver wax. To finish I tied with black twine, secured with a brad.

The stamps are from Visible Image.


Thank you for stopping by,  I will catch up with you all later and back to work tomorrow so will probably not be posting again until Wednesday!

Love and Hugs,
Carole X

Monday, 18 May 2015

Sporty Guy Card - Monday 18th May 2015

Hello Friends,

Thank you for all your comments on my blog on Saturday, they really did mean a lot to me....hope you all  had a good weekend?  We made the most of some nice weather..Saturday we went to Tetbury to shop, drink coffee and get some plants from a market plantsman we've used regularly over many years...lovely guy. Tom's parents have gone off to Italy to see the family, so we had Tom's brother over yesterday afternoon and Tom made his gorgeous pizzas for our meal. Aside from that we spent a good deal of time coaxing the 'girls'  to use a new feeder, cage mounted, closable, all mod cons (!)...tey don't like change but accepted it in the end!

Today I'm sharing the card I designed for my group of ladies to make at last week's Out of the Blue craft class, plus the cards they made.

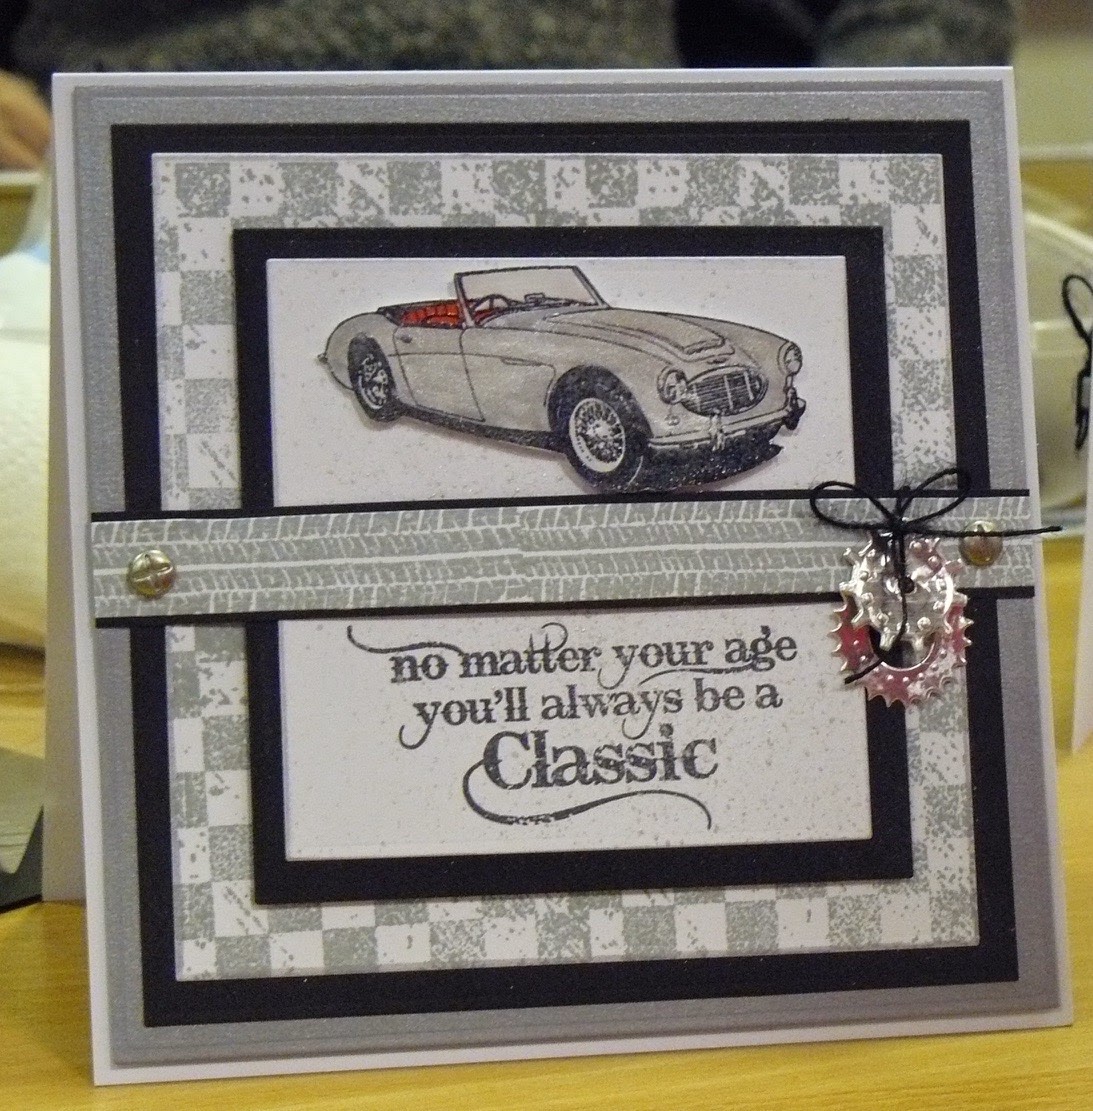
We were using a classic sports car stamp, background stamps and sentiment stamps from Visible Image...we have made some more 'involved' cards lately and some had struggled to finish, so I wanted to create something that I thought they would like and that I knew they could finish comfortably in the time...they all said they loved it and were so pleased to have finished, especially a couple of ladies who haven't been crafting so long, plus it was a nice change to make a guy card!

I made two versions of my card, one for Father's Day and one Birthday, for those who didn't want to make a Father's Day card (all but one!)


 The card is 7x7 and mat and layered in silver and black. I then took a white layer and chequered background die, which I stamped using London Fog Versafine ink. The stamp is a lot smaller than the card, so repeat stamping was needed, but easy to match up.

For the top white layer I created a splattered background by mixing some brushed pewter distress paint, with a little silver-black ink, spritzed with water and then picked up on a toothbrush...those little brushes you get on a plane do have their uses! All you do is run your finger across the bristles to create the splatter. I love this effect, none of the ladies had tried it before and really enjoyed it and loved the effect.

The sentiment was then stamped across the bottom. The car was stamped separately and then cut out. I coloured it with Promarkers and then gave it a coat of watered down mica powder for a sheen. On the Father's Day card, I picked up a mica with a gold tint by mistake, but in reality it doesn't have such a colour tint as the photo would have you believe.

To finish off, I stamped a tyre mark along a strip of card using the grey ink, again the design is repeated stamping. I mat and layers on black card and added screw effect brads and die cut cogs, tied with black twine. The metal brads were copper in colour, so I coated them with brushed pewter distress paint.

I also decided on a pop of colour by making the seats red.


Here are some of the cards made by the group:


They all did such fabulous work, don't you agree?

I made some more cards using these stamps and will share them later. Thanks so much for stopping by and have a happy Monday...I'm in work today and it looks like a wet walk there!

Love and Hugs
Carole X