Total Pageviews

Showing posts with label distress inks. Show all posts

Thursday, 19 March 2015

Horsey Birthday! - Thursday 19th March 2015

Hello Friends,

Thank you for you visits and comments,  I love reading them! 

Thank you so much to those of you who sent me a birthday card, that was so kind of you and of course they are gorgeous! I've had a quiet day, but Tom and I are going out for a meal in a country Inn near Tetbury tonight and he has tomorrow off work, so we are going to the Cotswold Farm park, one of my favourite places, especially around lambing.

I had lots of lovely craft presents..dies and stamps so lots of new 'toys' to play with!

Today I am sharing a card I made for our God-daughter's 21st Birthday, which is tomorrow...goodness I still remember her Baptism as if it were yesterday! She is the daughter of two of our best friends, her dad has been Tom's closest friend since they were babies.

Natalie loves horses and riding and with a lot of saving and a little help from her parents, she finally got her own horse last November. It was after  a lot of searching and a few hopefuls that didn't pass the vet's examination, that she found Tara. Sadly, since the beginning of the year, Tara developed a few health problems and Natalie is unable to ride her at the moment. Fortunately, she does still ride friends' horses, but I do hope she is able to get back on Tara soon.

I made her a horse themed card:


I do have some lovely horse stamps, but this is an 8x8 card and they weren't quite large enough...I did use them on the envelope and forgot to photograph it. I used a purple base layer, die-cut using Spellbinders Grand Squares, and using the heart card, I cut the next layer with the next size die.

The main image is a digital stamp by Dragonslairdesigns, which I coloured using distress inks as watercolours. The image comes with a wreath surrounding it, but I decided instead to cut out the head and use the Catalina Wreath die by Memory Box.

The rosette is a Sizzix Alterations die and the '21' from a numbers set of dies by Tonic. I typed the greeting and cut it out into a banner shape. To finish I added ribbon and gems.


 I also decided to decorate the inside, using the same digital stamps, plus another horse from Starglow Studio

I followed through with the design from the outside and also made a pocket to hold her gift of money, so she can buy something for herself, or as I suspect, put it towards something to help with the horse. 


 That's all for today, thank you for stopping by, always much appreciated!


We had  visit from a juvenile Sparrowhawk in our garden this morning...I was on the phone to a friend so snapped this with one hand...it's too small to be any threat to our large hens but it was very interesting because it sat on the fence for almost 10 minutes, with it's back to them, but during all that time they just froze, standing in one place like statues, no movement whatsoever and as soon as it flew off they just went about their foraging.


Love and Hugs
Carole X

Thursday, 5 March 2015

House Mouse Easter Bags - Thursday 5th March 2015

Hello Friends!

A much brighter and more cheerful subject today! Tonight is craft group night and our groups are going to be decorating bags for Easter gifts/eggs. These are the two I've made as inspiration for my group:


We are using these cute Stampendous House Mouse stamps, featuring Monica mouse. 
I used a polka dot mask on both bags, inking them up and then ran it through the Grand to   emboss it, imprinting the ink on to the card. I gave the yellow card a much lighter covering on ink (I used Mustard Seed distress for this one and Peacock Feathers for the first one). It's Spring, I wanted them to have bright and cheerful seasonal colours.


I stamped the design and coloured them both with distress inks, using them as watercolours and then die cut using Spellbinders Labels 17.

To make the flowers I used Spellbinders Carnation Creations. I wanted a large  Springlike bloom, so I followed a tutorial to create it as a carnation or peony like flower and used paper for more 'movement'.I inked the edges using distress inks to give a touch of colour on the edges of the petals.


I made the tags using Labels 17, but left the end of the die overlapping to create the fold.


Whilst I was using these stamps I made some cards, gift bags and boxes, which I will share later,

Thank you so much for stopping by!

Love and Hugs
Carole X

Friday, 27 June 2014

Sunday Stampers wk 313 - Friday 27th June 2014

Good morning Friends,

Aaah thanks so much for all your lovely comments about my desk! I've got to admit I was a tad pleased with it, though I took the photos on a bright day (even though I waited until evening) so most of the 'distressing' doesn't show. I loved working with the Annie Sloan Chalk paint, it is really beautiful to use. It was really hard work over several weeks - goodness after one session I was so stiff the next day I could hardly move to begin with, but thankfully my back held out, so those sport therapy sessions must be doing some good!

Some of you asked if I am using it yet....sadly no :( - there are still items in the summer house that don't belong there..e.g garden furniture (I keep telling Tom he has to find another home for it). I had hoped to get in there to sort it all out this week, but I've been busy with craft commitments and now, today the weather has changed! I'll get there soon and post another final photo.

This week the uber talented Hels Sheridan set the theme of including green in our Sunday Stampers creations for her weekly challenged. For full deets click here and take a look.

My creation this week is a Fairy Door card, again using Lavinia Stamps. A lot of crafters don't seem to like green on cards; when Julia Watts did her demo for Amy's shop a few weeks ago, she told us that she gets a lot of negative comments when she posts cards with green on, but I actually like green a lot.

Now I promise you there is green on this card, it just look more yellow  in the photo!

This is an 8x8 card blank, matted and layered in black-green-black. To create the inked background I used a brayer and the following inks and colours:

Distress: Mustard Seed, shabby shutters (green!), squeezed lemonade, Ripe persimmon, dried marigold, worn lipstick

I then used the following stamps: Lavinia: Fairy Door, path, bunnies, vine leaves, stars
Lindsay Mason Designs: mushrooms
Phill Martin for Creative Expressions: sentiment & butterflies

The tree stamp comes 'bare' and the little leaf stamp is included for you to stamp as you wish. To stamp the leaves I used Versafine Spanish Moss ink (green!). I stamped the vine leaves around the edge using Versafine black ink, but I shadow stamped by stamping each time on copy paper before stamping on the card.

To finish I used Seedless Preserves distress ink with a water-colour brush just to give a colour wash and a 'grounding' for the tree and dotted a little glitter here and there.

I stamped the sentiment on white card and cut into a banner shape, inking the edges with Shabby Shutters, distress ink.

For the inside:I used black card for the base and inked the edges of white card with Shabby Shutters. I stamped two pixies by Lavina, as well as the tree. The sentiment is from LOTV


This fairy door  stamp really made me want to make a real Fairy Door, so I looked for ideas on the internet and was amazed to discover that they are really 'big'...my five minutes research lasted an hour and I have now started to decorate my own. When I met my friend for lunch a few weeks ago, I mentioned this and she said that she had been wanting to make one for ages...now she isn't into craft, but she made one and posted it on Facebook last week...it's fabulous!

Thanks so much for stopping by!

Love and hugs,
Carole X
Sunday, 19 May 2013

Happy Birthday - Sunday 19th May

Good Morning Friends,

So far so good here with the weather this weekend! Yesterday we were supposed to be visiting some friends in Trowbridge, but one of them was unwell so we had to cancel. Tom and I headed off for a morning walk at Westonbirt Arboretum instead and it was beautiful, so full of colour. In the afternoon I managed to get some more crafting done..very unusual for a Saturday!

Friday was supposed to be a day when I got through quite a few commissions: I started off well with a Diamond anniversary card, but I had been asked to make two cards for one couple to be given (of course!) by different people and on the second one my mojo just went walkies! I think it was the pressure of creating two very different cards for the same couple. I ended up spending a few hours on a card, which I then totally discarded it was that bad! Got there in the end though!

Before I talk about today's card, after I mentioned the other day about a problem with the link to the Emergency Crafters challenge blog, a few of you said you have cards ready to post. I have now heard that due to the person who runs the challenge being unfortunately out of action at the moment, the challenge for May has been cancelled. I am really sorry to tell you this, but all I know is that everything should be back to normal for June.

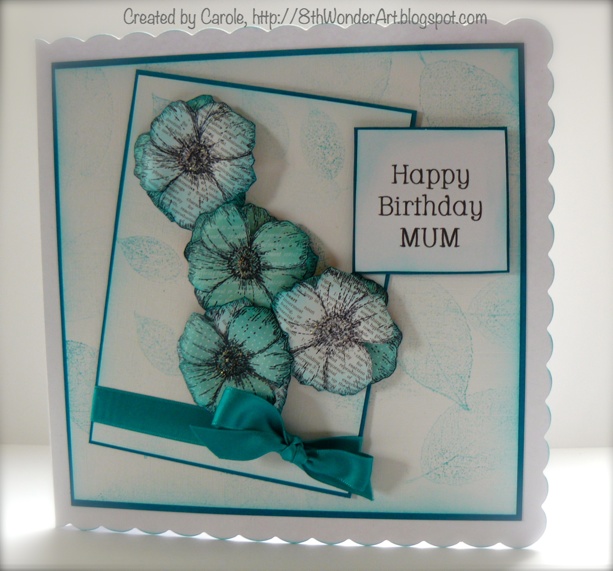
Today's card is another commission for a regular customer's Mum. It is really nice creating cards for people who come back regularly, of course the same challenge applies...I must have been making cards for this lady's Mum for quite  a while now, so they need to be different. Of course the 'bonus' is I think I know what appeals (I hope!


 I started by creating a background and to do this I used a lovely leaf stamp from the 'You're Bloomin' Great' stamp set by Indigo Blu. I used Peacock Feathers distress ink, (my current favourite i think)just stamping lightly (by stamping first on copy paper then the card) randomly across the card.


This is an 8x8 card blank and after also inking the edges, I matted and layered onto teal card.

I then created a smaller matt and layer for the topper and tied it with some teal ribbon.

The flower stamp is als by Indigo Blu, from the 'Live, Love, Laugh' set. I stamped it on some Teresa Collins paper, which is a scrapbook paper and good weight for 'moulding'. I stamped the flower ten times and inked them, some all over, some just lightly with the Peacock Feathers ink, before layering for depth. I attached the ribboned layer to the card before adding the flowers. The sentiment is typed and printed from my computer.

To finish off I inked the edges of the scalloped card blank and added my last layered flower to the inside.

Thank you so much for visiting, I really do appreciate your comments. I hope you all have a beautiful Sunday, whether it's crafty or not!

Love and Hugs,
Carole Z X


Wednesday, 7 November 2012

Sunday Stampers week 230 - Weds 6th November


Hello Blog Friends,

I'm later posting today, because it's my no work day...hence crafting day...and I wanted to get my project for this week's Sunday Stampers made!

This week Hels has set the theme of  'blue' for the challenge, so to be seasonal, I thought 'ice blue' and made this large tag/hanger...

 First of all I cut a large tag shape from linen effect card and stamped a snowflake randomly all over it with Perfect Medium. Then I inked all over the tag with a mix of these distress inks: Peacock Feathers, Broken China and Faded Denim..these creates a resist against the stamped images (which in reality are much more defined and visible than the photo would have you believe!).


I then cut a piece from a double-sided adhesive sheet, peeled off one side and stuck it to a sheet of card, which was used to cut the snowflakes from Spellbinders Snowflake Pendant 2010. The die-cuts were then dipped into Clear Micro Glass Beads before sticking to the tag.

A wide piece of seam binding was then cut in half to give it a frayed finish and I stamped 'Jingle Bells' along it with Broken China distress ink. To finish off I added a Vintage ribbon double bow and some little bells!

Hope you like this and thanks for stopping by...I am hoping to finish off my 'general' Christmas cards this afternoon...wish me luck!

Carole X

Thursday, 1 November 2012

Sunday Stampers WK 229,Autumn - Nov 1st

Good Morning Friends,

We had quite a few Trick or Treaters as usual last night, with very wet parents...what a shame about the rain! And so we are in November....oh my, Christmas is getting way too close! Today's post is my project for Sunday Stampers challenge and the theme this week is colours of autumn.

With last week's marathon of workshop, events and craft fair I missed last week's challenge for the first time since I started and I really did miss it! I don't have time to enter many challenges, but this one is a must for me!

Two weeks ago I made an autumnal card for the metallics challenge, so the challenge for me was coming up with something different!


For the main image I used the Dreamweaver Bare Trees stencil on white card. I wanted to create a bright background of autumnal colours - sometimes in a dense woodland on a bright day, it can look like the the whole landscape is on fire. I used a mixture of distress inks - Broken China and Faded Jeans for the hint of sky,Brushed Corduroy, Wild Honey, Rusty Hinge and Mustard Seed for the bright colours and Brushed Sage and Crushed Olive for the grass. There may have been a few more in there somewhere - too many to remember! It took quite a while to get it so I was happy with it!

For the base I used Autumn Maple Leaves stamp set from Clarity Stamps. I love the sentiment. The stamps are all individual so I arranged the images around the sentiment. I stamped them with Versamark and then heat embossed. The powders are my own mixture and what fun I had trying to get it right!

I used gold, chocolate brown, holographic and red and I even threw in a tiny amount of stamp magic from the metals range. My aim was to create a brown-gold with a hint of red, just like you get when the leaves are changing.

The trees were matted and layered on brown, white, brown; then I tied some orange ribbon around the bottom (I promise you it's not such a bright orange as the photos would have you believe!) and added a pumpkin button and Spellbinders Leaf cut from craft foil. I added some hessian  to kraft card and mounted  the image on top. To finish I added a few maple leaf brads.


Hope you like this and thanks for dropping by and leaving a comment!

Carole X

Monday, 8 October 2012

Snowflakes - Monday 8th October

Good Morning Friends,

First of all, thank you to those of you who shared with me your ways into card making following my blog post on Saturday. I loved reading all your comments and different 'paths'. Yes, my Dad was just wonderful, so was Mum, but we were fortunate to have had her with us so much longer, as we only lost her a few years ago, whereas Dad passed away  24 years ago and I still had so much to learn from him. Thank you so much again to those of you who commented.

I had a busy day crafting yesterday, finally a full day just to make cards! We are normally out visiting Tom's parents on a Sunday, but they were going out somewhere, so as it was an unexpectedly sunny day (not as forecast!), Tom put the garden to bed with the help of the hens and I got on with some commissions. I may not be about much posting this week, I'll see how it goes, but the commissions I made, I can't post just yet and I haven't had too much time for other creations, especially as we have another workshop this week! Gosh, if only I could do this full time, I certainly have enough work to keep me going! Well, we'll see what next year brings :)

 Over the next few weeks we have 2 works shops and I have a card-making demo day and a craft fair, busy, busy, busy!  I will be stopping by all your blogs to say hello and hopefully, by the end of the week I'll be posting again!

However, I did make  some time for myself yesterday and made this week's contribution to Sunday Stampers - I am usually so last minute, that I've even surprised myself!

This week's topic is 'Snowflakes' and here is my card...

I started with a 6x6 card blank and some linen card, on which I stamped the snowflakes from the Creative Expressions "Snowflakes and Sprigs" stamp set, using a clear embossing ink, which I covered Cosmic Shimmer Aurora Sparkle embossing powder and heat embossed. Next I coloured the card with a mix of Faded Denim and Broken China embossing inks. After I had covered the whole card, I rubbed it in with one of those duster sheets you use on the floor and then set it with a quick blast of an iron.

The snowflake is Spellbinders Create-a-flake covered in clear micro glass beads, set over some blue vintage ribbon tied in a double bow.

Materials used:

6x6 card blank

6x6 linen card

Snowflakes and Sprigs stamp set (Creative Expressions)

Cosmic Shimmer Aurora Crystal Sparkle embossing powder

Faded Denim and Broken China distress ink

Spellbinders Create-a-Flake dies

Clear Micro Glass beads and double side adhesive paper

LIlli of the Valley sentiment and Spellbinders Classic Heart Circle (used behind sentiment)

Vintage ribbon, pearl gems

Thanks for stopping by today and please leave a comment, I read and appreciate them all.

Carole X

Friday, 14 September 2012

Sunday Stampers Week 222 Colour- Friday 14th Sept

Good Morning Blog Friends!


I'm pleased you liked my photos of the Olympians yesterday and thank you for all your comments. It was a truly memorable day and yes, I was very emotional!

Yesterday we had a day at home catching up with work on the path around the coop in the garden, luckily the weather was glorious! Last night was our first workshop for this month (we have two this month). If any of my group from last night are checking, look out for a second post this afternoon, when I'll be posting the photos!

Today I am sharing my Sunday Stampers project for this week: an easy peasy tag, as I've not  had much craft time this week with us being on our stay at home hols! The theme for Sunday Stampers this week is colour - I was going to go for a  multi coloured smorgasbord,  but coincidentally I have a Design Team card to show over the weekend, which has a multi coloured theme, so for this one I chose one colour and that colour is blue, not shades of grey :), shades of blue...

I had some card left over from a previous project where I had used mica sprays over a mask, so I cut this into a tag shape and then using a  leaf stamp from Studio 490's Wendy Vecchi, Love to Make Art set, I stamped the leaf on the tag, using Broken China distress ink. I also stamped this leaf again on separate card and cut it out. Then I stamped the heart from the same set, on plain card,  dark turquoise paper, pale acqua paper with a tiny dotty pattern and a blue/white floral paper. I used these to paper piece the heart.

My final bit of stamping, was the wings from Sam Poole's Steam Punk Dreams dress form and a sentiment from Sam Poole's Art Sayings set. I then stuck the leaves to the back of the card, added a little piece of scrap from one of the cut outs and some ribbon to the top and bottom and covered the back with another tag to tidy.

Hope you like it! Thanks for stopping and leaving a comment! Check back after mid-day for news from last night's workshop!

Carole X

Monday, 13 August 2012

Butterfly Birthday - Monday 13th August

Good Morning Blog Friends!

I hope you  all had a lovely weekend and made the most of the sunshine! My goodness what are we all going to do without the Olympics, wasn't it just fabulous!? I am bleary eyed and not at all ready for a Monday morning back to work, having stayed up until past midnight watching the spectacular closing ceremony/concert - loved Eric Idle!

Thank you for your comments yesterday and glad you liked the new chicks! Poor Penny was feeling a bit bewildered yesterday and Lacey had already asserted her dominance, but today they are more settled and I have cuddled them both a few times. It'll be a week before we let them free range with our other girls and probably longer until they are all in the big run, but taking it slowly and easy has always paid off for us...anyway..to today's card!

This is a design I've been working on for my group on our next card class. I absolutely love this stamp, Steampunk Dreams by Sam Poole (Creative Expressions) and I do beg forgiveness for using it quite a lot on my blog..well you do get those favourites you keep going back to don't you!?

However, I do appreciate that not everyone likes or even knows what Steampunk is, so I decided to give the stamp a feminine twist. This is a 6x6 easel card,for which I created a background for both base and easel, but inking all over with MIlled Lavender and Spun Sugar  distress inks, more heavily around the edges but very lightly elsewhere. I then used a butterfly stamp, inked with Milled Lavender and stamped more heavily on the base and lightly on the easel.

I then spritzed some card with a mixture of Raspberry and Egyptian Blue Cosmic Mica Mists and dried it with a heat tool. When dry, I stamped the dress form with Versafine Vintage Sepia ink and the sentiment with Milled Lavender. The dress form was cut out and the wings removed. I cut out the wings from Spellbinders Wings of Hope, the flowe from a mixture of the Aster Flower Topper and Anemone Flower Topper dies and the sentiment from Heart Circles. For a final touch I added the rose and some ribbon.

Thanks for stopping by, I really appreciate your visiting and your comments, remember.."Always look on the bright side of life...!"
Carole X

Wednesday, 8 August 2012

Sunday Stampers Week 217 - Weds 8th Aug

Good Morning Friends!


The theme for this week's Sunday Stampers  over at Hels' Sheridan's blog (click the link!) is patterns. Lately I had been making canvases and plaques for my contribution to this challenge, so this week I thought I would make a card for a change...


I decided to make backing paper, forming a pattern with the heart from one of my favourite stamp sets, Wendy Vecchi's 'Love to Make Art' from Studio 490. I also decided that the card would be bright (to make up for all the Sunshine we've been missing) and also with a rustic feel, so hope I've achieved that!

First of all I inked the entire card with mustard seed distress ink, I ran the heat tool over it to make sure it was dry and then using the same ink, I used the heart from the stamp set to form the pattern. I then inked the edge quite roughly all around for the rustic bit!

Next I used the highlighter pen technique, which I found in an issue of Craft Stamper and featured in a card a few weeks ago - stop by tomorrow and I'll include mini tutorial  on this....

I used vintage photo distress ink to colour the hearts. I find with this technique, because the highlighter seems to light up the card, it gives a 'rusty' look to the card. I then stamped the heart three times and cut it out. Then I wound some bakers twine around the hearts and tied a bow on the centre heart. 

The inking process was repeated on the card I used for the butterflies, which were then die cut using the little die from Spellbinders Flights of Fancy set. I used small pieces of card, just enough for the dies and stamped with black archival ink, which I then heat embossed using clear embossing powder.

Before I go...the photo for today in the Photo a Day challenge for August, is glasses, so as that can also mean specs...I took a piccy of mine!:) Surprised it's in focus cos I can't see a darn tuttin' thing without them!


Thanks for stopping by!, I'm going to be visiting all your blogs later today, as some commissions to catch up with on my day off!


Carole X

Wednesday, 25 July 2012

Distressed Leaves - Wednesday 25th

Good Morning Blog Friends,


I have a really easy card today, just trying another Ally Reeve technique, giving a vintage look to some leaf masks.


I simply inked the mask with antique linen distress ink and then embossed it on some card through the Grand Calibur. Then I die cut in using Grand Labels 23.  I used some pumice stone and inked the design so that it gave a deep impression. I used a little brushed corduroy to deepen the colour more and then finished off with a little vintage photo. The result is that the embossed areas are highlighted. Before the ink dries I dusted the whole design with a green pearlescent mica powder.

The design was mounted on to a Kraft Card blank (edges inked with vintage photo) and some ribbon, a button and some bakers twine  finish it off.

Thanks for stopping by!

Carole X

Monday, 23 July 2012

Teal Duck - Monday 23rd July


Good Morning blog Friends,

I have always really enjoyed watching Ali Reeve (Stamps Away) on Create and Craft; I love the way sheet looks at a stamp or mask (for starters) and sees something that most of us wouldn't even have considered, so the fact that she has been on quite a bit recently has been an added bonus!

"That Special Touch' masks are so versatile, you can emboss with them of course, but you can stencil, stamp, ink...and more.

For this card I simply used some leaf design mini masks (That Special Touch) and using a very small piece of cut n dry foam, dipped in the tiniest amount of petroleum jelly, I rubbed around the masks. You must be careful to only use a tiny amount or this won't work. I then inked over the whole card using Wild Honey distress ink.


I stamped the Teal Duck, which is from the Stamps Away Pilkington Riverside Wildlife set, using Versafine Vintage Sepia and just left it as that. The nice thing about the Pilkington stamps is that you don't have to colour them, I think it might have been too much with all the colour going on in the background and the ribbon.

The stamped image was die cut using a Grand Labels 23 die and then inked at the edges (leaving the die in place) with a mixture of Brushed Corduroy and Antique Linen distress inks.

Sorry, a bit of an autumnal stamp just as the sun comes out! But thanks for stopping by,
Carole X

Wednesday, 20 June 2012

Keep-sake Book - Weds 20th June

Morning Blog friends!


Not a card today but a little keepsake book cover I made after rummaging through all my scrapbooking stash and finding a couple of board books that were just crying out "why have you abandoned us? We just want to be decorated, embellished, prettied up!" So who am I to ignore such a plea?!!!


This started out as a plain white BoBunny board book and whilst I was searching for inspiration I came across a card design in this month's copy of Simply Cards & Papercraft and as soon as I saw it, I thought what a lovely cover for a keepsake book it would make, so I changed a few things here and there and adapted it.


 First of all I took some paper from stash and covered both the back and front of the book cover and then distressed all around the edges of the board pages and cover with a mixture of Spun Sugar and Tattered Rose distress inks, just to give it a vintage aged look.

I coloured some American Seam Binding with the same inks and set it along the edge nearest the spine, then I added a layer of vintage lace and an edge die from Spellbinders Antique Frame and Accents. I used a Heart Circle die off centre and this is coated with micro beads with a  paper rose embellishment made from Spiral Blossom One. The small accent dies are from assorted sets. I finished off with some little heart pearl gems and the sentiments were typed and then the tags coloured with the inks. I used the same sentiments as in the magazine  example because they were perfect for this book, which is being sent to the same couple for whom I made the  wedding card.
 
I do love using these micro beads, but you can't really see their effect in the photo. Throughout the project I used cosmic shimmer glue and red line tape.


Thanks for stopping by!
Carole X


Monday, 4 June 2012

Best of British - Monday 4th June

Hello Blog Friends!


Today I have 'two of a kind' cards to share with you..very easy makes and similar to designs I have seen in shops...including a very upmarket department store in London where they were charging over £5 for a small 6x6!


Both of these are actually 5x5, they were quick to make and could be ideal for  good luck cards.


The first one is simply a kind of light brown (sounds boring, I'm sure it has a much nicer official name!) card front, which I distressed with a mixture of antique linen and tattered rose distress inks and typed the greeting in one of the 'typewriter' fonts. Using the Portabello Road paper set from doCrafts, I cut out the flag and the bunting and used vintage bakers twine as the line to hang it.

 For the second card, I used Clarity Stamps London set, which I got at Ally Pally and hadn't had a chance to use...and read on for a story about these stamps! I made the front of the card in the same way as the first one, but this time stamped the little soldiers above the greeting. I then made the Union Jack from the same stamp set, stamping quite 'roughly' for a vintage feel - I used cranberry and denim adirondacks, as suggested by Barbara Gray. The soldiers were coloured with Promarkers (of course!)
Now, I have seen Barbara Gray demo this stamp set on TV and also live at Ally Pally. I loved it and decided to buy it. The set includes one of Clarity's lovely designs with the great big 'O' that can be used as an aperture. I sat down to try and recreate one of her designs with these stamps a few days ago and after a few attempts got it right. I was really pleased with the finished result and then...I did the unthinkable! I picked it up without cleaning my hands! I have no idea why I did it, but I ruined the card, there was no saving it. So when all the activities of this weekend are over, I am going to sit down and do it again...it takes ages, but the result is so satisfying and by the end of the week, I hope to be posting my finished card...wish me luck and clean hands this time!


Thanks for stopping by...I have a special card tomorrow and I will also let you know how our own little garden party went...enjoy the Bank Holiday everyone, if you're in the UK!


Carole X

Tuesday, 22 May 2012

Steampunk Circles - Tuesday 22nd May

Hi Blog Friends,

Isn't it lovely now that the sun is shining again? I was so happy to see the sun still warm in the sky when I got home from work last night, that I took this project outside in the garden  to photograph it!
I created this piece of art work on Sunday, for Hels Sheridan's Sunday Stampers week 206 challenge, the theme of which is Circles; it was fun and I had no idea where I was going when I started out! I die cut 3 large circles and punched 2 deckle edged circles, all with various pieces of kraft card card I had in my stash. I stamped the cogs from Sam Poole's 'Steampunk Dreams' stamp set, very faintly on one circle and I also stamped the mechanical bug from the same set (he has a round body, I had to!) and "Dare to Create' on another. That stamp and the flower are both from Sam Poole's 'Steampunk Flowers' set.


Having stamped the circles I then spent quite a bit of time distressing them with a mixture of Wild Honey and Tea Dye Ranger inks. I had seen Hels' demo-ing the flower on C&C at the weekend and have the tut from her blog. The demo reminded me that I hadn't made a flower like this in a while, so I was determined to incorporate one on this piece, but I had to adapt it to the stamp I wanted to use, which didn't have the same effect because the petals were closer together and harder to manipulate. I stamped the on grunge paper and also distressed it. After I had made it and stuck it together with Cosmic Shimmer glue, (which is my favourite glue, I use it all the time!), instead of teasing the petals back,  I painted them with some Glossy Accents and did the same to the bug.


To finish off I added a clock face, little brass cog,a faux screw brad and some rusty wire as the hanger. I then die cut some flowers using the smaller dies in the Peony set, distressed them and scrunched them.


It's a whimsy, I had fun making it and it will hang on my craft room wall!


Thanks for stopping by!
Carole X


I made this as my contribution to
Sunday Stampers Challenge - Week 206: Circles
http://pinkleart.blogspot.co.uk/


Sunday, 29 April 2012

Fairy Cupcake - Sunday 29th April

Good Morning,


Today a  change from the Sarah Kay stamped cards that I've been sharing these last few days (though there are more to come). I'm back to LOTV today with a sweet little fairy cupcake!


I stamped the image on coconut white card and coloured with a mixture of Promarkers and Flexmarkers:
Promarkers: Ivory, Blush (skin), Caramel (hair); Flexmarkers: Sorbet, Wild Orchid (clothing) and I then cut out the image using Spellbinders Grand Scalloped Ovals, shading the edges with Spun Sugar distress ink.


I cut a card blank using Grand Labels 23 and then using a paper from stash, I cut three  more pieces from the same die. Apologies for  not photographing the inside of the card, but I adhered one piece to the front and the other two to the inside, where I also added the stamped sentiment, which came with the stamp set.  
I then cut flowers in purple wool felt, using Flower Creations and Spiral Blossom One and added buttons and embroidery thread to the smaller blossoms. To complete, I added three tiny heart buttons, a Greeting (I think, from Craftwork Cards), some pink ribbon, tiny star gems and some Cosmic Twinkles on the icing and wings.
Thanks for stopping by, 
Carole X

Thursday, 12 April 2012

Brits & Bikes - Thursday 12th April

Good Morning Friends!


First of all I'd like to say Thank you and welcome to my new followers..I hope you will drop by often and leave comments. I love to read them and if you like what you see please spread the word!


I try to post at least every other day, this week has been a bit busy so I've missed a few. I'm very excited today because I will be teaching my first card-making workshop tonight! I'll be teaching the workshop with my friend Amy, who owns an absolutely wonderful gift and craft shop in nearby Chipping Sodbury and who has also organised the evening. I was thrilled when Amy asked me to join her with the workshop and I think we are both nervous and excited for this evening. We have a full class and we spent all Tuesday evening making the final preparations for it.


Tomorrow, Tom and I are off to London for the weekend and will be going to the Stamp and Scrapbooking Show at Alexandra Palace. I've been to the NEC craft shows several times, but never this one, so that's something else to be excited about - however, if I'm not too tired when I get home tonight, I will post for tomorrow and report on tonight's craft class.


Today's card is one I made today for a commission..my remit was a 30th Birthday card for a male who likes motorbikes. I do use this Lambretta stamp from 'Little Claire' quite a lot, especially as it features a Union Jack - so we'll forget it's an Italian bike!


I coloured the bike with Promarkers and then cut it out using Spellbinders Grand Scalloped Rectangles and shaded the edges with faded denim distress ink, adding a mod button from stash. I cut a larger rectangular using paper from Docrafts British papers set, which is also the background. I then cut a small Labels 24. The letters and numbers were cut using the Cricut. Finally, I stamped "Happy Birthday' along the top and bottom of the card and added red, white and blue gems.


Thanks for stopping by....have a good day!
Carole X

Friday, 6 April 2012

Happy Easter - Good Friday 2012

Good Morning Friends,


Hope you all have a wonderful Good Friday...we are having family over later this morning for our annual brunch, so I am just grabbing a few minutes between preparations to post this Easter card today..there will be a different one for the next two days.


This card is  a Lilli of the Valley stamp, coloured with promarkers...


The stamp could be for birthdays, Mother's Day, to say sorry...but I figured that the bunnies also lend it to Easter! I cut out the card using a recent Spellbinders buy..Grand Labels 23. I decided it was time to increase my collection of Grand Nesties and I am really pleased with this purchase. I cut the card with the die and also backing paper from stash, which I used as the base. Then I cut the stamped image with the same die and shaded the edges with Spun Sugar distress ink. I added a little lace, flowers and a punched out butterfly to finish. The greeting was typed and die cut using Spellbinders Fancy Tags.


Hope you all have a lovely day...I did so much baking after work yesterday that I'm already worn out, but looking forward to the day!


Carole X


Friday, 30 March 2012

Steampunk for the Girls! Friday 30th March

Hello!


Normally I would be saying thank goodness it's Friday, as it's one of my non-work days, but this week Friday signifies that  the end of my week off work is near and I have to go back to the office on Monday! Oh well, it's been a great week of crafting with a little bit of enjoying the sun in between, so I can't complain!


Steampunk - what is it? I think it has slightly different interpretations for all of us crafters. To me, it means something that life would have been like had we not experienced the technological revolution (Sam Poole put it really well on Create and Craft yesterday, but I'm going to have to re-check my recording for the exact words. However I remember thinking that were are on the same wavelength about it!). The Industrial Revolution really set the Victorians imagining the future in weird and wonderful ways and that's what Steampunk is all about..I wonder what the 22nd Century version of Steampunk will be looking back at us? I doubt it will be as interesting, as things progress so quickly now that there is little room for such vibrant imaginings....anyway I digress!


I'm very girly in my card-making, but in the way that I like cute images, ribbons, flowers and muted pinks and purples, browns, greens...I love 'distressed' and shabby chic, not hugely bright colours or lots of glitter. So this is probably why I prefer to embrace  the more feminine side to Steampunk and this is my take on it....


The background is a "That Special Touch of...' Mask (Cogs). I used dark cream card and put the mask through my Grand Calibur. I then shaded the edges and slightly 'into' the card all round with Vintage Photo distress ink. The greeting is from  Sam Poole's 'Inventor' Stamp set, stamped with Vintage Photo on to Kraft Card. The flower was made using the Spellbinders Floral Creations die set (all the flowers layered). I used the old book I got from a charity shop and distressed the edges of some of the layers. It's held together with a metallic brad.


The mannequin is chipboard from Craftwork Cards, bought in a pack at my lovely local craft shop, Out of the Blue (Chipping Sodbury). I covered it with paper from the book and distressed it with Vintage Photo.


I cut the Wings from the Fanciful Flight Spellbinders die set, using brown card which had been stamped with a Script stamp from Lilli of the Valley. The little toppers in the corners are the 'waste' from this die-cut.


To finish off and carry through the Steampunk theme, I added the clock, hanging from a brad which has the effect of a screw - both from Creative Expressions. Just to soften the card a little, I finished off with sheer ribbon.


I still believe (and this is only my opinion) that Steampunk is something that a lot of us crafters really enjoy playing with because there are no rules, no limits to the imagination...but in the end, it's just for us to enjoy...well, there is so much Steampunk craft stuff out there, but has anyone seen a Steampunk style card for sale commercially - even for men? I've never been commissioned to make one either.  I still occasionally look at cards in shops just to see what's about and it's not something I've seen...maybe us crafters are just a few years ahead of everyone else!


Thanks for stopping by!
Carole X