Total Pageviews

Friday, 31 January 2014

Workshop Photos! Friday January 31st

Good afternoon Friends!

 One of my favourite films is the sci-fi movie Bladerunner (not the directors cut, I would add, the one with the full Harrison Ford Film Noir voice-over), but just lately I've felt like an unwilling 'extra' on the set of this movie - I know, you wonder what I'm talking about? 

Well if you know the movie, you know that it's set in the future where the city is dark and wet all the time. It just doesn't stop raining(remind you of the UK at the moment?)...so you see what I'm getting at now don't you? :) 

I had to go into work this morning and had a very wet walk home. As for the hens... soon as they know someone is in the house (no matter how quietly I creep in!), they know I'm home and they start making a noise to be let out, so I let them out and they ran straight to their favourite cover of an old cold frame. They spent the next hour dashing between that, the greenhouse and the cover of their own coop..just for a change of scenery I guess.

The rain was finally coming down so much and the wind blowing, that I decided it was safer to put them back in their run (where they were sheltering anyway) -but- they know I'm home and are now crying to come out again!  I'm holding out that they'll soon get fed up and realise that they are better off inside!

At last night's Out of the Blue Craft Group,  I had one new lady in my group and two that had only been once before, but last time were on Amy's table. They aren't just new t he group, they told me they were pretty knew to crafting.They made four of the amazing cards below(one of them made two!). 

After the initial hesitation from everyone, it was the same as the week before: heads down just doodling..some just doodled and took their art home to make into cards, but these were the cards I managed to photograph.
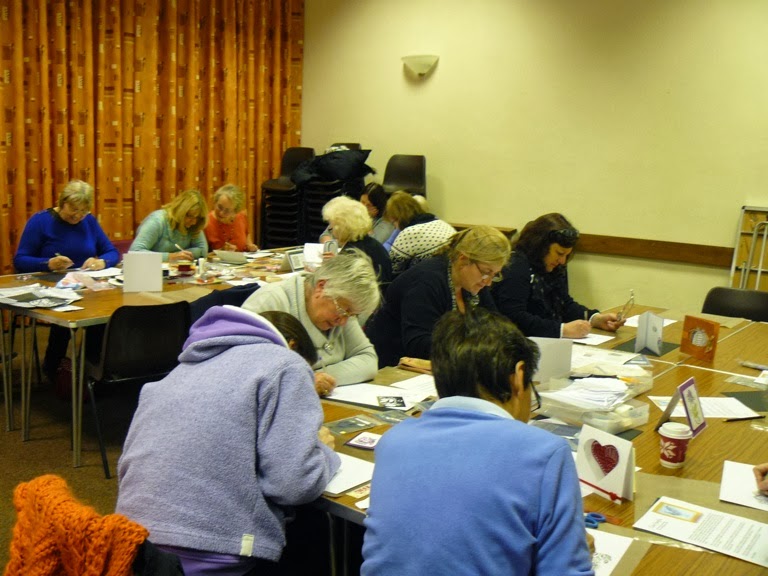
Such concentration..everyone is in the zone!


I just couldn't get an in focus shot of this lovely card by our first time lady


This owl was made by one of our regulars and was modelled on one of the examples I'd made, which I will be sharing sometime soon

Well done to everyone again, these cards are all fabulous!

I'm not going to share my Zentangle with a twist card just yet as it was made for a Design Team and the challenge isn't up yet, so had better wait!

Love and Hugs and keep  dry,

Carole X
PS The 'girls' are still protesting at being shut in the dry, out of harms way! :)

Thursday, 30 January 2014

Venetian Carnival Mask - Thursday 30th January

Hello Friends,

Hoping you are well and getting lots of craft time this week! Thank you for visiting and commenting on my blog. Yesterday was a card with quite a bit of colour, I love colour and when Hels Sheridan set the  theme of 'orange' for this week's Sunday Stampers I was really pleased - Spiced Marmalade is one of my favourite distress inks and I got to use it in abundance! I love the browns, oranges etc, which is why autumn is also one of my favourite card making times of the year - and seasons.

Today however it's back to monotone and another Zentangle inspired card made as an example for the ladies at our class tonight, the second of our Zentangle workshops. I've been making a lot of examples over the past few weeks and I do confess that the ones where I've added colour are my favourite - but that's just a personal thing, I always feel the need for colour! For work I wear a black sweatshirt or polo shirt with our logo on it, so with it I wear black trousers..but I always have to at least add some colourful earrings!


For our class we are providing an assortment of dreamweaver stencils for the group to use. Stencils are brilliant to use as a base for Zentangle designs and there are several books available that show you how to achieve lovely results using them - I have several more cards to post over the next few weeks that use stencils.

However, you can of course draw your own designs (I'm working on one at the moment), use masks, rubber stamps -anything suitable - and for this 

card I drew around a Spellbinders Venetian Mask die for  the basic outline.     

Before starting my tangle design, I partitioned areas of the mask by drawing  'strings' between two areas. This gives you a guideline in which to draw each different pattern (or leave blank). The strings can be anything you like - swirls, zig-zags or just lines.

For the background to the easel I used the 'Venetian' M-Bossability and die cut the image using Labels 17 and the 'outside the box' method to allow the 'feathers' to hang over the side.

I  shaded some areas of the design with pencil and used some black ribbon through a ribbon buckle die to the side of the image and added some gems and black and white hat pins.

For the base I drew a tangle design around the edge and added a sentiment (stamp by Indigo Blu) as the stopper with a diamante brad.

Apologies for the close up photo above, I haven't added pink gems in an effort to add some colour - I was wearing a red sweatshirt when I took the photo and somehow got a bounce of light back on this one!

Off to work now for a morning of the one thing I really don't like about my job! Sitting in a meeting all morning, when all I am thinking about it what I could be making better use of my time doing back at the office (or even better in the craft room)!

I'll be back tomorrow with that Zentangle inspired card that has a bit of a twist to it!

Thanks so  much for stopping by and have a great day all!


I am entering this card in 
Country View  Crafts current challenge with the theme of
"Monochromatic"  


Love and Hugs,

Carole X

Wednesday, 29 January 2014

Sunday Stampers wk 292: Orange Crush - Wednesday 29th January 2014

Good Morning Friends,

No sharing my desk on WOYWW this week...trust me, the state it's in, you really wouldn't want to see it - no really you wouldn't!

Anyway, I have been getting inky again for this week's Sunday Stampers Challenge, set by Hels Sheridan: if you aren't already acquainted with Hels fabulous work, please check her blog -here-

This week's theme is to include the colour orange, which I love!  This is a simple card:  No going to the office today, but I'm still trying to prepare for tomorrow's 'Out of the Blue' Craft workshop with some more samples, so a busy day ahead! 


I printed off some polka dot kraft paper from a Pink Petticoat download, adhered this to a white card blank and inked the edges with dried marigold distress ink.

I chose a stamp by Crafty Individuals,which I stamped on plain kraft card using clear embossing ink, coated it with white detail embossing powder and heat embossed. I then die-cut it using Spellbinders Labels One Small and inked over the whole shape with a mix of dried marigold and  spiced marmalade distress inks.

Then I die cut the same label on white card and inked over with the same inks, leaving it darker on the edges. To finish I added some sheer pale gold ribbon.

Inside the card I stamped a sentiment from a Creative Expressions set and die cut using Labels 4 Small. I inked in the same way as the label on the front of the card. I used a pale orange paper to make the flowers from a mixture of dies and punches and inked them to created a deeper colour.

Thank you so much for stopping by and for all your lovely comments on my page layout yesterday!

Love and hugs,
Carole X

Tuesday, 28 January 2014

Scrapbook layout - Tuesday 28th January 2014

Good Morning Friends,

Thank you so much for all your comments on my last post, I am so grateful for them all and love to read them!

I can't believe that it was Friday whenI last posted on here and at the time I was deciding which craft I would do that day! Well sewing won, but I didn't get on too well: I think I'm going through a phase where I have lots of ideas, but when I try to bring them to fruition, nothing goes right! I wasted a lot of time just not 'getting' an instruction on a pattern... it was only a duck's beak for goodness sake; I could see exactly how it should work but could I get it right?...Noooo! 

I have had the same problem with some paper craft projects lately, so it must be a 'mojo' thing...anyway, not much crafting time was achieved on Saturday, but Sunday was such an awful day weatherise, that we didn't go out at all. In the morning, I decided to  finish off a Christmas scrapbook page that I started over the Christmas Holiday. When I say 'started' I mean that I gathered the papers together and put them, with the photo in a 12x12 box ready to complete!

One of my crafting resolutions this year is to do more scrapbooking: I am at least determined to scrapbook our California trip last year, especially as I never got around to 'scrapping' the last time we went four years ago or our last trip to Venice to see Tom's family...very poor!

Tom's brother took this photo of us on Christmas Day with my phone. We had just opened the bottle of wine we'd brought back from our wine tasting and fun evenings at Casa Dumetz, Los Alamos California last year. I think our evenings there were one of the highlights of our holiday, apart of course from visiting all my relatives again, so it was great on a cold Christmas Day to remember happy times in sunny California and share with our family here!

The papers I used are a mixture from my stash - Basic Grey, Teresa Collins and American Craft. I used a Martha Stewart punch for the edger and Sizzix holly dies. The numbers were cut from a Sizzix Tim Holz alterations die. I cut the tag going across the page under the photo using Nitwit papers (downloaded and printed). To finish off I took a photo of the wine bottle (empty of course!) and added some journalling.

I've been working on a little  more Zentangling as we have the second of our classes this week and I wanted to take some more examples for the group, so there will be a few more (including a Valentine card with a 'twist' ) coming up this week, after which you will probably be happy to hear that I'm 'Zentangled out' for the time being!

Have a good day all..it looks like it's going to be  a very wet walk to work for me this morning, but I'd rather have that than ice!

Love and Hugs,
Carole X

Friday, 24 January 2014

Sunday Stampers week 291: Ultraviolet - Friday 24th January 2014

Good Morning Friends!

Wow! I was bowled over by all the comments about the Christening card on my last post, thank you to all of you who visited and commented. It did take quite a while to make and the person who commissioned it was thrilled with it, I'm happy to report! The aperture box card blanks are available from Stamps by Chloe. To be honest, I bought a pack a while ago to see what they were like: as you know I had become very busy so took time off from commissions and had also decided that I wouldn't offer any more boxed cards, but this lady had asked for one and as I had these on the shelf, I decided to give it a a go. It was very time consuming and not something I would choose to do often, but I was  very pleased with how it turned out.

Today I am back in my 'comfort zone' I guess, although I think that doing the commissions and workshops has made me try so many different styles and techniques, that I don't really feel 'uncomfortable' in most forms of paper craft any more. I think a better description would be "back doing what I like doing"...messing about with stamping and my melt pot!

Sunday Stampers for those who don't know, is a weekly challenge set by the oh so inspirational Hels Sheridan. You can create anything, just add in the weekly theme and some stamping. Click on my link to take a look at Hels' fab blog.

Up until I had my back problem and then our US trip last year, when I got all behind with everything, I don't think I'd missed one week for about a year, but since then I've missed so many...here's hoping this is the start of regular participation once more!

This week Hels set the theme of adding violet/purple to our projects. I hadn't made a tag in  a while and I love making tags, so this week my little creation is just that!


I made the flowers using Spellbinders dies from Bitty Blossoms, inked the edges with Dusty Concord distress ink and dipped into UTEE in my melt pot. I've had my melt pot over a year now, I use it a lot and I still get a tingle every time a little paper flower comes out looking like porcelain!

To create the background for the tag I used a honeycomb mask, dabbed through with Gelato paint (my new love, it's fab and so versatile) that I had mixed with a little water. I used mostly Bubble Gum pink, but also a little white and blue (Cotton Candy), so it has a tinge of lilac, though still predominantly pink in tone just for a little contrast to the rest of the tag.

The butterfly is one of the 'Dinkies' by Indigo Blu, though actually it is quite a large stamp! I used clear embossing ink and mixed together two embossing powders that have been in my embossing powder drawer for years: they are both by Heritage Rubber Stamps. The colours I mixed are Grape and Rose Sparkle, which together have made a lovely deep purple with a fine shimmer. I used the same Gelato mixture to paint in the white areas of the butterfly.

I aded a stamped quote, again using the same embossing powders and some purple ribbon to finish off...well that's me for today...no work, hairdresser this morning and then hopefully some craft time, but my dilemma today is paper craft or sewing craft? I have a few patterns all cut out ready to go..some Easter bunnies (yes I am finally thinking ahead!), another Tilda doll and a Tilda hen! Oh but I also have lots of paper craft projects to get on with.....Ooh decisions decisions :)

Whatever you do, have a fun day!

Love and Hugs,
Carole X

Tuesday, 21 January 2014

Christening card - Monday 21st January 2014

Good Morning Friends!

Commissioned Christening Card

I hope the week got of to a good start for you all: I'm looking forward to tomorrow and a nice day  in my craft room! I have some cards to make and some patterns cut out and ready to sew!

Today's card is a commission card: I'm still not really taking commissions, because there are so many projects I want to make and I found when I was actively taking them, they kind of 'took over', but if someone asks, I will usually still make them. They are usually colleagues of Tom's.

I was asked to make this Christening card and the person wanted it to be a boxed card if possible, so I made this card using one of these 'box aperture cards that I got from 'Stamps by Chloe' before Christmas and decorated a bag to match it.


 For the images I used LOTV stamps coloured with Promarkers, but very minimally. The dotty papers are by Pink Petticoat. I used Spellbinders Labels 17 dies, together with Floral Corner One, .Carnation Creations, Spiral Blossom One and Bitty Blossoms


 For the inside I followed through with more baby image stamps by LOTV and used am embossing folder that was free with a magazine for the background. I also added a panel to the back of the card for the person to write their message, but didn't photograph it!


  I decorated the bag with the same image and layers as the front of the card

That's it for today friends, I'm off to get ready for another day at the office now...have a good day everyone!

Love and Hugs,
Carole X

Sunday, 19 January 2014

 Hi Friends and Happy Sunday to you!

I promise these are the last few Zentangle cards, at least for a few days(!); they are virtually all I have been making this past week and I still have a few tangles to make into cards..but after finishing this post, when I have some craft time, I do have a Design Team card and a commission to work on, so I need to get out of the 'zone'..it is weird how it grabs hold of you and you just have to keep at it once you start!


Today I'm sharing two Zentangles that I added colour to - it doesn't have to be black and white! They are both Dreamweaver stencils and yes the first one is that cockerel again!


As you may have guessed by now,  I just love working with this stencil: in the past I have posted a card where I used embossing paste and glitter, making a multi-coloured cockerel. This time I gave him a colour wash using Inktense pencils as watercolours: I used a pink, orange and yellow and just let them flow into each other and outside the edges. Unfortunately it's impossible to see in the photo, but I also added a layer of watered down iridescent mica powder over the whole image, which gives it a lustre, which I was really please with. The only thing was, that the micas over powered the tangling, so I had to go back over it with my pen, but that wasn't any hardship!

I die cut the image using my Spellbinders Curved Matting Basics A die and mat and layered on red card, which I inked at the edges using Worn Lipstick distress ink, finishing off with a red bow.

 For my second card, I again coloured the card using  water colour pencils and although you can only possible barely see it in the second photo, I painted over the image with Mod Podge to give it a shine. I matted and layered on purple card, which I had embossed with a folder that came free with a magazine.


I often decorate the inside of the card, but rarely remember to photograph it! This is the inside of the flower card: I used a sentiment from Pink Petticoat and use another freebie embossing folder to frame it. I used just the leaf from the stencil in the corner and freehand tangled in the other corners.

 Before I go today, I promised my blog friend Dee over at Scrumptious Crafts that I would spread the word that she has a Cricut for sale - pop over if you are interested.

Well, hope you all have a lovely day! Thank you so much for stopping by,
Love and Hugs
Carole X