Total Pageviews

Showing posts with label Dreamweaver stencils. Show all posts

Thursday, 16 January 2014

Zentangled Cockerel - Thursday 16th January 2013

Good Morning Friends,

Today's card is one of the Zentangle creations you saw on my desk yesterday (if you visited my WOYWW post!). Tonight Amy and I are delivering our first workshop of 2014.  To ease our ladies in with something (hopefully) relaxing and also new to the workshops, we are going to have a Zentangle session.

Zentangle is an art form created by Rick Roberts (Zen) and Maria Thomas (Tangle); a combination of his meditation background and her art background. It's idea is to bring art to anyone and in a relaxing way. It can be addictive too! I tend to tangle now and then, when I'm in the mood, but the trouble is that once you start it's hard to stop! As a result, in preparation for this class I had lots of tangles drawn, but not many card examples made up as yet, so be prepared, there will be a drip feed of Zentangle cards for a while ahead.

For the class we are using Dreamweaver stencils as stencils are a great way to tangle, with the dividing lines already drawn for you, but in my cards over the next few weeks you will see tangles I have created using Spellbinder dies as templates and also from my own drawings.

This cockerel I have used before; it's a lovely stencil for tangling as it is large and thus gives more space for creating patterns.

This is a 6x6 card blank: I die cut the image and layer using Spellbinders Curved Matting Basics A, which my lovely brother-in-law gave me for Christmas. I also matted and layered the base card with dark red card.

The sentiment is printed from my computer, using a Pink Petticoat digi. I finished off with a matching feather and a little cockerel button from my button jar.

I'll let you know tomorrow, how our ladies got on with tangling! It will be lovely to see them again after the Christmas break.

Love and Hugs,
Carole X

Monday, 25 February 2013

Sunday Stampers week 246 - Monday 25th February

Good Morning Friends,


I hope you all had a good weekend and got in some crafting!  I actually did get some decent amount of time to devote to card-making, so for a change I am nice and early with my Sunday Stampers project this week! Well I would have been if blogger hadn't decided to play up this morning when I tried to do this before leaving for work! Grrrr!
Anyway, I'm here now and ready to share this week's project with you. Hels Sheridan set us the theme of 'texture' this week, which couldn't have been better timing for me. After seeing Lynelle Harlow and her wonderful Dreamweaver creations at the NEC last week - and then on C&C, I was prompted to get my stencils and paste out. After receiving quite a bit of attention around Christmas, I hadn't used them much of late.
So this week's card is a Steampunk cog clock....


I used metallic bronze paste with the stencil and coated it with red, gold and a little green f/x micas before heat drying to create the bubble effect. Then I wiped over the whole area with a duster to remove excess powders. I had actually used white card, so I used Vintage Photo to colour all the white bits.
The clock face I added to the front is a Tim Holz/Stampers Anonymous Visual Artistry stamp; Mr Inventor and the words  are all Sam Poole stamps. I stamped them in Vintage Photo distress ink and then heat embossed clear.
That's me done for now...thanks so much for stopping by!
Hugs,
Carole X

Saturday, 2 February 2013

All You Need is Love - Saturday 2nd February

Hello Friends,

Today's card is my Design Team card for the new Emergency Crafters Challenge..the theme is Love, but it doesn't have to be Valentine's! I'm writing this at about 7am, but scheduling for later in the hope that the new challenge will be live by then, as we are out all day...not much crafting for me today!

This card was also my group's card for our class on Thursday and the easiest way to describe it's 'construction' is to break it down into sections...sorry about the photo, I hadn't realised it was quite to dark when I originally uploaded it!


The Rose Topper

I Inked the large rose stamp (Kanban) on watercolour card (that was just my choice, it could be any stamping card) using Cranberry Adirondack ink and heat embossed with clear embossing powder.

Next I mixed  a little Victorian Velvet and Bundled Sage  distress(separately) inks with a spritz of water on my mat and using a paintbrush, coloured in the rose and leaves quickly, it just needed a 'wash'.  I then quickly ran my heat tool over the image just to dry off the ink.
Finally I  inked  the edges  of the card with Victorian Velvet before matting and layering on the pink and white card, ddd a little ink to the edges of bottom white layer as well.

The Rose Background for the Easel

For this I used a cuttlebug embossing folder  and embossed it through a cuttlebug, twice to cover the whole layer of the card. In case those of you who have followed me for a while and know how much I love my Grand Calibur are wondering why I was using a Cuttlebug, as some of you know, my GC developed 'internal' problems just before Christmas. I contacted Spellbinders in the US who were brilliant and got the UK repairer to contact me. They will repair for free, but as mine was one of the original machines and is almost 3 years old, I had to pay for the postage to send it to him, with no guarantee he could repair it. After a lot of consideration and communication with the repairer, we decided that in view of the age and possible extent of damage, it isn't worth repairing, so I'm going to have a new one for my birthday. The original is still struggling on, but the more intricate dies are just too much for it. 

A friend of mine who decided to dabble in craft and then decided that it maybe wasn't for her, had bought a Cuttlebug and hardly used it, so she offered it to me just after Christmas for a very small price...as this means I can use the Tim Holz and other thicker dies, how could I refuse that offer!

To make the background paper for the base

I used a piece of linen card cut to the size of the base. Using the Victorian Velvet, I stamped a single small rose stamp from the same set on scrap paper and then inked the card. This way the stamped image wasn't so  defined. I stamp randomly or in a pattern over the sheet, coated with clear embossing powder and heat embossed, then I inked all over lightly with Victorian Velvet.

The Stencilled Greeting

This is a Dreamweaver stencil, used with iridescent Dreamweaver Paste and Dreamwaver F/x mica powder, heat embossed until it bubbled. I actually saw Ali Reeve on TV making her own paste yesterday, something I'll definitely give a go...when I get the time!

To complete I added ribbon and a few gems and left a corner of the topper free from glue, just to turn it up for more of a Vintage effect.

Well for me I am going to have to 'fit in' crafting when I can this weekend as I have a lot of commissions to make, plus a craft fair in March that I haven't even started thinking about...but we aren't going to be home much...it looks like I'll be playing catch up with tonight's episode of 'Borgen' !!!

Hope you all have a fab weekend...please check out the latest Emergency Crafters Challenge here ("m hoping it's live now! If not, it should be in the next day or so)

Thank you so much for stopping by, I love reading your comments!

Hugs,

Carole X

Saturday, 12 January 2013

Anniversary Card - Saturday 12th January

Good Morning Blog Friends,


Today's card is one that I made when trying to think of Valentine's ideas for our next workshop. We are  probably going to to give our group the choice of sentiment, so for this one I've used anniversary. This is a vintage style card using a Kanban rose stamp and Happy Anniversary Dreamweaver Stencil. I also used paper from a pad by Tilda and some some dusky pink  textured card.


I stamped the image in red and then heat embossed with clear embossing powder. I then distressed all around the edge with worn lipstick and turned up the corner after matting and layering  on the textured base card. 

For the stencil I scraped with Dreamweaver perlescent embossing paste and after removing the stencil, I sprinkled with red glitter and then left to dry before matting and layer on matching card to create the stopper.

Thanks so much for stopping by, I really do appreciate it!
Carole X


Thursday, 20 September 2012

Dreamweavers Christmas Tree - Thursday 20th September


Good Morning Blog friends,

Today's post is scheduled as we are off to London today for the last few days of our holiday; our hens are having a holiday of their own back at the farm where they came from, so all is well! We are going to the Ally Pally Stamping and Scrapbooking Show on Saturday, so hopefully I'll have lots to 'report' next week.

As we've been on holiday the past week or so, I don't have any other projects or cards to post, so I'll be missing from here until next week, but I'll be visiting you all when I can.


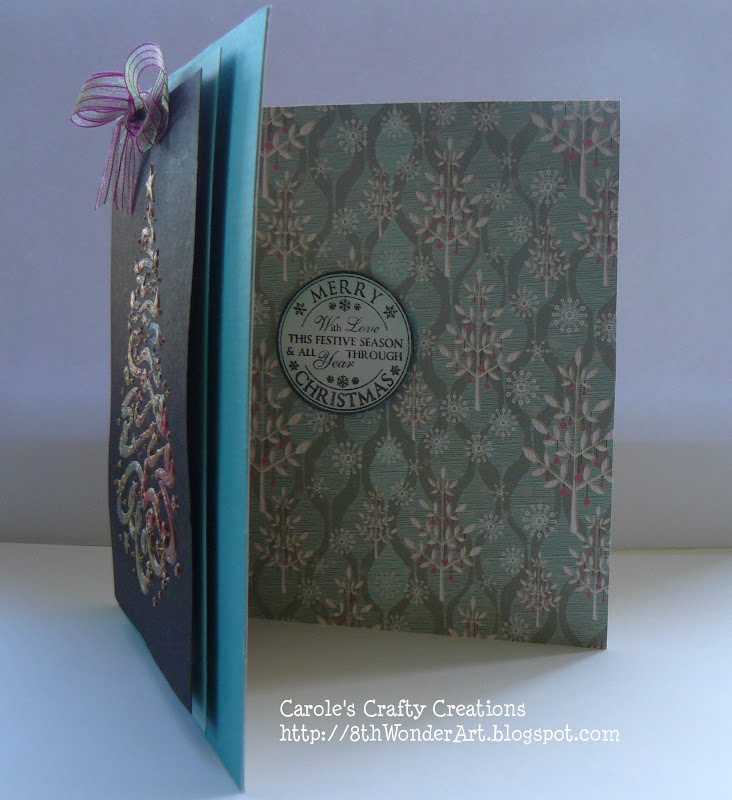
This is one of the cards we made during the Woodware workshops last week. To create this design we used the Dreamweaver Christmas Tree Stencil with Dreamweaver Pearlescent Embossing Paste and metallic powders.

The stencil is attached to the black card with removable tape and then a palette knife is used to smooth the paste over the stencil openings. Once you've done this, you need to carefully remove the stencil before sprinkling the  powders over the paste. There are different methods that can be used to create cards with these materials, the one we used was 'molten magic' where the paste- embossed image, covered with the mica powder (excess shaken off) is heated with a heat tool, which forms large bubbles as it is heated.


I think this was my favourite technique of the day and I am anxious to try it at home. I finished the card off at home, but felt the finished image needed a simple background. The photo doesn't really do the finished tree justice, especially as it is also a very 'tactile' image as well as bright and cheery.

Thanks for stopping by here, I will be back next week...we have another workshop and our next card will be from another technique we used at the Woodware Workshop, so I will be sharing that with you,

Happy Crafting everyone!

Carole X