Total Pageviews

Friday, 17 January 2014

Zentangled Craft Group! - Friday 17th January

Hello Friends!

Well it was good to see our first group of ladies again last night after the Christmas break! I think a lot of them were a bit 'dubious' about our choice of theme - some had never heard of Zentangle and only a couple had ever tried it before, but they they are a group of ladies who are always game to try what we 'throw' at them!

I'm sharing today a few cards made by some of the ladies on my little group. Not all of them made cards, some were happy just to try tangling with different stencils and take their work home to finish off. Looking at these cards..ALL..by ladies who had never Zentangled before, will show you why you should give it a go! The cards are (in my opinion) beautiful and I don't think that anyone but the most expert tangler would know they were all beginners. The thing about Zentangle for the first time, is that you might be faced with your outline and wonder 'what do I do now?', but there are lots of examples in books and on the internet, which can get you started and once that first section is complete, the rest just seems to flow naturally!

Super design and love the backing paper, which looks a bit like chicken wire!

Really good idea to 'frame' the image this way, very effective

The backing paper used with this one actually looks Zentangled doesn't it?! Super faux stitching too
Love the Zentangle at the side here, it really completes the card

I was both surprised and -not-  that the cockerel stencil was such a popular choice last night and I think the reason why is because it's a large area. You may think that would make it take longer to work on, but having Zentangled quite a few images over the past week, I felt far more comfortable and satisfied working on a larger area, where there is more 'scope' for a pattern.

Anyway, suffice to say this was a very successful class and I'm sure we will return to Zentangle at some point..it's not over yet though; we run 2 groups a month using the same project, so our second group of ladies will be tangling at the end of the month!

Bye for now and thank you for stopping by!

Love and Hugs,
Carole X

Thursday, 16 January 2014

Zentangled Cockerel - Thursday 16th January 2013

Good Morning Friends,

Today's card is one of the Zentangle creations you saw on my desk yesterday (if you visited my WOYWW post!). Tonight Amy and I are delivering our first workshop of 2014.  To ease our ladies in with something (hopefully) relaxing and also new to the workshops, we are going to have a Zentangle session.

Zentangle is an art form created by Rick Roberts (Zen) and Maria Thomas (Tangle); a combination of his meditation background and her art background. It's idea is to bring art to anyone and in a relaxing way. It can be addictive too! I tend to tangle now and then, when I'm in the mood, but the trouble is that once you start it's hard to stop! As a result, in preparation for this class I had lots of tangles drawn, but not many card examples made up as yet, so be prepared, there will be a drip feed of Zentangle cards for a while ahead.

For the class we are using Dreamweaver stencils as stencils are a great way to tangle, with the dividing lines already drawn for you, but in my cards over the next few weeks you will see tangles I have created using Spellbinder dies as templates and also from my own drawings.

This cockerel I have used before; it's a lovely stencil for tangling as it is large and thus gives more space for creating patterns.

This is a 6x6 card blank: I die cut the image and layer using Spellbinders Curved Matting Basics A, which my lovely brother-in-law gave me for Christmas. I also matted and layered the base card with dark red card.

The sentiment is printed from my computer, using a Pink Petticoat digi. I finished off with a matching feather and a little cockerel button from my button jar.

I'll let you know tomorrow, how our ladies got on with tangling! It will be lovely to see them again after the Christmas break.

Love and Hugs,
Carole X

Wednesday, 15 January 2014

WOYWW 241 - Wednesday 15th January 2014

Hello Friends and fellow WOYWWers!


Before I  let you peak at my work desk this week, I would like to offer a big welcome to my latest follower Claire Grantham..hello there Claire and thank you so much for choosing to follow me, do let me know if you have a blog of your own so that I can come visit.

For those of you new to WOYWW or don't know what I'm on about, hop over to Julia at Stamping Ground for all the deets and then put your desk on display for the world to see as well!

After last week's tour of my newly tidied craft room, I am back on more familiar ground this week, with a desk of crafty messiness!


 A little sneak peak of what I've been up to this week..it's our first craft class for 2014 tomorrow and we have decided to give our ladies something a little different to start off with - and we hope a nice, relaxing start to the year - Zentangle. These are a few of the tangles I have been doodling away at and a few of the cards I've made and will be blogging over the next week or so. I do love to tangle, but don't do it that often, the main reason being it does tend to get you lost in your own little world and before you know it hours have passed and your still at it when the evening meal should be cooking or worse still...the hens tucked in for the night!

But I guess that's the reason behind it...to allow you to lose yourself in art..speaking of which,gotta g and get back in 'the zone' !

Love and Hugs,
Carole X

Monday, 13 January 2014

Seaside Tilda - Monday 12th January 2014

Hello Friends,

Seaside Girl Tilda

I hope you all had good weekends and managed to filter in some  crafting time..I got very little time to craft, but did manage to finish this little project!

On Friday, I finally got my sewing machine mended...it was my fault it took so long; so  many paper crafting projects needed to be completed over the past year or so and as there was very little time for sewing, my machine has just been sitting on the shelf looking very sorry for itself. A New Year's resolution that I made to myself before Christmas, was that I would sew more this year and make little items to sell at the (few) craft fairs I do.

As you know, over the Holidays I made those Polar Bears, sewn by hand...and this was always going to be my next creation, but it really needed a sewing machine. Someone had told me about Cathedral Sewing Machine repairs in Bristol. He is a mobile repair man, so he comes to your house and for any of you who live in the Bristol, Somerset, Gloucestershire areas I thoroughly recommend him. He came to our house Friday afternoon, found the fault, fixed the machine and then I was ready to sew!Everything else was just pushed aside, I HAD to play!

I had already cut out the pattern/fabric pieces for this doll and Tom had a really late night at work; whenever he has a project launch it has to factor into the USA time zones and is a nightmare for working hours....so I was all on my own and decided to start sewing her up!

As some of you know, in the past I have made cloth dolls, angels and animals, but this is my first Tilda..what do you think? She was all finished on Friday except for the coat, which was the only part that I found difficult (Luckily I have no inclination to be a dressmaker!)...and that is why I had to finish her on Saturday. I didn't get a chance until late afternoon, so by the time I'd finished, all that lovely sunshine had faded and since then, trying to get a decent photo has been a nightmare! Even this morning with decent light the bright blue dots on the coat just don't show!


 Do you know what's strange? Whenever I use rubber stamps or have made dolls from patterns before, where there are no mouths..I have had to add them, I thought I would be the same with this one, but I have had no need to do so this time!

Before I finish, I would like to thank all of you who left suggestions about stamp storage on my WOYWW blog..all of them very helpful. I think I have decided that they will stay in boxes. The only reason being, that I started off with binders and it just doesn't work for me. I am however going to re-sort them into ''type' rather than designer - i.e. flowers, nature, male, steampunk etc. I'm hoping this will make it easier to find what I'm looking for..quite a few of you suggested this.

My desk at the moment is back to a state of disarray - full of doodles actually, Zentangles to be precise! This is what  we are doing in our first workshop of 2014, this week. I'm not in work today, so I will be concentrating on this for the day.

Yesterday we finally got the boxes of Christmas decs back up to the attic..I am amazed at how many it was, but of course the 'Christmas Village' takes up a lot of room!

Now I have to focus my sewing projects on little Easter makes, as I have a craft fair in March, so bunnies and chickens here I come...

Thank you so much for stopping by, following my blog and leaving a comment..I really appreciate it!

Love and Hugs,
Carole X

Wednesday, 8 January 2014

WOYWW 240 - Wednesday 10th January 2014

Hello Friends and Fellow WOYWWers!

It's been a while since I took part in  WOYWW, so although I try and keep these post short, please forgive me for a lengthy one today and not just a desk but a whole room! WOYWW, for those who don't know, is where we get the chance to share our craft space with blogland, courtesy of Julia over at Stamping Ground...please click the link for all the deets!

 For a start with all the Christmas paraphernalia, my desk has been hardly visible for months and I've been quite ashamed of the state of my craft room:)..which is saying something as tidy craft rooms are a rarity..aren't they?

However, as my regular friends will know, for a few days over New Year when the rain was really lashing it down and the winds were howling (hence there was no going out), I decided to completely declutter my craft room. Of course, most of the time to us crafters, 'decluttering' simply means moving stuff around!

I'm lucky: several years ago Tom and I built a summer house in the garden, which was supposed to be my craft room. It worked okay for a little while, although I was still semi working in a spare room (aka craft room!) because it was just too small and over the past few years it has sadly been neglected and mostly used or storage. 

During our lovely summer last year, I did use it a few times for some art work and decided that this year I was going to use the craft room for my paper crafts and sewing and the summer house for altered art and mixed  media.


So the reason my craft room is so tidy at the moment, is because my art parts and paints are all packed up ready for a new home when the weather gets better. It will be nice to use two separate spaces.

It's weird isn't it? I got all this stuff out, packed up a good part of it and then still struggled to get the rest back in!!! There is still a lot of sorting to do - papers and card blanks but at least it's easy to work in at the moment..not that I'm expecting that to last!

Now I want to ask you a question! How do you store your stamps? I have lots and lots and at the moment they are in boxes on shelves and in the cupboard. I've tried storage folders in the past, but the boxes seem to work best for me. However, currently I store them by make of stamp - I have House Mouse boxes, Creative Expressions, Crafty Individuals, Tim Holz....but sometimes I just want a butterfly and find myself hunting through my boxes for an appropriate stamp, so would I be better having a box for nature, for flowers etc..what works for you? I'd be really interested to know!

So, do come into my craft room....


I made this bunny a few years ago and he now hangs on my craft room door

 My desk..as you can see, it's quite clear at the moment....it's nice and big and was FREE many years ago when Tom's employer moved offices and it was a 'free for all' with the furniture!  It's good that it's so big, because I can just clear aside the keyboard, replace with a mat.... and craft!
 My sort of tidy shelves! The cabinet with the cutter on top was another 'throw away' - it's one of those old video cabinets. It now doubles as a cabinet for my craft CD's and is a nice height for cutting paper and using my die cutting machines.
 Yes, you guessed it the cabinet came with the office move and is used to mostly store household files (tho,ugh some craft stuff has crept in there). The plastic drawers are storage for my inks and next to it is the built in wardrobe where I keep my die cutting machines and some of my stamps.

 This is my sewing corner...my little desk and shelves for my sewing machine, materials and (mostly)Tilda books.

..and finally right next to the coop, our little summer house (and our four 'girls')..in need of some TLC, but watch out I hope to be posting a WOYWW from there later this year....


So that's it folks! Thanks for dropping in! I'll look forward to having a look around a few of your desks later...

Love and Hugs
 Carole X

Tuesday, 7 January 2014

Dream Big: Sunday Stampers wk 289 - Tuesday 7th January 2014

Good Morning Friends!

How are you all doing? Yesterday was back to work after a two week break for the Holidays - we spent most of Sunday taking down the decorations...first the tree and then that Village...goodness it takes forever to box it all up and now the house looks so bare! I think I miss the lights most of all - most of us in our road had lights of some sort on our houses and it looked so pretty coming home on a dark, wet evening...oh well, we have next Christmas to look forward to!

I have left out my Polar Bears on the coffee table - I think they are as much for 'winter' as Christmas and as I only just finished them, it would seem a shame to put them away just yet!

Before getting to my card, I want to thank you for your visits and comments - especially recently on the bears and my vintage accordion card - both of them were just a pleasure to make! I am hopefully getting my sewing machine repaired on Friday, which I am excited about as I am eager to start some Spring sewing projects that aren't good for hand sewing. 

I also want to say a big welcome to my latest follow Helen Phillips...Helen has some lovely creations on her blog, so do take a look: http://at-helens.blogspot.co.uk

This now brings me up to 70 followers and I did say that there would be Candy when I got to this next milestone...so please bear with me whilst I get a very busy week ahead over with and I will do a draw for one of you to win a little something!

Today's simple card was born out of frustration! On Sunday, admittedly feeling pretty tired after all the decs removal, I tried a new technique with alcohol inks, die cuts and felt and I just couldn't get it right. I will try again and get there in the end, but it just wasn't to be on Sunday...so instead I made this quick card to ease me back into Hels Sheridan's Sunday Stampers weekly challenge, which I haven't managed to participate in for weeks! This week's theme is to include the word 'Dream'....


Using a 6x6 card blank, I cut a piece of white card slightly smaller and inked all around using  Spiced Marmalade Distress ink. I then stamped the images using a Jofy stamp on white card and coloured with distress inks mixed with water.

The Dream Big stamp is from a set by Sam Poole for Creative Expressions. I matted and layered and added a button tied with Bakers Twine to finish.

Well that's the beauty of crafting isn't it? From the Vintage Nicecrane Design Team card, which took quite a while to put together to a simple, bright contemporary design..all good fun! Talking of the Nicecrane card I made a few years ago, do hop over to Nicecrane's blog to see not only my card, but what the other DT members have been doing with the same designs - so really lovely projects and we all seemed to go for the same style of colouring! 
http://nicecranedesigns.blogspot.co.uk/2014/01/elfos-magical-names-cards-birds-calendar.html
Thanks for stopping by!

Love and Hugs,
Carole X

Saturday, 4 January 2014

Little Women - Saturday 4th January 2014

Good Morning Friends!

From a pretty simple card yesterday, to one that took much longer to make! Mr Mojo is still feeling a little lazy and lacking in enthusiasm  but once I got the idea for this card and once I'd started, he did sit on my shoulder and play along for a while!

Today's card is my Design Team project for Nicecrane Designs - if you love vintage images of all kinds, from romantic to quirky, cute and humorous you should visit this website for an exceptional choice of coloured images and digi stamps. Click on this link to check it out http://nicecranedesigns.com

For this project I chose to work with one of the latest releases 'Your Magical Name'. The files are for you to colour and add the name of your choice to the banner, either writing, stamping or digitally!


These are the images


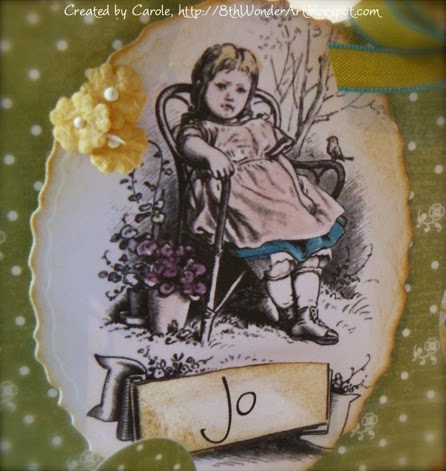
I chose four of the images and used my Sissix Accordian Die to create the card - the names I chose to use are from Louise M. Allcott's novel, Little Women, even though  the ages of the girls don't match the story! With four images to work with, it seemed like a nice idea!


I coloured the girls using drawing ink: I wanted to create the effect of old hand-coloured photos where just the main image is coloured, usually in blue,green and pink hues,which really stand out. Drawing Ink is great for this effect and for colouring Vintage images in general, I love it.


 I then die cut the images on to Spellbinders dies that matched the inners of the accordion die and inked the edges of the shapes.. To complete the card I added die cuts, ribbons, flourishes and paper flowers - all the details are listed below.


Thank you so much for stopping by and leaving a comment, if you choose to - I really appreciate it and love to read them!

Love Carole X

Materials used:
Images: Your Magical Name: Nicecrane Designs
Drawing Inks: Cosmic Shimmer
Sissix Accordian Die; Decorative Flourish set
Spellbinders : Labels 1, Fanciful Flight,Floral Corner One
Papers: Graphic 45 Secret Garden
Distress Inks
Ribbons, gems, paper flowers