Total Pageviews

Friday 31 May 2013

Zentangled Cockerel! - Friday 31st May

Good morning Friends,

Well we are  almost in June, do you think we have a chance of summer actually arriving sometime soon?

Today's cards were  made out of some doodling last weekend, when I couldn't actually get into my craft room to craft due to my ahem..moment of madness in moving everything out! The trouble is that I can't not do something - if I'm watching TV, I could also be playing with the iPad, reading something or as happened last Saturday: doodling!

To be honest it didn't 'just' occur to me to try a bit of Zentangle. I was moving stuff out of the craft room and had Create and Craft on in the room, when they happened to have a show about Zentangle. It was only on in the background, but at the same time, clearing all my books off the shelf, I found one which had some Zentangle ideas in it. I also remembered seeing this Dreamweaver cockerel stencil given the treatment, so I stopped what I was doing (as you do), got out the stencil and some card, traced it with one of my pens and put it aside for later.

I actually zentangled these two stencilled images whilst watching TV that night - and it was very relaxing! I made them up into quite simple cards - what do you think?


Thanks for stopping by - I always appreciate your visits!

Love and Hugs,
Carole X

Thursday 30 May 2013

Sunday Stampers week 259 - Thursday 30th May

Good Morning Friends,

Sunday Stampers Week 259 - Some like it Hot

This week's Sunday Stampers challenge set by Hels Sheridan  - deets here - is a project to include some embossing powder..yippee! One of my favourite crafty items! But having done no crafting over the weekend and lots to catch up with, I'm afraid it's another quick card this week.... I just had to include something made using my melt pot somewhere though - would have been rude not to :)

For this little card, I used Crafty Individuals stamp CI-119: which is a little vintage postcard of a bather, plus backing paper and the backing postcard from a selection by Tilda. I first of all backed the front of the card with a piece of linen card from my scraps box, which I then inked all over using Peacock Feathers distress ink. I tore the edges of the Tilda paper and also inked around the edges with the same ink.


I stamped the image using black archival and then for a little sea-side shimmer, I used heat embossed using Cosmic Aurora Sparkle embossing powder. Then I inked over the card with Vintage Photo to give it a really old look..I did the same to the postcard backing. The only bit of colour I added was to the parasol, just using a little Aquamarine Flexmarker to tie in with the base background.

So where does the melt pot come into this project? Well I took a bottle top, added a starfish embellishment and poured in some clear UTEE mixed with a few pieces of Stampendous Fragments to create an embellishment for the card. Of course whilst my UTEE was all heated up,I just had to dip a few paper flowers to add to my 'melt pot makes' box!

To finish off I just added a little think rope and tied a knot.

Thanks so much for stopping by, you know I really appreciate it!

Love and Hugs, Carole X

Wednesday 29 May 2013

WOYWW 4th Birthday - Wednesday 29th May

Hello Friends and WOYWWers!


I've only been participating in WOYWW this year, so I'm a newbie, but how great that it's 4 years old! To find out what it's all about, hop over to Stamping Ground for all the deets from Julia

Those of you who've read my recent posts, will know that I made the decision to re-organise my craft room...as a result half of the contents are still gracing the floor of another room whilst I try and fit them back in! Help!

I see from some of your comments yesterday that us crafters all share similar craft room 'problems' - such as sharing with filing cabinets and the home office (yes me too) and having too little room, or too much stash depending on how you look at it!

The one thing I did achieve was swapping the uses of my desks...I have two because I started with a small one in our tiniest room some years ago and then, when Tom's (my husband) employer moved premises they let them have the pick of office furniture. Tom got his desk and it's very large and wooden and lovely...and I also got a bigger room! But if I'm honest, it's really too big for the room. I have been using the large one for crafting and had my Mac and printer crammed on the little one..so now I have made my little desk my 'messy' desk - got my melt pot on there and inks..and my computer is sitting pretty on the big desk, along with the printer and my little cricut (I might even use it now). I'll keep this for  my non messy crafting (is there such a thing?)

Anyway, it already feels better to have more room to sit at the computer, so that was a good decision..now just have to sort out where to put the rest of the stuff :) My desks this week are tidy - have to say this is a better way of working, I've made two cards today and as of now I can still find things on my desk :)


 Above, my computer desk - no inky stuff here and below my work desk where I can get messy!
I've taken all the makes off the window sill, so I can actually open the window and I want to display them on the wall and shelves, maybe I'll have that done by next week!

Happy 4th Birthday WOYWW!

Love,
Carole X

Tuesday 28 May 2013

Cluckety-Cluck! - Tuesday 28th May

Good Morning Friends!


I hope you all had  a super sunny Bank Holiday weekend and if you weren't crafting, you were out enjoying it! We had lovely sunshine until yesterday afternoon when the chilly wind picked up and Mr Sunshine made his exit behind some dark clouds.

After  getting out early to do the usual food shop and stock up on food for the hens Saturday, we headed back home. Tom had the car to wash (he loves that weekly task, it's his 'gym') and I decided to tackle the craft room..did I ever wish that I'd decided just to craft or enjoy the sun instead? YES!!

I'd reconciled myself some weeks back to the fact that my desire to move the furniture wasn't going to happen; no matter what configuration I tried on paper, the desks and shelves just wouldn't fit any other way. It's a medium-to-small spare room and I'm lucky to have it all to myself, so I'm not going to complain, but when I went into melt down having taken everything out and not finding places for some of it to go back again, Tom was quite right when he said "well you just have too much stuff'. I couldn't argue, us crafters accumulate don't we? I have boxes of stamps and shelves of card and paper, plus all those art parts..oh dear!

I don't suppose it helps that I don't just stop at making cards - I enjoy mixed media art, so there's paints and all that goes with that... and I also have my sewing machine in the room (on a  shelf doing nothing most of time, as when I sew I much prefer to do so by hand) plus my GC..and then there's those stamps!

Anyway, as we were out visiting or pottering with the hens Sunday and Monday, this morning (as I return to work) my art parts and papers are still on the floor in the other spare room, waiting for me to find them somewhere to live..I sense I will be moving things about today at some point again!

The one thing I did achieve was re-organising my workspace - check on my WOYWW report tomorrow and I'll give you a peek!

Now, sorry if I've bored you with my 'interior design' problems and on to the card!

I made this card last week, for my friend Trish, who also has some pet hens and she has told me she really liked it. I just thought it would be a bit of fun!
The stamp is by Penny Black, coloured with Promarkers, I love these hen cards, they never fail to raise a smile. The card is  A5 blank matted and layered in pink/raspberry card and paper, all from stash scraps.

I made another chicken related card this week -totally different so look out for it later this week!

Bye for now and thank you so much for stopping by my little piece of blogland, I really do appreciate your visits!

Love and Hugs,
Carole X

PS I may have started to remodel the craft room, but no changes to my blog as yet!

Saturday 25 May 2013

'Thanks a Bunch' - Saturday 25th May

Good Morning Friends!

Today's card is another one that I was asked to make recently, a thank you card for a lady called June, which is why the word 'June' is hanging on a sign off the fence!

This an 8x8 card and my base layer was some dark cream card, which I inked at the edges with tea dye distress ink. I then covered with a layer of Teresa Collins card from a 12x12 selection. I stamped the flowers from Button Florals by Sam Poole on scraps of card left over from other projects, mostly from Graphic 45; the teen butterflies also come from the same stamp set, as does the sentiment. I used candi for the flower centres.

This set of stamps comes with separate flower stems so you can make up the flowers and I stamped the stems quite a few times  directly on to the card. I made the fence, using the same Teresa Collins card and a  'That Special Touch' mask, which once I'd cut out, I inked with a mixture of tea dye and wild honey.

The card is completed by adding the little name sign and two birds using Spellbinder dies.

Whilst on  the subject of flowers, my DT Challenge project for this month, the ribbon wreath, is now on the Fantastic Ribbons blog...(Kirsty has spelt my name wrong, usually a punishable offence, but she's such a honey I've let her off!)..if you do have a minute to pop over there and leave a quick comment I'd really appreciate it! You can get there from here

Thanks for stopping by..hope you all have a super crafty Saturday!

Love and Hugs,
Carole Z

Friday 24 May 2013

Tim's Tags for 2013 : May - Friday 25th May


Hello Friends,

At the beginning of the year, I made the decision to take part in Tim Holz's Tag challenge this year and so far, so good, I've managed every one. I haven't had a lot of the 'ingredients' but I have learnt some new techniques and it is great fun! This is going to be a pretty long post, so feel free to skip to the end if you don't want to read about the making of my tag..I won't be offended!:)

This is Tim's tag for May: you can visit his blog here


..and this is mine..


Once again it was all about improvisation as I didn't  have many of the items  that Tim used, but never mind...the tags are all about technique really and learning new ones and once again I think Mr Holz came up trumps!

I started with the basic manilla tag and as per the tutorial, the items I did have were the remnant rub ons, which I have to confess had been sitting in my box of everything 'Tim Holz' and had never been used and wow was I in for a surprise..brilliant! I don't use rub ons often at all, but these were certainly the best I've ever used. Tim says to place the sheet over the tag and rub in small areas, which I did. I then sanded the edges of the tag to remove the excess rubs.

For the next step Tim used distress stains, but I have very few of these so far and not in blues or reds, so I used distress inks - a random selection of Worn Lipstick, Broken China, Wild Honey, which I spread on my mat and spritzed with water to give them fluidity. I then rubbed the tag through the inks and wow, great..the rubs resist the inks. I heat dried the ink whilst very wet and then blotted the excess with a paper towel. Finally for this stage I inked the edges of the tag with various colours of ink. 

I didn't have the Mona Lisa stamp that Tim actually used, but this is a little stamp from Tim Holz, by Stamper Anonymous that I picked up for literally a few $$'s including postage on Etsy!

In the tutorial, Tim says to wipe away the archival ink from the top of the rubs using a towel, in parts where I wanted the image to appear behind the rubs...another super technique. To make the image appear layered, I heat dried on top of the rubs.

In the next stage, enamelled tags are used with alcohol ink, I don't have any of these but they look pretty cool so are on my 'Tim Wish List'..so I skipped this stage and used an Ideology domed cash-key instead. I took some card and used my tiniest oval Spellbinder die to make the background, which I inked with a mix of colours again. I then used some of the smallest rubs to fill..and I really liked the effect.

Next, Tim used Ideology Film Strip Ribbon, which I did have a little tin of in my box (Yay!). I taped this to the tag and secured the cash-key on top with a brad. 

I completed the tag using a little metal word band from my stash and then realised I'd not included the number 5, for May anywhere! So I went to my  best buy at Ally Pally, a numbers stamp set in a tin, from Darkroom Door. I'd been looking for some number stamps that were a  good size and a bit grungey and these were there screaming 'buy me'. They were quite expensive (but then stamps are nowadays aren't they?) and I wondered if I was paying for the snazzy metal tin..but I love them and have used them so much already. I had never bought a Dark Room Door stamp before, but they stamp beautifully.

Finally I wetted the inks on my mat again and rubbed some crinkle ribbon in it to colour it. Mine isn't as bright as Tim's, I should have used Picked Raspberry instead of Worn Lipstick, but on the whole I was pretty pleased with it.

Sorry for the long post...I'm not sure how much crafting I will get done over the weekend, we've a spare room half cleared out that needs finishing and a few places we want to go..and I do need to spend some quality time in the craft room but giving some tlc to my Mac! Sorting my iPhoto files and doing that blog overhaul I've been promising myself...

Thanks for stopping by!

Love and Hugs,
Carole X


Thursday 23 May 2013

Sunday Stampers week 258 - Thursday 23rd May

Hello Friends!

Well I did have a pretty productive day yesterday, not only did I make my Sunday Stamper card, but also my Tim's tag and made three commissioned cards. I was so engrossed in my crafting that time just slipped away from me! It was a lovely sunny day and our hens were roaming the garden, or having dust baths, not a peep out of them!

For his week's Sunday Stampers challenge,  Hels Sheridan set the theme of Vintage/old ...and this is my card:


I decided to use the Indigo Blu Elisabeth Bennet stamp again.I stamped it twice, so that I could layer the flowers and butterfly. The card I used is a really soft pale cream. Once I'd stamped it, I took a second piece of card, which I stamped with a script stamp from Creative Expressions Vintage Labels stamp set. I used it  to create a frame over the image, by cutting away the centre, which I then peeled back to create a rough edged  aperture  around the image.I inked the edges of the  aperture, frame and the card using Tattered Rose distress ink.

The flowers, bird and butterfly were the only parts of the image I coloured,except for the lips and I used a mixture of flexmarkers and Promarkers.

Then I got a bit carried away with the embellishments! All the flowers are from Spellbinders Bitty Blossoms, inked at the edges with Tattered Rose again, as are the flourishes (die is from Spellbinders Venetian Motifs). To finish I added some Vintage silk crush ribbon, vintage lace and beads.

Thank you so much for stopping  by my blog!

Love and Hugs,
Carole  X

Wednesday 22 May 2013

WOYWW 207 - Wednesday 22nd May

Good Morning Friends and WOYWWers!


Well it's that day again - that's great for two reasons..no work and it's the day that courtesy of Julia over at Stamping Ground, we get to spill the beans about what's lurking on our craft desks to anyone who cares to take a peak! If you want to take part or find out more, just click here and you'll be whisked right over there!

I've been having a quick blog hop catch up around those of you I follow today, it's turned into a busy week and Tom's been getting home later from work, so I've not had the time to blog or comment..of course, today our internet connection is playing up..so if my comment didn't get left or indeed it appears twice..my apologies, even as I write I am not sure it will post!

I also found out yesterday that I was a prize winner on Barb Cady's blog..what a lovely surprise and thank you Barb! The prize is a blank journal and as I love altered art, what a perfect prize..I will make sure that this piece takes priority and shared. Please do hope over to Barbara's Craft Room to see her beautiful and inspirational work!

My desk is not very inspiring this week, but I haven't been able to participate for a few weeks, so..just felt the need :)


So what am I up to today? Well to begin with the sneak peak at the back, I'm going to finish off my Sunday Stampers project for this week (hopefully to post later today)..then I am gathering all my bits for this month's Tim's Challenge and after that it's back to the commissions I have to get made. So no extra time for the art part pieces I am so desperate to get going on!

The black and white card to the left is a sneak peak of one I have been working on for a future workshop project...

Well off to make those cards and tag, hope you all have a happy WOYWW day!

Love and Hugs,
Carole  X

Sunday 19 May 2013

Happy Birthday - Sunday 19th May

Good Morning Friends,

So far so good here with the weather this weekend! Yesterday we were supposed to be visiting some friends in Trowbridge, but one of them was unwell so we had to cancel. Tom and I headed off for a morning walk at Westonbirt Arboretum instead and it was beautiful, so full of colour. In the afternoon I managed to get some more crafting done..very unusual for a Saturday!

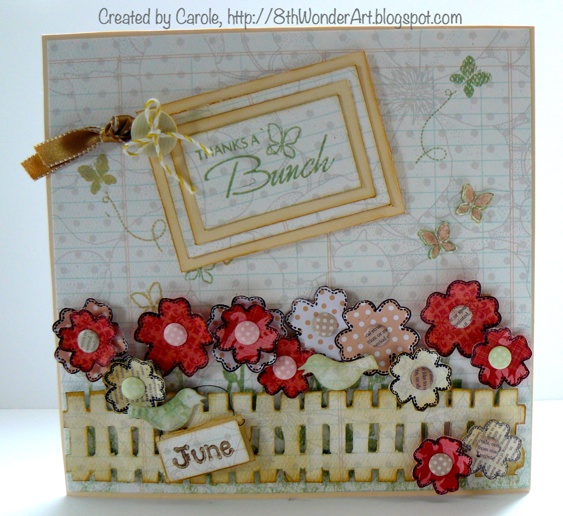
Friday was supposed to be a day when I got through quite a few commissions: I started off well with a Diamond anniversary card, but I had been asked to make two cards for one couple to be given (of course!) by different people and on the second one my mojo just went walkies! I think it was the pressure of creating two very different cards for the same couple. I ended up spending a few hours on a card, which I then totally discarded it was that bad! Got there in the end though!

Before I talk about today's card, after I mentioned the other day about a problem with the link to the Emergency Crafters challenge blog, a few of you said you have cards ready to post. I have now heard that due to the person who runs the challenge being unfortunately out of action at the moment, the challenge for May has been cancelled. I am really sorry to tell you this, but all I know is that everything should be back to normal for June.

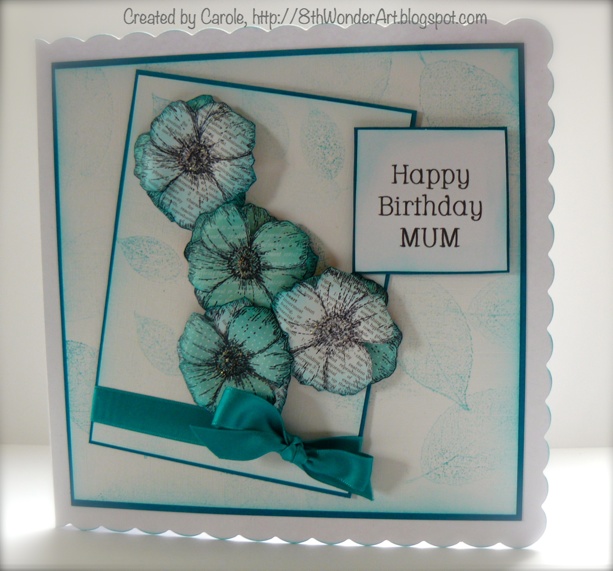
Today's card is another commission for a regular customer's Mum. It is really nice creating cards for people who come back regularly, of course the same challenge applies...I must have been making cards for this lady's Mum for quite  a while now, so they need to be different. Of course the 'bonus' is I think I know what appeals (I hope!


 I started by creating a background and to do this I used a lovely leaf stamp from the 'You're Bloomin' Great' stamp set by Indigo Blu. I used Peacock Feathers distress ink, (my current favourite i think)just stamping lightly (by stamping first on copy paper then the card) randomly across the card.


This is an 8x8 card blank and after also inking the edges, I matted and layered onto teal card.

I then created a smaller matt and layer for the topper and tied it with some teal ribbon.

The flower stamp is als by Indigo Blu, from the 'Live, Love, Laugh' set. I stamped it on some Teresa Collins paper, which is a scrapbook paper and good weight for 'moulding'. I stamped the flower ten times and inked them, some all over, some just lightly with the Peacock Feathers ink, before layering for depth. I attached the ribboned layer to the card before adding the flowers. The sentiment is typed and printed from my computer.

To finish off I inked the edges of the scalloped card blank and added my last layered flower to the inside.

Thank you so much for visiting, I really do appreciate your comments. I hope you all have a beautiful Sunday, whether it's crafty or not!

Love and Hugs,
Carole Z X


Friday 17 May 2013

Workshop Photos - Friday 17th May

Good Morning Friends!

Well at the moment it's bright and sunny, I don't have to go to work and I have a mega craft day ahead of me, with lots of commissions to complete! What a busy week it's been, I didn't even get the time to post my desk top photo to WOYWW this week - not that any of you would have wanted to see it, the state that it's in! I have some half-finished altered art, stamped images.. going to have to do some tidying before I start today.

Last night we had another super craft workshop at Out of the Blue Craft Group: this time Amy and I decided to use the Anemone stamp from Indigo Blu. We've been using their stamps and materials for last few workshops: they have a really good loan scheme for the retailers who buy from them and it has been a lot of help with having more stamps available. Everyone seems to have been really taken with their stamps and yes, last night, I did succumb and buy another myself!

I based my group's card project on one of Amy's designs,  just changing the colours to the promarkers  we had available for the ladies to use and adding my own butterfly stamp (also Indigo Blu). Everyone said how much enjoyment they got from using this very useful and pretty corner stamp.I've also penned a design to use it on a dress form - it's all prepped, just got to make it!

So many 'jobs' and where does the time go? I am still set on revamping my blog theme..background chosen but partly through time (lack of) and mostly fear of everything crashing(!) it just keeps getting put off..but beware, some day soon you will visit here and see an entirely different background!

Here are the photos of our ladies at work and the cards made by those on my group..I think they are totes amazing!


Tom has left for work, the hens seem to be quietly enjoying their free ranging and that means all I have to do is unpack my bags from last night, tidy my desk and get crafting!
Have a fab Friday all!

Love,
Carole X

By the way...if any of you have tried to look at the Emergency Crafters Challenge this time and aren't having any luck, same here (as I am supposed to comment on some of the entries). I did get in touch with one of the lovely ladies that runs the site and apparently, Lucy, who updates has not been well, so that's the reason. I'll let you know if anything changes X

Thursday 16 May 2013

Meadow Resist, Sunday Stampers week 257 -Thursday 16th May

Good Morning Friends,

Goodness I can't believe I've been 'missing' since Sunday from bloglamd..I have tried to keep up with your posts, but please excuse me if I haven't visited these last few days...it's been another busy week!

 Most of my free time at the weekend was spent making and putting the finishing touches to the ribbon wreath for my Fantastic Ribbons DT project and thank you for all your lovely comments..it was a bit of  a 'labour of love' once I'd started it...and now it's hanging on our lounge door, welcoming visitors when they come through the hallway!

It reminded me that I haven't shared my door wreaths with you this year..those of you who have been my crafty friends here for a long time,will know that I decorate and hang a seasonal wreath on my front door. Last year I made all new ones and they will stay for this year too...for my newer friends over the next few days sometime I'll show you the story so far! However since making the ribbon wreath I already have ideas for interior door wreaths for autumn and winter using dies.

Sunday Stampers Week 257 - Simply Irresistable 

Yesterday, my crafting day was spent preparing for tonight's workshop...I'll be reporting on that tomorrow! Yesterday, I also made my project for this week's Sunday Stampers - this week Hels Sheridan has set the theme of using the resist technique and this is my card...my project had to be resist in its simplest form because of time (or lack of it at the moment), but I love the technique Hels uses in her project this week and will be trying it as soon as I get the chance and some more distress paint. Click the link above to check it out!

The backing paper is from Teresa Collins 'Tell Your Story' 6x6 paper pad; I stamped the image, Crafty Individuals CI-385 on to Clarity Matte card using Perfect Medium. I then dusted with white embossing powder and heat embossed. The whole piece was then inked using a blend of Broken China, Mown Lawn and a hint of Pine Needles distress inks..simples!


That's all for today friends, I'm off to work now - you all have a great day!

Love,
Carole X

Sunday 12 May 2013

Floral Ribbon Wreath - Sunday 12th May

Hello Friends,

This month the design team at Fantastic Ribbons were asked to create a project with ribbon flowers and for my project I decided to decorate a  summer door wreath.


The  flowers on this wreath are made from a selection of ribbons all available from Fantastic Ribbons. I always have a seasonal wreath on our front door, but  wanted to create an inviting summery wreath for an internal door.


The individual flowers are all very easy to make and were made using three different techniques. I added finishing touches of buttons, beads and felt for the leaves.


To make the 'loopy' flower, just take a small square of card, locate the centre and stitch the ribbon in loops joining at the centre. When you have finished, trim away any excess card and you will have a looped flower like the one below. I have added a second blossom to the centre, along with a bead.

The blossom in the centre of the loopy flower is made by zig zag stitching along a length of ribbon: when you get to the end, just pull it together and sew the ends to create a double ruched affect and a very full blossom.


My third blossom was made by simply making a running stitch along a length of ribbon;pull it in at the end, sew the two ends together and you will have a flower just like the one below, to which I have added some pearl beads.


Thank you very much for visiting and I do hope that you have been inspired to brighten up your rooms with some ribbon for the summer!


I would also like to enter this project in the :


Love,
Carole Z X

Friday 10 May 2013

Craft Workshop Photos - Friday 10th May

Good Morning Friends!

Another quick post today as I am taking a day off from my craft room to meet a friend in Bath for a mooch around the shops and lunch..the wind is howling outside and it's become a bit of a joke between us, because we hardly ever get to just meet and mooch  and when we do, the weather has been appalling! Oh well never mind, it's been ages since I last saw her so it will be great to catch up.

Last night was another of our 'Out of the Blue' craft group workshops and following on from last time, when we made a card using stamps, gilding flakes and flitterglu, this time we used gilding flakes with double-sided tape. For my group I made a card in black and another in burgundy and let my ladies choose their colour theme, so we had a lovely mixture of cards. I already posted my black and white card last week, but I'll post my burgundy one separately in a few days time.

My camera battery packed up on me last night..I knew it was going but the last time I attempted a 'tidy' of my craft room, for some reason I moved the spare and charger to somewhere that I thought was a better place, well it was certainly a good hiding place, because could I find it before going out last night? NO!!

So not so many photos as usual, but these are the ones I managed to take before the power went..aren't they lovely?


Thanks for stopping by, I have been so busy at home and work again that if I haven't visited your blog lately, many apologies..I will be having a catch up later tonight!

Love and hugs,
Carole X

Thursday 9 May 2013

Butterfly trail - Thursday 9th May

Hello Friends,

Thank you for visiting my blog and (hopefully) leaving a comment! After the last two very long blogs, a very quick one today..this was one of the cards I made for the recent large order for an assortment of small cards and is a variation on a design by Sue Wilson in the second Creative Expressions design book, just adapted for a smaller card.


Apologies for the photograph, I didn't realise it was quite so dark until I just uploaded it..it's  a 6x6 card..the first white layer was pin pricked, then I matted and layered in black and white, using cosmic shimmer pearl PVA for the butterfly trail. The butterfly I used isn't a die, but a punch I have had for a very long time!

We have another workshop tonight and our ladies will be making the cards using the Indigo Blu BFF stamp that I featured in my post of 27th April, so photos here tomorrow!

Love,
Carole X

Wednesday 8 May 2013

Secret Garden - Wednesday 8th May

Good Morning Friends,

Thank you for visiting my blog, I really mean that - it's so good to have you take a peek at my little corner of crafty blogland! Thanks for all your comments yesterday, I'm glad you liked the projects. I do enjoy design team work, there's always a challenge to come up with a card or other project that is quite specific, which can sometimes be difficult, but always fun. I am currently working on my next DT project for Fantastic Ribbons..and it's not a card, far from it and that's all I'm saying for now!

This is my little creation for Sunday Stampers this week, but I would also like to enter it in a few other challenges as well..details at the end. This time Hels set the time of diamonds and pearls..look carefully they are there!


I started creating this little plaque at the weekend and finished it last night. First of all I covered the whole plaque with Claudine Helmuth gesso and whilst that was drying off (not that it took long at all), I turned on my melt pot!

This time, instead of using dies,  I made the flowers using the stamp shown below, from Sam Poole's Button Florals stamp set and  followed Hels' tutorial to create  lovely paper blossoms like these. You can follow Hels tutorial here -  do take a look it's superb!

The paper I used is from the Fabrications pad by Teresa Collins, once I had stamped the flowers I inked the edges with Fired Brick distress ink and I also dusted over the edges again once I had made up the roses. The leaves are die cut using a Spellbinders die, it's the leaf from the Poinsettia set.

Having made up the roses, I dipped them in beeswax, which had been melting away in my pot. It leaves a sheen on the dipped item and the leaves are bendable - totally different to when you use UTEE, which gives a high gloss porcelain effect.

With the roses made I returned to the bare plaque - I used the Ali Reeves method of stamping with some string wrapped around wood all over the plaque, leaving streaks which look like weathered wood. I did this with Forest Moss distress paint.

I also added a tiny bit of  Kroma Crackle at the bottom of the plaque..it just gives a deep cracked effect. Once it had dried (it takes a few days but in the end I aided it a little with the heat tool!) I inked over it with a tiny amount of Wild Honey distress ink.

Next I stamped the sentiment on to tissue (one ply) and sealed it on to the plaque using 'slap it on'. I then added torn segments from Graphic 45's Secret Garden Range and sealed with some Modge Podge sealer, which I have had in craft room for years and it just keeps on going! I also dabbed all around the edge of the plaque with black acrylic paint, just to give a more aged effect.


I added the roses using my glue gun and also two stick pins, one with pearls and one with 'diamonds'(well I guess they are sapphire coloured really, let's call it 'artistic licence!'). To finish off I just placed a little key charm over a key on the paper.

Sorry it's such a long post today -I wanted to write down all that I had done to create this!

This is my project for the Sunday Stampers Challenge week 256 Diamonds and Pearls.  and I would also like to enter it into the following challenges:

Country View May Challenge -  #3 - How does you garden grow?
Our Creative Corner -  May - Anything Goes

Thanks so much for stopping by!

Love,
Carole X


Tuesday 7 May 2013

Mabel Lucie Attwell - Tuesday 7th May

Good Morning Friends,

I hope you all had a lovely weekend and the sun shone for you! We had a super weekend, but I do admit to spending time in the craft room when I should  have been out enjoying the sun! However, it was a very fruitful weekend - I finished off my large order, managed to finish the plaque I was struggling with in Sunday's post... and ..we booked our flights to California for September, so I also spent a lot of time on line, excitedly emailing relatives to confirm we are coming and booking hotels for our drive down from San Francisco to San Diego..I am really looking forward to it now, but I won't wish the summer away!

More excellent news! I have been asked to join the design team for Nicecrane Designs, which is owned by a lovely guy called Ignacio. I was thrilled to be asked and am in the best company as my lovely blog friend Anne, Redanne has also just joined the team...

You can view the Nicecrane site here, but he specialises in vintage ephemera collage sheets for card-making and paper craft and also digital stamps. I will mostly be creating projects colouring the stamps and here are my first two projects:

These are digital stamps of images by the British artist/illustrator  Mabel Lucie Attwell (1879-1964). She  is most well known for her quirky, nostalgic drawings of babies and children, based on her own daughter Peggy. Her style is very much that of the  'British Postcard' and indeed many of her illustrations were used on postcards and advertisements.

For my first project I decided to make an easel card with a drawer and as the little girl is off to  do some painting, I thought it would make a good pencil or crayon box for  a child. I coloured this with Inktense pencils that I got at Ally Pally, they are superb and yes, very intense! I also stuck to the colours in the original artwork as much as possible. Mabel Lucie Attwell's work was used for illustration and posters so it was very much block coloured, with no shading, so quite easy in a way but very different to what I'm used to when colouring LOTV stamps, for example.

The box was made from a template (also an Ally Pally purchase) and the papers are vintage papers by Pink Petticoat.


My second project is a card with  Cinderella themed artwork and this time I used a different colouring medium again - drawing inks! I was given some for my birthday and hadn't had a chance to use them, so I decided to give them ago..wow they were lovely to use!
 Again I used a very similar colour theme as the original artwork. The papers are by Graphic 45 and the stamp, Sam Poole.

Here is the coloured artwork, which can be purchased from Nicecrane, or the digital stamps as shown below: view these and many other designs - and purchase them by clicking this link 


Thank you so much for stopping by and please leave a comment, I love to read them!

Happy Crafting,
Love,
Carole X