Total Pageviews

Monday 30 June 2014

More Choc Wrappers! - Monday 30th June 2014

Hello Friends,

Hope you all had a good weekend...I think I finally got around all your blogs this morning; we had a bit of a 'hectic' time and I didn't get on the computer or even iPad..except we did watch Dolly at Glasto in the garden yesterday, wasn't she amazing? I think it's the one time I wish I'd been there!!'

We finally ordered our new kitchen last week: we now have to think about the little extras we need and choose floor tiles, before finalising everything (it should be fitted in September) so that is what we were doing most of Saturday. 

Aside from that I have spent a lot of time providing TLC in the hen coop :(....Our lovely speckledy Lacey, is very poorly. She's on antibiotics, but to be honest they never really do much good..she's eating and drinking and scratching about, but losing weight to it's probably a tumor, which is quite common in poultry. All I can do is give her lots of cuddles really. Our Bluebelle, Bella gave us a bit of a cause for concern Friday, but she is fine now. In fact, Tom was gardening yesterday and I was trying to craft (all behind at the moment with deadlines!) and all I could hear was him telling her off....

I went down to have a look and she had been put back in the pen (the naughty corner, lol). Apparently he was trying to clear up our tiny little pond and the girls were trying to help (!), as they do, but frogs kept popping their heads out and Bella kept grabbing them. He managed to rescue one, but she ate two!!

Our oldest hen, Cara has been acting like she has taken some performance enhancing drug for 2 weeks now..totally manic, very odd!

Anyway, that's it for 'tales from the hen coop' today...


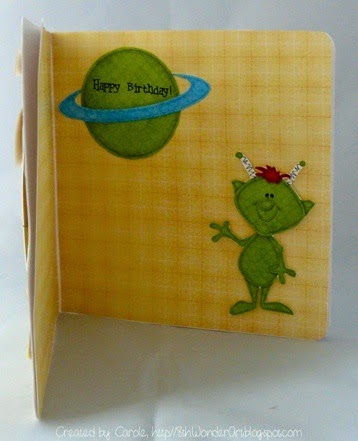
I have two of my chocolate bar wrappers to share (I love making these!)...


 For both of these cards  I used Indigo Blue stamps. The above card is made using papers from stash with some ribbon that matched it very well. I stamped the  greeting using archival ink  and then heat embossed it with clear embossing powder.

 For the second wrapper, I used script paper from stash and inked the edges of the paper with Brushed Corduroy distress ink. I also made a little card to match. The stamped sentiment on the card is by Creative Expressions.

I need to go an craft whilst keeping an eye on Lacey  now (no work today)...I'll be back tomorrow with this week's DT creation for Sam Poole...this week it's something I love to make for every season..some of you will guess what it is, I'm sure!

Have a good day all,

Love and Hugs
Carole X

Friday 27 June 2014

Sunday Stampers wk 313 - Friday 27th June 2014

Good morning Friends,

Aaah thanks so much for all your lovely comments about my desk! I've got to admit I was a tad pleased with it, though I took the photos on a bright day (even though I waited until evening) so most of the 'distressing' doesn't show. I loved working with the Annie Sloan Chalk paint, it is really beautiful to use. It was really hard work over several weeks - goodness after one session I was so stiff the next day I could hardly move to begin with, but thankfully my back held out, so those sport therapy sessions must be doing some good!

Some of you asked if I am using it yet....sadly no :( - there are still items in the summer house that don't belong there..e.g garden furniture (I keep telling Tom he has to find another home for it). I had hoped to get in there to sort it all out this week, but I've been busy with craft commitments and now, today the weather has changed! I'll get there soon and post another final photo.

This week the uber talented Hels Sheridan set the theme of including green in our Sunday Stampers creations for her weekly challenged. For full deets click here and take a look.

My creation this week is a Fairy Door card, again using Lavinia Stamps. A lot of crafters don't seem to like green on cards; when Julia Watts did her demo for Amy's shop a few weeks ago, she told us that she gets a lot of negative comments when she posts cards with green on, but I actually like green a lot.

Now I promise you there is green on this card, it just look more yellow  in the photo!

This is an 8x8 card blank, matted and layered in black-green-black. To create the inked background I used a brayer and the following inks and colours:

Distress: Mustard Seed, shabby shutters (green!), squeezed lemonade, Ripe persimmon, dried marigold, worn lipstick

I then used the following stamps: Lavinia: Fairy Door, path, bunnies, vine leaves, stars
Lindsay Mason Designs: mushrooms
Phill Martin for Creative Expressions: sentiment & butterflies

The tree stamp comes 'bare' and the little leaf stamp is included for you to stamp as you wish. To stamp the leaves I used Versafine Spanish Moss ink (green!). I stamped the vine leaves around the edge using Versafine black ink, but I shadow stamped by stamping each time on copy paper before stamping on the card.

To finish I used Seedless Preserves distress ink with a water-colour brush just to give a colour wash and a 'grounding' for the tree and dotted a little glitter here and there.

I stamped the sentiment on white card and cut into a banner shape, inking the edges with Shabby Shutters, distress ink.

For the inside:I used black card for the base and inked the edges of white card with Shabby Shutters. I stamped two pixies by Lavina, as well as the tree. The sentiment is from LOTV


This fairy door  stamp really made me want to make a real Fairy Door, so I looked for ideas on the internet and was amazed to discover that they are really 'big'...my five minutes research lasted an hour and I have now started to decorate my own. When I met my friend for lunch a few weeks ago, I mentioned this and she said that she had been wanting to make one for ages...now she isn't into craft, but she made one and posted it on Facebook last week...it's fabulous!

Thanks so much for stopping by!

Love and hugs,
Carole X

Wednesday 25 June 2014

WOYWW 264 - Wednesday 25th June 2014

Good Morning Friends,

Thank you so much to those of you who for popped over and leaving comments on Sam's blog yesterday...so appreciated! Glad you liked the candles...we did actually sit outside and have it all on the table on Sunday evening! If you'd like to look the link is http://www.creative-studios.co.uk/oh-those-summer-lights


WOYWW 264

I'm back with my desk after being awol from WOYWW for a few weeks..for anyone who doesn't know what WOYWW is all about, click the link and head on over to  Stamping Ground, where the wonderful Julia will let you know what it's all about. I was sorry to hear that Julia has been poorly, so sending a big hug and well wishes!

This week isn't so much what's on my desk, but my desk...and believe me you will never see it this clear again!

Some  of you know that I am lucky enough to have use of our old summer house as a little second art room and a few weeks ago, I posted on here that I had bought a very old desk,  which I intended to up cycle  and use in said little art room in the garden.

This is the desk when I bought it for a very small amount in a local antique shop:

As you can see it was pretty old and sad looking :(

This was it last month when I started off by sanding it and given it one coat of paint. I had to work on it in the garden, so have been extra pleased with the good weather we've been having recently :)

I used an oak wood stain for the desk top and Annie Sloan Chalk paint in 'Original' for the desk itself.


I wanted the drawers to contrast to the creamy colour so I used ........After painting, I waxed with  Annie Sloan clear wax and then sanded away some of the paint. I've never done this on such a big piece of furniture before so I didn't distress too much (though more than the photos show!!!). I may go back in and do a little more.

After the first waxing, I added some  dark wax...this was the scary bit: the clear wax goes on quite dark but dries light, the dark wax is very dark! I rubbed it in and then went back with another coat of light wax. I used a round wax brush which was brilliant to use, but still hard work. When the wax was dry, I wiped all over with a soft cloth. I also waxed the top of the desk.

Here's my desk from the side with the old chair that I also recently painted. Now we have to clear our some items that have found there way into the little summerhouse and get  into it's new home (below). Had it been just a little smaller, I think it would have found it's way into the house, but it's just a little too big for the space we have.

Well for a first project of this type I was pleased with the result and I am sure it will be with me for many years to come...if I decided to shabby chic a bit more, I'll post pictures!

Thank you so much for stopping by - I'll look forward to visiting your desks today,

Love and Hugs,
Carole  X

Tuesday 24 June 2014

Warm Summer evenings....Tuesday 24th June 2014

Good Morning Friends!

It's Tuesday again so that means my weekly Design Team project for Sam Poole's Creative Studios. This week, working with Sam's latest nautical stamp set I've created some home decor items for summer evenings...here's a glimpse, but please pop over to my post on Sam's blog for full details and more photos...I have 'hidden' a couple of makes behind the glasses and there is a short tutorial on decorating candles with stamps.

Here's the link: http://www.creative-studios.co.uk/oh-those-summer-lights

Whilst you're there if you could leave a  little comment, I'd be so appreciative!


Many thanks!!!

Love and Hugs,
Carole X

Monday 23 June 2014

Bears don't Surf? Monday 23rd June 2014

Hello Friends!

Some of you may have noticed that the title of this post is  a bit of a take on a well known quote from one of my favourite movies, Apocalypse Now...okay, maybe a bit too obscure if I had to explain it, lol! I studied it in depth at Film School, so it will always have a place in my top 5 movies and when I see it I will forever have to analyse every scene :)

Anyway, this card is one of two similar cards I made - one as a request from someone and this one for my friend's son's 16th Birthday. They love Cornwall and the beach, so this card is just a bit of bright, summer fun!

  I have no idea what made me choose this bear stamp by Sam Poole for my focal image...I do love this image so much that I will find ways for it to pop up in cards - be warned - ....I wanted the card to be a bit of fun and to include something that you wouldn't expect to find on a beach...now one of you is going to tell me that you have seen a bear on a beach aren't you??

 I do need to make one for one of my cousins in California, after all the  bear is their State emblem and as he surfs most days and has a wacky sense of humour, I think he'd really like it!

I used blue card to layer the front of a 7x7 card blank and mat and layered with ice cream paper by Pink Petticoat   - the little beach huts are also from Pink Petticoat.  The yellow sun/ star paper with amongst my paper stash. The surfboard is one of three digital stamps downloaded from MacMahon Five designs...just click on my sidebar link to visit. I thought the design on  this particular board could pass as paw prints!

The bear, huts and board are coloured with Promarkers and although you can't see it in the photo, I painted the board with glossy accents to give it some authentic shine. I think that the bear really has a look of 'What am I doing here, when I should be up in the mountains catching fish from a river"!!!

To finish I stamped the '16' using black archival and then heat embossed with a black glittery embossing powder. The stamp is part of a numbers set I got at Ally Pally a few  years ago and is by Darkroom Door...a very useful set as the individual stamps are quite large   The greeting is computer generated.
For the inside of the card I coated the base with yellow card and then printed off the fish paper from Pink Petticoat, I also printed the greeting from Pink Petticoat. I tore the paper to place across the centre and added another surfboard.

I also made a little gift card holder with paper from the same pad:


Did you all have a good weekend? I spent a few hours Saturday with some of my volunteers from work, at the Chipping Sodbury Festival Day, it was a very hot  day, but our stand was right outside my friend  Amy's shop and she very kindly brought us out a very welcome cuppa! Yesterday I spent the afternoon finishing off my old desk...all will be revealed for WOYWW this week.

Last Friday, Amy and I had our Festival Workshop, where our group made cards using Lavinia stamps. They all seemed to enjoy it and made some lovely cards. I have a few photos to share, but some of the group had left before I got my camera out and sadly some of the photos were really blurred when I downloaded them, which was rather a shame...here are some of the finished cards...


That's it for today...I will be back tomorrow with my weekly post for Sam: I have had such fun creating this weeks post. I love creating 'seasonal' home decor, so I've been making some items for the summer using Sam's nautical stamps...please check back tomorrow and thank you for visiting!

Love and Hugs,
Carole X

Friday 20 June 2014

Fairy Wishes

Hello Friends,

I'm back with Lavinia Fairies, but promise this will be the of my fairy for a little while - apart from card class photos tomorrow...(I'll save the rest! to slip into my posts now and then!). I really have been enjoying using them again!


Today was our 'Out of the Blue' special card making class for the annual Chipping Sodbury Festival. This year the theme is Disney. We chose fairies as they are widely featured in Disney, but we wanted to make cards that are more appealing to adults.

This was the card design I made for my part of the group- they did have a choice of two feature stamps and I did make another card but I'll save that one for another day. I did take a few photos and will share them with you tomorrow.


This is a 7x7 easel card: I first of all stamped the two large pale blue panels using a foliage stamp by Creative Expressions. I just touched the edges, stamping with Blue Lagoon Versafine ink. I  then inked around the edges using Chipped Sapphire distress ink.

I then made a 'moon' from a die-cut post it note (I found some that are totally sticky on the back, which was really useful). I inked the edge of the card using Chipped Sapphire and gradually worked this towards and around the moon, getting lighter towards the centre. Next I used a darker distress ink, Faded Jeans, just to increase the depth of colour around the edge.

I removed the post it note to reveal the moon and stamped the girl, stars and pixies using black versamark. I then used Lavinia stamps - orchid, around the edge of the layer and little mushrooms.

Next I stamped 4 butterflies on acetate and heat embossed with an iridescent embossing powder. I cut out the butterflies and glued two together, so I ended up with two butterflies. I glued one to the image layer and set the other aside. 

I die cut the 'stopper' using Spellbinders Labels 17 three times in decreasing sizes and to the final layer I stamped the sentiment, which is is from a set by Dreamees. Before  gluing the layers to the card, I added the ribbon.

To finish the card I added a butterfly to the stopper and although you can't see it in the photo, plenty of stickles glitter.

Tomorrow I am out early as I am volunteering...one of my office volunteers had the idea of a stand at Festival  Day to promote volunteering, so we are going to give it a go and I thought that as all my volunteers are giving their time, mine should be voluntary as well. At least it looks like the sun will be shining!

Hope the sun shines on all of you this weekend,

Love and Hugs,
Carole x


Thursday 19 June 2014

Space Boy - Thursday 19th June 2014

Good Morning Friends,

Hope you are all well and still enjoying fine weather wherever you are...I know one of my dear blog friends has been poorly with a bug these past few days, so hope you're feeling better Claire!

Thank you again to those who popped over to Sam's blog and left a message there about my DT card this week...especially as there were some problems with the site for a few hours. Thanks for persevering and popping back, it meant a lot to me. I enjoyed making this week's card (well I've enjoyed making them all!) -  I love big bows but rarely use them,  but the striped ribbon was really crying out for a great big bow!!! I've come to the end of the cards made for Sam's TV shows now and am working on a home decor project for next week!

Anyway, today I'm giving you a break from the fairies (there are plenty more!) and  am sharing  a card that I was  recently asked to make for a little boy's birthday.


The backing paper is from a pad I had in my paper/card stash and the space ship and other elements on the from are from Nitwit Designs. "Spaced Out' collection.

The image is a stamp by Lili of the Valley, which I coloured with Promarkers. I also got the inspiration for the card from their blog as I have to admit 'Mr Mojo' was taking a little break when I made this card!

 Inside I again used paper and images from Nitwit Collections.

Not a difficult card, but a fun one!

Love and Hugs,
Carole X

Tuesday 17 June 2014

Just for You! - Tuesday 17th June 2014

Good Morning Friends!


Well it's Tuesday again, so I have another DT post for Sam Poole's Creative Studios....this week I have a simple layered card to share:


Please click on the following link and head over to Sam's blog, where you'll find full details of this card (outside and in!) plus a little tutorial on the 'out of the box' die cutting technique... http://www.creative-studios.co.uk/just-for-you-three
Thank you so much for popping over there every week, I really do appreciate and love reading all your comments!

Many thanks,

Love and Hugs,
Carole X

Monday 16 June 2014

My First ATB! - Monday 16th June 2014

Good morning Friends!

Did you all have a fabulous weekend...? With lots of Sunshine...? It has been beautiful here, so we have spent a lot of time outside! Actually, Saturday I was quite pleased England vs Italy (a toughie for Tom, being half Italian!) was on late, because I stayed up for a very late night crafting session in my craft room, which was brilliant!

I also spent quite a bit of time working on the old desk I got my hands on a few weeks ago..it's all painted, I just need to make sure that I haven't missed anything and then I have to distress and wax it...the slightly 'scary' bit, but also the part I'm looking forward to the most...there should be a reveal soon....

Today is something new for me...inspired by my lovely and so inspirational blog friend Anne -Redanne, I have created my first ATB ''Artist's Trading Block". Anne has made some incredibly stunning ATBs and is now, very deservedly on the Artists on the Block design team.  If you haven't yet come across Anne's blog, you really should check it out. Anne was one of my very first blog friends when I started blogging and I have been in awe of her work from the start. I had better shut up there because I see her blushes!!! But it's all true.

I had never even really got into making ATCs and totally missed joining in with the ATC swap hosted by Julia at Stamping Ground to celebrate the WOYWW 5th anniversary. However my lovely blog friend Claire - who made some fabulous ones, was so kind to send me one, so I was inspired to make one to send back to her...what fun!

My ATB - Fairies, Butterflies and Fairies - a Mid-Summer Night's Dream!

My ATB,  was made using fairy stamps by Lavinia  and what a joy it was to make!

I made the block using the Sissix 3D cube die and purple card. I measured layers for each side and inked the edges of each panel using Seedless Preserves distress ink. I used a different Lavinia stamp on each side, all stamped in black onyx versafine ink. 


The door was stamped twice: I cut the door our of the second stamping and adhered it to the original image so that it opens.


I stamped a second vine leaf image, which I layered to hang off the side of the cube and also stamped additional wings on acetate, coated with gossamer lilac embossing powder, heat dried and adhered to the fairy using Cosmic Shimmer dries clear. I repeated this with the wings on the second fairy; for the pixies I added stickles to the wings


For the top I used the Zen flower stamp from Lavinia and stamped it three times to layer. I then  'painted'  each layer with mica powder. 


Finally  I  added the stamped butterfly. I stamped the first butterfly and coloured  with micas. I cut it out, chopping off the antennae/legs(ouch!). I then stamped a second butterfly using versamark ink on acetate, added the gossamer embossing powder and heat dried. I then cut it out, this time leaving the antennae and tail/legs. The embossing powder dries to a soft  shimmery lilac and I was really pleased with the effect.


To complete the ATB I added crystal stickles to all the wings. I also added gems, which were colourless, but I coloured purple with a promarker. I added the gems to the butterfly wings, flower, plants, fairy dust and door. I also added beaded legs to the butterfly, which is suspended on wire above the block.


As I used a lot of stamps, I've listed them below the post...when we decided to do our workshop this week using Lavinia stamps, I was able to get out all the ones I own, as well as the ones Amy gave me to play with, so I've been having a great time!


I'd like to enter this project into the:

Lavinia Stamps Challenge #6: Add some beads or gems

&

Art with Heart June Challenge - Summer Creations because butterflies & fairies bring to mind mid-summer evenings in the garden


ml
Thanks for stopping by and Happy Crafting!


Love and Hugs,

Carole X

Stamps used for this ATB: all Lavinia

Fairy Door - small
Vine Leaves 
Fairy Dust Silhouette
Small pixies
Flower Fairy
Stars
Zen Flower 2
Butterfly


Saturday 14 June 2014

A hot day out! - Saturday 14th June 2014

Hello Friends!

Wow yesterday was hot!! We went to the Three Counties Show at Malvern...this is a very large Country/agricultural show...we had a fabulous time, even though it was really a little too hot (never satisfied!).

There is so much to look at...the usual 'shops' and trade stands, the cow and sheep judging, blacksmiths students in competition and of course we headed straight for the poultry tent, where silly me started blubbing as soon as I saw the Buff Orpingtond :).

We saw the Red Arrow team parachute in to the arena (so amazing),  show ponies and one of the highlights for me was the mounted games. When I was a child, we simply called it gymkhana and I loved it...it was nice to see that the games were still the same and it brought back so many childhood memories of when I was on the back of a pony every chance I got!

Here are a few photos...including one of a Zorse...the only horse cross zebra in the UK and these darling alpacas...they really know they're cute don't they?

That's all for now, be back tomorrow with craft..

Love and Hugs,
Carole X
A Zorse, you can just see the stripes 

vintage tractors

Alpaca..cute!!


Thursday 12 June 2014

Sunday Stampers 311, You Gotta Friend - Thursday 12th June 2014

Hello Friends!

Thank you so much once again for all your comments over on Sam Poole's blog on Tuesday, glad you liked the stationery set, I had fun making it - but it was the 'packaging' I enjoyed most! I would also like to welcome my latest follower, Annie Sharland..thank you Annie for choosing to join my blog friends!

Well we've certainly picked a lovely week to have off work! I had two days on my own - crafting (of course), yesterday we went into Cirencester for some lunch and a wander (I have more 'Hare Trail' photos to share soon). Today I went into work for a meeting whilst Tom waited in for the annual gas check and we have just had a kitchen designer come to measure up, let's see what he comes up with!

Tomorrow we are going to the Three Counties Agricultural and Country show at Malvern...to be honest I think we both like going so much for the poultry show...don't tell our girls... but it's a great day out!

My card for this week's Sunday Stampers challenge set by Hels Sheridan..click here for deets..is another of my Lavinia Stamps demos for our workshop next week. Hels set the theme of friendship and I think this stamp says it all...it could be for a best friend or a loved one, in fact I made our anniversary card using it last year.


I first of all created the background using a brayer and these inks: Distress inks - Ripe Persimmon, dried marigold and Adirondack, Sunshine Yellow. I created the moon by making  a mask from a die cut circle; I also moved the mask slightly across the moon to create a shadow. Once I was happy with the background I stamped the fairy couple in front of the moon and stamped them with black versa fine ink. I then stamped the image again on a post it note to create a mask, stuck the mask over the image and used the tree trunk stamp to stamp across the width of the card, providing a seat for them to sit on.

I used the vine leaf stamp (I find this such a useful stamp) to create a frame and then across the bottom of the card stamped "The Butterfly Field', a stamp by Phill Martin for Creative Expressions, another lovely stamp. All the additional butterflies are also from this stamp set. To finish I mat and layered on white and black card and added some stickles glitter, especially to the wings and grasses.


Inside the card I stamped this sentiment from Indigo Blu and added some butterflies and toadstools to follow through the mystical theme. I then matted on to black card.

Thank you so much for stopping by and do leave a comment, I love to read them,

Love and Hugs,
Carole X


Tuesday 10 June 2014

Nautical Stationery - Tuesday 10th June 2014

Hello Friends,

Thank you so much for stopping by, well you know how much  I appreciate it! I hope the sun is shining where you are, as it is here! I have this week off work, these two days on my own and then Tom has the rest of the week (I do have a meeting to go to Thursday morning, but that's ok!). So yesterday I tried to cram lots of 'fairy' crafting into my day. I didn't make many cards, but I made a lot of backgrounds.

But today, is Tuesday and time for my DT project for Sam Poole at Creative Studios. I thought I would have a change this week, this isn't one of the projects that was made for Sam's TV appearance last month. This is a stationery set - co-ordinating notecards, envelopes and a notepad in a little presentation package.


There are more photos of the individual elements and full details over on Sam's blog and as always, I would be so grateful if you could pop over and leave a short comment please. Sam has changed the blog slightly so all the DT posts are on the main blog and this is the link to my post http://www.creative-studios.co.uk/nautical-stationery-set

Many thanks and have a lovely day,

Love and hugs,

Carole X

Monday 9 June 2014

Fairy Fleur - Monday 9th June 2014

Hello Friends,

I hope you all had a good weekend and the sun shone! I had a busy one, helping out at the Julia Watts demo day on Saturday and yesterday we picked up Tom's parents from the airport (they've been on holiday in Italy) and then all went to lunch.

Today's card is another card made using Lavinia Stamps fairies: we are basing a special Chipping Sodbury Festival workshop on a fairy theme in a few weeks time (because the festival theme is Disney), so I have been playing with my stamps for examples and to decide on the card my group will make.

We were asked to put on a special  festival workshop last year, where the theme was The Beatles and Amy and I  had great fun basing cards around Beatles lyrics. This year the theme was originally to be First World War commemorations and we had great ideas with poppy stamps...then it got changed to Disney!

Although we aren't totally going down the Disney route with our cards, we have to give a nod to the theme,  so  we decided to  use the mystical fairy silhouettes that Lavinia produces. Actually from what I've read about the movie and the photos I've seen, I think the images Lavinia creates will fit in nicely with the new Disney movie Malefficent, so we're right up to date!

I was playing with the background more than anything with this one, so if I decide go with it, I may change the fairy to one that looks more 'traditional'. However, I do really love this stamp.


I am working on a  selection of cards using Lavinia stamps and for a few of them I created my backgrounds using a brayer. But this wouldn't be practical in the workshop at the moment, so for others I just used inks and cut n' dry.

I inked this one using 2 colours: Dusty Concord distress ink and Purple Twilight adirondack. I used Cut n Dry to apply the inks. To create the moon, I die cut a circle and used it as a mask. For the mountains I tore copy paper into sheets and also used it as a mask. Using both colour inks to create depth.

The Vine stamp is also by Lavinia, but the ferns and quote are from the Dandelion Wishes set of stamps by Creative Expressions and the tiny butterflies are by Majestix. The main fairy is 'Fleur' by Lavinia.

I coloured  'Fleur' in with the inks I used to create the background, just painting in with a brush. I also added glitter to Fleur and a little to the ferns (you have to have glitter with fairies!).

Inside the card I stamped the greeting from Phill Martin's Birthday Verses stamp set for Creative Expressions (another Ally Pally buy and very useful!) I stamped the vine leaves in the corners and the little starbursts.


That's all from me for today, I'll be back tomorrow with this week's Sam Poole DT post, meanwhile enjoy the rest of the day!

Love and Hugs,
Carole X

Saturday 7 June 2014

Good evening Friends, 

I hope you are having a good weekend! I've  had a super day  helping at the demo day my friend Amy had organised through her shop, for the lovely Julia Watts from Creative Expressions and Create and Craft TV to come and do some demos during the day. Well done to Amy for arranging it and to her mum, Diane and the other two staff members because they had a heck of a busy day back in the shop!

Over 70 people booked (average 15-20 per session) and Julia provided some excellent techniques with shimmer paint, chalk paint, micas, mists, texture pastes masks and stamps. Everyone seemed to enjoy it and I think purchased a lot of the items to try for themselves. I was certainly eager to get in the craft room when I got home, but I was too doggone tired! I'm glad Tom's cooking!


 Thanks for stopping by!


Love and hugs 
Carole


Friday 6 June 2014

Lest We Forget - Friday 6th June 2014

Good Morning Friends,

Today, for the 70th Anniversary of D-Day and I wanted to make a card in remembrance of those brave troops who gave their lives for us.

It's a simple Easel card: I created the poppy background paper using a single digital stamp and the main poppy stamp is by Hobby Art.


Let us never forget the sacrifice of these brave people. 


A personal reflection: My parents were older parents...a good 15 years older than most of my peers. The war was partly the reason for this, but had it not been for the war, they would never have met. My dad had emigrated to Canada aged 14; when war broke out he joined the Royal Canadian Engineers and fought in Italy and Holland. I have his medals and his battle record framed and every time I pass it, I wish that I had talked more with him about his experiences, but he passed away when I was in my 20's, married and no longer 'Daddy's Girl'. I was able to talk to my Mum at length about her experiences here at home, but I should have asked Dad more questions. Dad didn't take part in the landings, he was in Italy, although one of my uncles did.

The wonders of the internet mean that I am able to look up and read about every battle he was involved in from Ortona to Arnhem. He met my mum when he was in England on leave visiting his mum. He had been sent here to recover after being wounded. Dad remained in the army until the war ended and he was de-mobbed and then he returned to England and married my mum in 1948. I know he would have liked to return to Canada, but Mum was one of 11 siblings and didn't want to leave. Mum loved children, but over the next 12 years she suffered a succession of losses  and then had a son who lived only a short time, before I came along as, so you see, quite late in life...a child for a new decade away from the war, the 1960s... It didn't matter though, I never noticed growing up, they were amazing parents. 

Dad did eventually convince Mum to visit Canada, after they retired and she loved it. They stayed over a year and Dad was able to claim his Service pension and reconnect with some old army buddies. I am so pleased he got to go back, because I think in his heart it was always home.

I really wish that Dad especially was still here to celebrate today with our nation. I know many of his Canadian comrades were there, including Lawrence, whom they stayed with when Mum and Dad went back to Canada. Sorry to have gone on a bit, but it's at times like these that I really appreciate what they all went through, as have the service men and women who continue to fight for us -  and how important it is always to remember.


Sapper L C Bateman 1632, Royal Canadian Engineers 1940-46.
The photo is dated on the back May 27th 1944


Thanks for stopping by,
Love and Hugs,
Carole X