Total Pageviews

Friday 31 October 2014

Happy Halloween! - Friday 31st October 2014

A Spookylicious good morning to you all!

I made quite a few Halloween inspired decor makes this year, but not so many cards so today a card!


For the side web background on this card I used the Tim Holz 'Shatter' mask, which was gifted to me last year by my lovely blog friend Anne (Redanne)..what a lovely surprise it was too! I actually had quite a few cards 'lined' up using this mask, but in the end only managed to make this one.

I inked it with embossing ink and ran it through my GC, then I coated it with  WOW gold embossing glitter. I added the digi stamp and the little dangling spider is a rubber stamp. I coloured the girl's hair quite 'messy'  and it doesn't show in the photo but I  streaked some gold  'wink of steel' through the hair.

Inside the card I die cut this Sizzizx  'Boo' '31' die on to purple glitter card and placed it inside so that it pops when the card is opened.


I didn't get time to use my new prize die, so it will have to wait until next year and I'm in work this morning so this post is scheduled. When I get home this afternoon, it will be time to decorate the front porch! I'll post some photos tomorrow x

Happy Halloween all!

Love and Bugs...oops I mean HUGS!

Carole X

Thursday 30 October 2014

Autumn Lantern - Thursday 30th October 2014

Good morning friends,


Today I would like to share another lantern with you...similar to the Halloween one, but this time with far brighter colours!

The basic lantern is from Clevercut and I painted it exactly the same as the Halloween one, using acrylic paint for the base coat and to rust it up. Although I held back a little on the 'rusting' for this one.

 I had the little pumpkins, burlap leaves and burlap ribbon on my fabric stash box, so it was just a case of decorating it.


Inside I painted a battery taillight with orange paint and added a few die cut leaves to decorate it.


 That's it for today...I had a lovely prize in the post yesterday, as I won a Spellbinders 'Jack O' Lantern' die in a draw that she held. I was so pleased to win it and I will have to see if I can squeeze one more Halloween make in before tomorrow!

Thank you so much for stopping by!

Love and Hugs
Carole X


Wednesday 29 October 2014

Pumpkin Patch - Wednesday 29th October 2014

Hello Friends,


No WOYWW again for me this week, hopefully back by next week with that! Today I wanted to share some pumpkins!

I made these just sat in front of the TV during evenings(after cutting out and any machine sewing) when we were on holiday at home whilst our kitchen was being fitted in September. They are so simple, just from remnants of material. The large one makes a lovely autumnal cushion!


All you need is fabric, embroidery floss, twine, yarn or heavy weight cotton, felt, toy stuffing, scissors and needle -  

 1.Cut two pieces of fabric that are twice as long as they are high and when folded in half make a square. You can make your pumpkin any size you like.

 2.Fold in half right sides together and sew up the side opposite the fold - you can sew by hand or machine. I used my machine for the three largest ones, but the others I sewed by hand.

3. Using embroidery floss (for strength) stitch a running stitch along one of the open sides through both layers (seam allowance about 1cm). When finished pull the thread to gather it and tie the ends.

4.Turn right side out and stuff with toy stuffing and then stitch all the way around the top. When you've finished pull the loose end in tight and you should be left with a ball shape.

5. You can squash it down a little  and then take some yarn or twine and wrap it around the ball from top to bottom, then pull very tightly and knot securely.. This is how you give the pumpkin shape, Repeat this around the pumpkin on opposite sides until you have 6-8 sections, depending on the size of your pumpkin. To make the leaves I die cut some felt pieces.  

6. To make the stems I used brown felt, cut into strips, coiled and glued together with fabric glue before sewing into the top of the pumpkin.

There are lots of good tutorials for these pumpkins on YouTube.

The little angel is a little 'Prim' hanger I have had for years, she was hung on a door handle in our old kitchen, but after the pumpkins have been put away, I think she will be living in my craft room!

Thank you so much for stopping by and leaving a comment, I really do appreciate it...I'll be back tomorrow with another lantern and on Friday, with a Halloween card...what else?

Love and Hugs,
Carole X 

Tuesday 28 October 2014

Trick or Treat - Tuesday 28th October 2014

Good Morning Friends,

I was up very late crafting last night...got to admit I'm not usually at my best as a night time crafter, but Tom is away, so I knew I'd have trouble sleeping and crafting was the better option! I made some birthday cards for family and friends who have birthdays next week, so I was quite productive!

Now I am up early to share with you a couple of treat boxes I made recently - they will be for the neighbours children when they come knocking.

 This one was made using a Sizzix box die and Boo die...then for the handle I used a Spellbinders border die. I have had that die a long time, I think it was the first border die that I bought. Simples.

 For this box I cut the two largest pumpkin dies from a Spellbinders set and then ran them through my GC with an embossing folder. I made a base and sides for the box, using part of the box die from above and adapting it and then joined the two together to make a box.

I die cut some leaves and adhered them to the box, adding some glossy accents for dew drops. To finish I added some ribbon, twine and a button.

Thank you so much for stopping by...I did say I would be posting workshop photos, but I still have some autumnal/Halloween projects to show before the 31st, so they will have to wait until the weekend!

Love and Hugs,
Carole X

Monday 27 October 2014

Christmas Joy - Monday 27th October 2014

Good Morning Friends,

I hope you all had a good weekend! I didn't get much time to craft, although I rarely do at weekends. My craft days are the week days I don't work, however I did start to get the Halloween 'decor' ready for Friday when I'll be decoratong the porch.

Thank you for all your lovely comments about my lantern...my lanterns and the Halloween scene were started back in the summer, working on them when I could find time in between paper craft 'commitments', but they were great fun to make.

Today I am scheduling this post as I am in work (not my usual day)..the new national volunteering database is being launched today, so this week I need to go in when my volunteers are there to make sure they are good to use it (and I am to, haven't seen it yet!!! lol).

This card is the one I designed for my groups to make in the last two Out of the Blue workshops for this year..Amy and I have a break now until January - she is of course very busy in her shop and I need to get to grips with Christmas, especially as I am making some presents this year. I will finish off Halloween tonight  as Tom is going to be away for work and then it's my quick Christmas cards, some special birthday and my sewing machine will be working hard to :). I don't normally craft at night, but when Tom's away I don't sleep well so I'll be up late!


We were going to be using this Dreamweaver stencil with Cosmic Shimmer Texture paste in the class and I decided to use a silver paste and make up the card using three different  effects.

I used black and pearlised card and an  8x8 blank. I hardly ever make large cards now -usually only for commissions and to be honest, since I offered 7x7 instead, most people are going for them. However this is a large stencil and I think that it benefits from the large card.

For the first pearl layer I stamped Sam Poole's mistletoe background stamp with versamark ink and then heat embossed using WOW snow twinkling embossing glitter. The small panel is embossed through a Grand Calibur using Couture Creations 'New Year Dove' embossing folder.

For the top black layer I used the stencil: because of time constraints in the class we were going to have to dry the paste with a heat tool...we did this a few years ago in a workshop we attended that was delivered by Lynelle Harlow who designs these stencils. When the paste is allowed to dry naturally it gives a glossy, flat effect which is gorgeous, but heat drying until it bubbles up gives quite a bit of texture, totally different but just as good.

I allowed the dried image to cool and then added some glitter using a glue pen, just to give a bit more sparkle.

To finish, I tied some sheer white ribbon around the panel and added a bow using the same ribbon. I tied so while tulle around the bow and then using glue dots I attached the layered poinsettia (Spellbinders) using some glitter paper. Finally I threaded a little bell through some white twine, tied a bow and adhered it to the front of the flower.


Thank you so much for stopping by, I will hopefully share the cards that the ladies made tomorrow,

Love and Hugs
Carole Z X

Friday 24 October 2014

Rusty Lantern Sunday Stampers week 330 - Friday 24th October 2014

Good morning Friends!

Sunday Stampers - Faux Techniques

Sorry I still haven't been around much lately...the kitchen is now finished (apart from a few little details) and I have got back into sorting out my times at work (at least for the time being!). Last night was our last 'Out of the Blue' craft workshop before Christmas and I will post the card my group made and the photos of their cards for this month over the weekend.

I have been a bit caught up in Halloween makes, not so many cards this year, but I've been out in the craft barn busily making and decorating autumn and Halloween items...now I can finally make some headway with Christmas cards and makes and try to catch up with some of you!

Thank you so much for all your comments on my Edgar Allen Poe-meets-Psycho landscape on my last post. I admit that I was really pleased with it and am looking forward to putting it in the window at Halloween. 

Today's make is another for Halloween, this one will be put on my porch bench, which I dress up for the Trick or Treaters...it also fits very well with this week's Sunday Stampers challenge from Hels Sheridan. 

As you know, lately I have barely had time to blog and haven't been able to make anything  for my favourite challenge in weeks...so am pleased to be back!

The theme for this week is to create something with a faux technique and of course add some stamping...my faux technique is rust and here it is...


The lantern itself is a plain mdf kit from Stamps Away/Clevercut; I've also made an autumnal one, which I will share next week and am working on one for Christmas. To paint it and create the rust effect I used a technique that Ally Reeve from Stamps Away has demo'd and it is really easy!

I painted the lantern after putting it together, using burnt ember acrylic paint. I then took some orange acrylic and a sponge, (just one of those we use in kitchens). I dipped it in a little of the paint and keeping it quite 'dry' dabbed it over the lantern to create a rusty look.

I did the same with the flowers, which is Sizzix Tim Holz Tattered Florals die. I die cut using a not too heavy plain card stock (I think I used a cereal box). I then painted these and stained them in the same way as the lamp itself, but the amazing result with the card is the texture! When you touch the flowers, they really feel like you're touching rusty metal, honest I have to touch them whenever I am anywhere near this project! Tom was suitably impressed too...I fixed them to the lamp using real rusty wire and it feels the same!


To finish with the non stamping decor, I took some burlap wired ribbon and painted it with burnt ember (they were selling large tubes of this for £1.99 in our local Works and I have made such good use of my buy this autumn!)

The stamping

I stamped various Halloween images, mostly involving crows (well after my last project I had to have a Poe lantern didn't I?) on to acetate and then heat embossed the images with clear embossing powder.

The stamps I used are from the 'Spookylicious' and 'Boo' sets by Chocolate Baroque


 To complete the lantern I painted the base of a battery tea light black and and placed in the centre


That's all for today, thank you so much for stopping by! I have some more autumn and Halloween projects to post this coming week, so please come back!

Love and Hugs,
Carole X

Saturday 18 October 2014

Once Upon a Midnight Dreary... - Saturday 18th October 2014

Hello Friends,


'I reined my horse to the precipitous brink of a black and lurid tarn that lay in unruffled lustre by the dwelling, and gazed down, but with a shudder even more thrilling than before upon the remodelled and inverted images of the grey sedge, and the ghastly tree-stems, and the vacant and eye-like windows.' Edgar Allen Poe, The Fall of the House of Usher


Well if there was ever a time of year for Edgar Allen Poe then this is it! I created this with inspiration from a mixture of Poe texts...The Raven, House of Usher and created a very dark scene for Halloween. The title is from The Raven (had to have crows, ravens somewhere here) and the vision is mostly House of Usher.

I love the fun of Halloween, our front garden will, as always be suitably decorated to reflect this and hopefully raise some "oohs" and 'aahs" from the Trick or Treaters ( I get a special tingle when even the teenagers compliment!), but I also like the more sinister and creepy images and tales.


I won't pretend this was easy or quick: this little scene took a long time to make in very tiny snatches of 'me' time over the last two months. I was also so tempted to keep on going with it (it just started as the little scene with the fence) but in the end I had to stop or it would never be posted...maybe next year it will expand!

So bear with me whilst I explain how it was created:

The background -  this is just A3 card, on which I painted some 'lightening' with white cosmic shimmer paint and highlighted with wink of stella pen.

The House - although the whole creation is a Poe homage, the actual house was kind of inspired by the Bates House in Pyscho. I wanted to go for a large and decrepit looking building.The main building is made from two large and one small block from the Sizzix Scoreboards xl die set by Eileen Hull. I wanted a slatted wood effect, so cut them using corrugated packaging and painted them using burnt ember acrylic paint. Once dry I brushed a layer of Cosmic Shimmer white matt chalk paint on top and then sanded it back to reveal the burnt umber and give it an old and worn effect.

The side part is made from the Sizzix Cottage die by Brenda Walton. I cut two, layering one on top of the other and painted it in the same way as the main building. I free cut the windows, details and door opening and I cut a little figure to stand spookily in the door way. I cut the steps simply by making a concertina from black card and dusting with white paint.

You can't see in the photos, but I used a glue gun over the house to create a web effect.


The Graveyard:

The fence is an mdf art part from Anna Marie crafts. I painted it with burnt ember and then sanded it back before finally adding a touch of rusty hinge distress ink. The barbed wire is simply rusty wire with knots tied at intervals. 


The tree  with the owl is an art part from Calico Crafts, as are the bats and pumpkins. I painted the tree using burnt umber and the bats in black sparkle. For the pumpkins of course I used orange!

I used dried out grapevine for  decoration and some little die cut leaves scattered on the base. The base is just some wooden packaging.

 The stamps: I used rather a lot of stamps in this project!

The owl at the top of the house  and the cat are by Chocolate Baroque
The The gravestone with raven  and 'Be Afraid' sign are  also from Halloween stamp sets by Chocolate Baroque

On the ground is a Poe quote from the poem A Dream within a Dream: "Is all that we see or seem but a dream within a dream?" - the stamp is from Crafty Individuals. The ravens in flight above the tree are also from the same stamp set.


The pumpkins hanging from the tree are also by Chocolate Baroque. I photographed these separately as they are hard to see: they are coloured black with orange faces (Promarkers) and then coated with glossy accents, so still a little hard to see I'm afraid,


 The pumpkins at the foot of the steps (see picture 1) are a stamp from a Hampton Art set I bought in the US last year.


The moon is part of the tree; I backed it with vellum and illuminated it by suspending  a battery operated tea light behind.


 That's about it..what fun it was to make...I love doing things like this, just wish there was more time to do it!


I'd like to enter this project in the following Challenges:

Art with Heart  Tricks and Treats Challenge - 

http://www.eileenhull.com/2014/10/spook-tacular-sizzix-projects.html

The Sizzix Challenge - Halloween 

http://blog.sizzix.com/sizzix-challenge-halloween/


Artists Trading Post Mixed Media Halloween Challenge -http://artisttradingpost.blogspot.co.uk


Thank you so much for stopping by, I know Halloween, especially the darker side isn't too all tastes, but I am such a fan and it was still fun to create!


Love and Hugs,
Carole X

Friday 17 October 2014

Christmas Delivery - Friday 17th October

Good Morning Friends,

Catching up, an accolade and new pens!

Well, I hope I have managed to catch up with you all this morning, even if I have just managed to comment on your latest posts. I was hoping to get back on track this week, but it's been a bit of an up and down week really...first there was news about a good friend's health which has been such a shock, that I can't stop thinking about her; I've been working odd days and had a library meeting last night, which was fine...ssshh...but it is literally the only meeting I go to that I enjoy! Probably because they are a nice bunch of people and there's no work pressure.

Tomorrow morning myself and a couple of my volunteers are taking part in an event in the library aimed at people who are soon to retire (though anyone can come), we will be extolling the benefits of volunteering.

Because my work days were messed about this week, I was actually home Tuesday and Wednesday and it was good to be home two days in a row. I got a few Christmas cards made, some Halloween bits and pieces and made a start on the birthday cards I need to make. I have some commissions from a regular customer who gave me her year's requests back in January and a lot of friends and family have their birthdays coming up in November...then yesterday one of my librarian friends asked if i could make a retirement card for the lady who drives the mobile...by next Thursday! I really have no time, but she is such a lovely lady, I just couldn't say no.

I have been working on a mega Halloween creation, remember my haunted house? Well this is a whole scene and is seriously Edgar Allen Poe. I'm having problems getting good photos, so am going to have another go after writing this post!

Speaking of my haunted house, I was thrilled to  receive a Top 3 in Eileen Hull's Artists on the Block Challenge: http://www.eileenhull.com/2014/10/spook-tacular-sizzix-projects.html

I thought of the joy I felt when I heard I got this placement (thank you Anne, I saw your comment first letting me know the news!) when I read Darnell's very inspiring post today, in which she talks about how we feel when we do or don't receive comments or accolades about our craft. I had put a lot of time into that house, so to get a bit of recognition for it did raise a big smile.  If you haven't read Darnell's post,  pop over and have a look, because I am sure it applies to us all....http://www.djkardkreations.com/2014/10/enjoy-journey-banishing-old-man.html


Now finally to today's post! I am a very lucky girl because recently one of  extended my US family sent me some pens. An illustrator friend had passed them to her,in case she knew anyone who could use them. She isn't a crafter so she had no use for them and sent them over. I received them at my busiest time, thought they looked very interesting, but resolved to leave them in the box until I had time to play..yeh right! Within a day I had them out (late at night, when I normally don't craft) and made this card, but I haven't had time to post it before.


I am a Promarker girl through and through, I have tried other pens but none have even tempted me to replace my beloved promarkers. My dad, when he drew a cartoons used them, a person I used to work with who did graphic art used them and I love them. I have a big collection and intend to keep it growing...but these pens are a totally new idea and I have to admit I love them!

They are called Chameleon pens and imagine by amazement the other week when I happened to tune in to Create and Craft whilst I had an hour to craft and saw them there...not only that but it seems you can only buy them there in this Country for several months...what a wide smile, I have them and they were a gift!


These are alcohol pens, just like the Promarkers and other makes, the difference in these is that you can create a great number of shades with just one pen by using a mixing chamber included in each pen. They will take a lot of practice to get used to the mixing. I thought I would find that part a bit tiresome, but I didn't and they have a good site with tutorials. They aren't meant to replace your usual alcohol pens and they worked perfectly in conjunction with my Promarkers, which would still be my first choice for something where not much blending and highlighting is needed, but you will be seeing a lot more of Chameleons on here!

All the green on the car was coloured with one pen, using the mixing chamber to lighten the colour...I was pretty pleased with it as the first time I'd used them. This was several weeks ago and I've not had much time to colour since, but I have used them a few times and I can see that they could become an addiction! :)

This is a Stampendous stamp, that I think I brought back from the USA last year. I created the snow using Cosmic Shimmer Glitter Jewels: Iced Snow, which give a lovely glistening raised effect as they are quite thick in texture. The backing paper is from a paper pad by Lily of the Valley that I bought last year.


Well I am  off to try and photograph the spooky scene whilst the sun is still shining making the light  a bit better! I realise I have still not show the photos from last week's workshop, so will endeavour to do so at the weekend.


Love and Hugs
Carole X

Friday 10 October 2014

Happy Fall Y'all - Friday 10th October 2014

Good afternoon Friends,

Well I don't seem to have been around blogland much lately, but hopefully all getting back to normal now...except of course for the rush to make Christmas cards!

Our workshop at the library on Tuesday went well...my first day back at work and because I work in the library, I thought it was pointless to come home, so I worked through...10 hours plus the 2 hours crafting, but it was ok...I got a lot done and I broke through the 'tired and why am I doing this?' barrier by about 5pm!

It was a small group of totally new people, but they  really enjoyed making the Dasher card...one lady on my table hadn't crafted in a while and was so thrilled with her card that she couldn't wait to show it to her family. I didn't inflict my camera on them though, save that for the regulars who know me!

Last night we did a Christmas card at our regular group, I did take my camera and will show the photos over the weekend.

This afternoon I have been home and as it was so beautiful in the sunshine, I went out to  my little craft barn to keep the hens company and work on a Halloween model that I seem to have been making forever and can't wait to show, but it's not quite finished yet...the truth being I keep thinking of more bits to add to it.

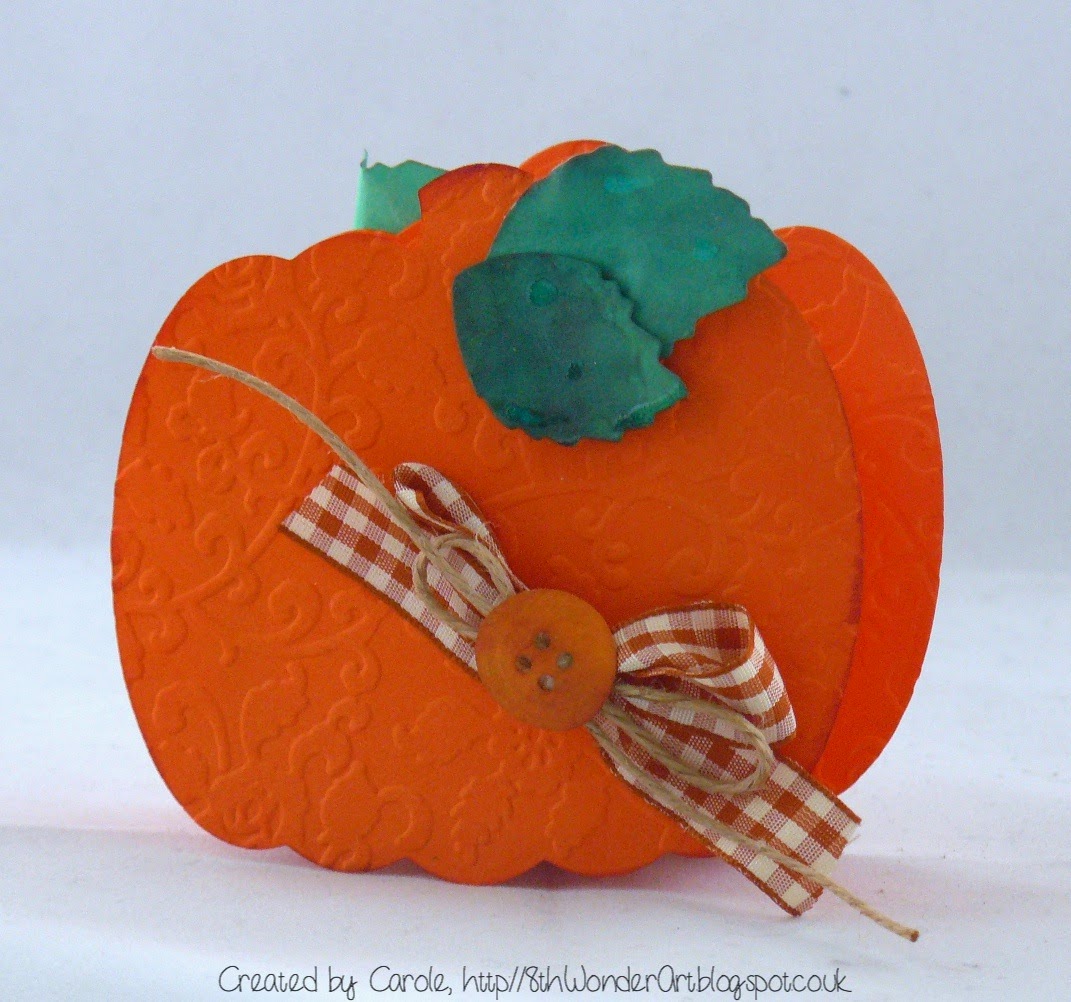
Today's card is a simple little seasonal card:

  I used a piece of kraft card to make the blank: the stamp, part of Inkydoodles Spring/Easter set (but which suits autumn equally well) is quite large, so I had to custom make a blank to fit the design. I used a piece of buttermilk card for the background which I embossed with a leaf M-Bossability and then inked the edges with Vintage Photo distress ink. I coloured the scarecrow with Promarkers and inked the background with Salty Ocean distress ink. The pumpkins are Spellbinders dies, die cut on to white card and inked through with Spiced Marigold ink. The sun stamp is from the same set.

If I had more time I would have stitched around the edge, but this time it had to be faux stitching  and I finished off with hessian, buttons and string.


Inside is a Prim Tag that I downloaded from the internet and inked with Vintage Photo. 

Talking about Prim craft, for almost the last 15 years I have gotten a lot of my Prim, folk and altered art supplies from an online craft Company called Calico Crafts, in fact they are probably the first craft company I ever ordered online from, so I have watched them grow over the years... great for papers, paints and all the mdf parts and little details such as rusty bells and hearts...Prim, Country, Steampunk..the lot.

 Last week I logged on to order a few little bits from them and was so shocked and dismayed to read a message in place of their website...their warehouse had burned down a few days before and they had lost their entire stock. I can't tell you how I feel for them having been a customer so long.

They are keeping optimistic that some time they will start again, but it is such a massive clear up job. Such a shame.


Well friends, I want to end on a more uplifting note....close to us we have a Country/Equestrian shop...we go there fairly often because they also sell poultry supplies and it's a good excuse for me to drool over all the riding equipment and bemoan the fact that my body stopped me from getting in the saddle some years ago. I think Tom just waits for me to say (I always do!)  "if we had had all these body protectors in my youth, I might still be riding now!" :)...anyways, a few weeks ago they had a sale and we bought our 'girls' a present..and oddly enough, they seem to love it...as long as they are being bribed with grapes that is...here is our Chicken Gym!


Take care all!

Love and Hugs
Carole X

Monday 6 October 2014

Dasher in the forest - Monday 6th October 2014

Good afternoon friends,


Well I just did a quick round of your blogs, sorry for the quick comments but I still seem to be trying to catch up with myself!

Tom and I spent from Friday until yesterday lunch time painting in the kitchen..finally it looks like a kitchen and we can use it properly. We are still waiting for the glass splash back to be made and then the wall tiles will be placed and we'll be finished...another month I think.

I go back to work tomorrow and Tom went today - I don't think we have ever had such a non-holiday and felt so tired at the end of 2 weeks off! The first week was  enjoyable as we could at least go out, but last week was just working on house stuff...we painted the craft barn and the chicken coop. My back is very tender, but I'm due a sports massage on wednesday and am so looking forward to it.

For the last two weeks I have barely entered the craft room, but we have 2 workshops this week - a bit of a mistake after 2 weeks holiday, so I had to prep for them. The first one tomorrow night is a special 'one off' at the library, so as I work there and I can see myself being mega busy tomorrow, I probably won't come home in between!

The card the group is going to be making is based on one I made as part of Sam Poole's DT, I  only showed it on the last post I did before Sam went on maternity leave and that posted consisted of several projects, I've also changed it a little for the class.


It's a tent fold card using Dasher Deer and little trees stamps, please excuse me for not going into detail, but again this has to be a quick post, I'm still catching up with myself!


Hoping to slowly get back to normal blogging and commenting this week, meanwhile,
Love and Hugs
Carole X

Wednesday 1 October 2014

A Festival of Hares...and a Rabbit! - Wednesday 1st October 2014

HI Friends!

Rabbits and Hares, they're all so adorable!

Please excuse the 'wordy' and photo heavy update post...

A week ago was my last post...it seems soooo long! How are you all ? It's also now October, what has happened to this year? Where has it gone? I love the colours and festivals of the autumn/fall, I just wish this season lasted a bit longer and winter would hold back.

This is the second week of our two week holiday and partly because of being in 'holiday' mode and mostly because the house has been in disarray through the kitchen fit, I have not felt like crafting at all, I haven't even wanted to get on the computer. The 'craftiest' thing I've done in nearly 2 weeks is look at Pinterest on the iPad....and as I pin, say to myself 'great idea, gotta make it'... I have managed to hop on to Mac (a not very original name for my iMac) every few days to catch up with you all though...I hate blog stuff on the iPad.

In truth, all I want to be doing at the moment is make Halloween cards, decorate my wooden and mdf pieces that are waiting for me in the craft barn..but I have craft commitments which have to come first! I have made a particularly Edgar Allen Poe-sih Halloween 'scene', which I am excited to share with you all soon though.

On the subject of Pinterest, following my Prim Folk art post recently, some of you said you'd never heard of it and asked what it is...well it's a form of American Folk art, based on very primitive art and ideas. If you look on Pinterest under 'Prim crafts' you will see lots of examples. I also have  a Board dedicated to Prim art and crafts on my account: Carole Zorzo

The two kitchen fitters, Martin and Justin, were wonderful and I can't believe how tidy they were: they finished Friday lunch time except for one thing...there is always one thing isn't there? We had ordered a glass splashback for behind the hob, in aubergine and I was so looking forward to seeing it up! Thursday evening as they were leaving, I asked about it and guess what? They knew nothing about it. They made a call to Magnet and to cut a long story short, basically the designer hadn't ordered it...it has to be made to measure, so we have another week to wait. But that's ok, otherwise we love our new kitchen!

Within an hour of them leaving, Magnet sent in two ladies to give it a thorough clean, that was  a nice touch.

As I write this, the floor tiles are being laid and the kitchen is again bare of everything and unusable. We still have the walls to do and some painting and then it will be finished. I've added a few photos at the end of this post showing what the kitchen was like for four days between the guys finishing and tiler Dave, starting... take no notice of the walls! We couldn't make up our mind what we wanted, they will be tiled, we've decided.

We have had some proper holiday time in between house stuff and on Monday we popped up to Cirencester. I've been following their Hare Festival all summer - they had lots of hares placed around the town, some designed by local celebs such as Laurence Llewellyn Bowen and Emma Samms - now they have all been removed and are about to be auctioned for charity, The Gloucestershire Wildlife Trust.  Until tomorrow they are all on a pre-auction display in one of the hotels and what a sight they are...photos at bottom of post.

So it's appropriate that today's card features a hare (well it's a rabbit but we can pretend). I made this card a few weeks ago using Sam Poole's bunny from the Woodland Creatures stamp sets

 Please excuse me for not going into details of everything else I used, there are already too many words in this post,but please ask if you would like to know!


First the hares in all their glory...


There were three rows of these hares...the one in front is Bare Hare
Some of the mini hares...the one in front is Vinny the Gangst-Hare

Woolly Jumper & Blue

Flame, the Phoenix Wayfarer

Hicarus

This is Hareoh the Pharaoh and was my favourite

Harelequin


Harry, King of the Hill

some more little 'ins: Bob and Neville

Buck the Trend and Material Girl


Hare

Hopportunity Hare


Pebley Hare


Patchwork,  Via Albatine & Bellaire


 There were so many more, all of them gorgeous!

Finally, the kitchen so far..the colour is a sort of sage-grey, in some lights it looks more grey, some more sage :)
The stools are up cycled! We were going to get new, but these belonged to Tom's grandparents have have always been with us, so I knew he'd rather keep them. I painted them with chalk paint (my fave Annie Sloan) and waxed them, then covered the seats with a fabric that has an aubergine pattern.


I think the pull out larder was the best choice we made, so much more storage!


Phew! Well thanks for sticking to the end...!

Love and Hugs
Carole X