Total Pageviews

Showing posts with label greeting cards. Show all posts

Tuesday, 28 February 2012

Vintage Hollywood - 28th February

Good Morning!


The cards I am going to share over the next few days are all as a result of using some tools/stash I haven't used in a while, mixing them with some new additions and sitting down to experiment with a blank canvas!


My first one is a Hollywood inspired card..I probably should have posted this yesterday to coincide with the Oscars! Instead of all the usual glitz and sparkle, I tried a muted, worn, distressed vintage feel and this is the result...

I started with an 8x8 piece of cream card. Last week when Sue Wilson was on Create and Craft, she brought with her the card that she always uses for stamping and die cutting and as I had been anxious to try it, I ordered some. It arrived on Friday and I have to say I love it.


First of all I roughly distressed the whole card with Vintage Photo distress ink. Amongst my stash I had a sheet of 12x12 'admit one' ticket paper, so I added them to the spine of the card on the left side..it's weird because on the actual card, they look really neat compared to the photo! I printed the papers and topper from Debbi Moore's Diamonds and Lace CD. The two die cuts are made using Spellbinders Grand Scalloped Rectangles. One thing I need to do is invest in a few more 'Grand' dies, as I only have a few. I could have cut a better shape for this card with the Cricut, but I really wanted the embossed edges. I again used Vintage Photo on the script die-cut, but on the film die-cut, I used a little black soot. I did use a little of my Cosmic Twinkles around the edges. I think that even a vintage Hollywood card needs a little glitz!


The 'Happy Birthday' ticket is stamped on some of the left over cream card, using Sam Poole's  Celebration Tickets stamp set, distressed with Vintage Photo.


I finished off with some gorgeous coffee creme coloured crushed satin ribbon, a little diamante pin from my button box, a few peel off starts and 2 Creative Expressions hat pins...


But....the whole card was really made because before Christmas I had bought a little tin of Tim Holz movie reel ribbon and I had been itching to use it. I attached it across the topper with tiny brads and let it rise up to give it a 3D effect. It will easily fold flat and then bounces back. I love it, but will use it wisely from now on!


Carole X


For this project I used: 8x8 Card blank
                                  Cream card
                                  Debbi Moore's Diamond and Lace CD
                                  Vintage crushed satin ribbon
                                  Tickets from My Mind's Eye Kraft Fun 12x12 Kraft card
                                  Sam Poole Celebrations stamp
                                  Vintage Photo, Black Soot distress ink
                                  Cosmic Shimmer PVA glue and Cosmic Twinkles
                                  Tim Holz Film reel ribbon
                                  items from stash

Saturday, 25 February 2012

Pretty in Pink - 25th February

Good Morning bloggers,


I'm back today with the first of two cards made for commissions...I have also been working on a few new cards to upload in the next few days....


It's very difficult when I get asked to make two cards for the same person, whatever happens they are going to have my 'stamp' on them and my challenge is for them to be different. 


For this card, which is 8x8, I started with a base layer of card from my Desert Flowers pad. I bought this on a whim and goodness it has been very useful! I shaded the edges with Spun Sugar distress ink, just to lift it a little and then I went for a letterpress effect for the next stage: I took the Spellbinders Heart Squares die and inked it with Perfect Medium. I then placed white card over it and embossed it as normal through the Grand Calibur. The result is the the embossed card can then be cut ut by hand, sprinkled with embossing powder (in this case Cosmic Shimmer Aurora Crystal and heat embossed. Unfortunately, it doesn't really show up in the photo.


I typed the greeting before cutting and embossing it with a smaller die from the same set.For the shading I used Worn Lipstick distress ink. I made the flowers using felt and the Flower Creations and Spiral Blossom One Spellbinders. I just love making these flowers from felt! The age greeting is cut from the Lacey Ovals die, shaded with Worn Lipstick ink and I finished the card with wide, sheer ribbon in a nice bright pink...a rather cheery card I think!


Carole X

Thursday, 23 February 2012

Plain & Simple - 23rd February

Hello Bloggers!


Today's card is a simple design, which I think would work for birthdays or 'just because' days! I just started with some yellow coredinations card stock adhered to a 6x6  blank. I sanded it lightly, but it doesn't show in the photo. I matted and layered this with some card from stash (desert blooms pad) and then cut the two largest dies from the Spellbinders Heart Squares set. The flower was cut using the Anemone die, out of wool felt, which is really soft and easy to cut. The card is completed with a button from my button box and  tied with bakers twine. A nice simple card for those times we are all in a hurry.

I'm not going to be posting on Friday, we have some family staying over night  and I haven't had time to schedule any more posts...so hope to be back on Saturday!

Thanks for stopping by,
Carole X

Wednesday, 22 February 2012

Birthday Owl - 22nd February

 Hello!


I'm late today...no work, but quite a few orders to get cracking on and Sue Wilson has the Pick of the Day on Ideal World/Create and Craft, so it's been quite a perfect day really! I will be sharing today's creations over the next few weeks...and yes, I was tempted by some Spellbinders last night. Fortunately it's my birthday next month!!!!


Today's card is a 6x6  card that was made for a friend's birthday. I started by running some dusky pink coredinations card through my Grand Calibur using the Floral Delight Grand Impressabilities embossing die and then sanded it to raise the image.


I printed an owl from my Polkadoodles Sugar Babies CD and cut it out. I then cut and embossed a Spellbinders Lacey Ovals die. This is one of the dies I have always had problems releasing the card from - no matter how careful I am it breaks. Today on TV Sue Wilson suggested using some greaseproof paper over the die and I have been trying it with todays cards and baking parchment  - it works! I have had 100% success rate with my more intricate dies today.

I shaded the outer edge of the die cut with Spun Sugar distress ink and then cut the flowers from Spellbinders Floral Creations, put layered them to make just one flower, the card is white, finished off with Spun Sugar.

Finally I  taped brown and pink polkadot ribbon across the centre of the card and matted and layered the card with the die-cut, image and flower. A few pieces of card candi finished the card. 

Bye for now,
Carole X

Sunday, 19 February 2012

Birthday Bubbles - 19th February

Good Morning Bloggers!


It's a gorgeous Sunday morning here...I was up early to let our hens out into the garden and they've been clucking happily (and quietly) to themselves ever since! Normally, I try and schedule a week's worth of posts and just revisit to 'tweak'. It's really the only way when I have to go to work and have time to actually make the cards.


Yesterday we went into Bristol for a meander in the lovely Clifton area (it was wet and dreary yesterday- shame) and one of the shops we went into was a sic-fi comic store. I used to be a bit of a nerd about sci-fi (I know it's hard to believe) and I still like it, but less. But I am envious of all these people who make a living from comic art, because from Manga to Marvel, I think it's amazing. Anyway, I digress! This store actually now has an art and crafts section, I kid you not. It consists of books for knitting and crocheting monsters and robots, but I was taken with a little book called 'Steampunk Softies' with patterns and instructions to created little Steampunk miniatures. I bought it....so watch this space, especially as I have yet to create a proper steampunk card!


Today's card is far from Steampunk...it's fun and cute, I made it for a commission and I was really pleased with it!


I began with an 8x8 card blank which I covered with blue and white dotty paper printed from do crafts digital designer  and slightly distressed the edges with the merest hint of weathered wood distress ink.


I then embossed a smaller square of coredinations card with a floral mat from 'That Special Touch' and lightly sanded it. I printed the images from digital designer Tulip and Friends (Tulip and Hot Diggity Dog) and die cut it with Spellbinders Grand Scalloped Rectangles. Again I shaded the edges with Weathered Wood distress ink. I made the rosette from the same base paper and cut the birds and flower with Spellbinders dies from the Cuckoo Clock set. The greeting was printed and cut with Spellbinders  Lacey Ovals die. The border circles were made using a Martha Stewart punch. I then finished it off with a little touch of Cosmic Twinkles and my favourite  final touch, ribbons and buttons!


Have a great Sunday and see you tomorrow,
Carole X

Saturday, 18 February 2012

Mouse Magic! 18th February

Morning!


I like making cards that take a long time to make, where I can really fill the space..but I don't often get the chance because most of the time I am creating a card with a remit from a customer and I am working to against the clock! But first and foremost I love to craft and every now and then have to take time just to put a  card together that is just for the enjoyment of it...and this is exactly how I would describe this card: I hope you like it!


I started with a 6x6 card blank, so it's a smallish card with a lot of dimension. The base blue card with raised polkadots is from my stash box, the paler blue is coredinations, which I embossed by putting a 'That Special Touch...' floral mask through my Grand Calibur. I gently sanded the card to raise the image, but there isn't much of the card showing. I then printed some backing paper (on to card) using docrafts 'Tulip and Friends' cd, cut the card into a square and distressed the edges with worn lipstick distress ink and sewed all around the edge by hand. The little mouse fairy is so sweet! I printed her from the same cd and then cut it out with the Spellbinders heart squares die, The edges were also shaded with  worn lipstick, but very lightly. My first choice would have been spun sugar, but I have used that one right up!


The heart is from Spellbinders classic hearts dies and the deckled circle was cut with my Cricut and tucked behind the heart square, which was added at an angle. The flowers, butterfly and ribbons were all from stash; the cupcake is from the cd and the bird, blue tag and blue flower were cut from the Spellbinders bird sanctuary die.


Finally I finished off with some lace and cosmic shimmer sparkle on the wings and wand.


This card was satisfying to make for several reasons...although I made a sketch of the layout, it came to life as I worked, I used all my favourite craft tools - Spellbinders, Grand Calibur, Cricut, distress inks, ribbons, stamps and cd, so it is a very eclectic finished card, that was a lot of fun to make!


Bye for now,
Carole Z


Thursday, 16 February 2012

Cuckoo! 16th February

Morning!


Today's card was a bit of fun with a vintage 'Country' Style. I bought this  Spellbinders die from Polkadoodles at the NEC last year and I confess, I had had my eyes on it for a while. It is fun to use and very effective, besides it's effect can change dramatically depending on the type of effect you want and the colours you choose.


With this card I was going for a kind of whimsical 'homespun' look....


I constructed the clock using Coredinations papers in blue and brown, which I then sanded to bring out the embossing. I started with a 6x6 card, layered with some card from stash. It's quite a deep blue with raised polka dots.


The clock was placed to one side and I printed the greeting on white card-stock, die cut using a die for the Spellbinders Ironworks Accents set and shaded with weathered wood distress ink. The card was edged with lace and the two butterfly buttons were the final touch.
What do you think?
Carole X

Wednesday, 15 February 2012

Simple Rose - 15th February

Hello!


Today's card is a very simple, any occasion card but I hope you like it!
I started with a 6x6 blank, which I covered with some green heavyweight scrapbooking paper (from stash) with a vintage floral design. Although the paper was 'pre-distressed' I added some Shabby Shutters distress ink around the edges.


The greeting was printed on white card, which was again edged with Shabby Shutters. Again apologies for the photo..I promise you that it's on the card straight! I made the rose from some thin card from my scrapbooking stash using the Spiral Blossom One die and used leaves from Creative Expressions, to which I sewed a few green bugle beads.


Carole X

Tuesday, 14 February 2012

Happy Valentine's Day! 14th February

Happy St Valentine's and lets hope you are all feeling loved today! Of course today's card has to be themed...so hope you like it! It's the one I made for my husband...


Apologies for the photography! I started with a linen effect gold base layer. I love this particular type of mirror card as it has an elegance about it. I cut the heart on white card from the Spellbinders Classic Hearts die set and then needed a slightly larger heart in gold, so created a faux die. I used a piece of red embossed paper for the next layer and cut it with the Grand Scalloped Rectangles die. The black card was cut with the same die and stamped it using the beautiful Indigo Blu, 'Love is' stamp. I've only just discovered them and this was my first use of the stamp. I stamped it with Perfect Medium and then embossed it in gold. The actual card looks so much better than the picture, which because if the light, doesn't really show up the gorgeous detail in this stamp - but it will be getting lots of use in different ways...so watch this space!


Finally I  shaded the edges of the heart with Worn Lipstick (of course!) distress ink and dotted gold 'pearls' around the edge using Cosmic Shimmer. Finally I added red organza ribbon. The sentiment was typed on to the card before die cutting.


Love to you all, Carole X

Monday, 13 February 2012

Pink Butterfly - 13th February

Morning,


We're all in the pink today..and loving it! This was one of those cards that I made for me..because I wanted to...and am saving for a special birthday or to sell at a craft fair!


I made the tiny dots around the base white layer with my wonderful Tim Holz ruler and then layered this with a deep pink linen effect card from stash. Before fixing the card to the blank I tied an organza ribbon and bow along the side. The sentiment was printed on white card and then cut on the Grand Calibur using a die from the Spellbinders Parisian Motifs set, coloured around the edges with Spun Sugar distress ink. I cut and embossed the butterfly from my favourite 'Fanciful Flight' Spellbinders set, in both white and pink to give it 'flight'. I added the flourish freehand with Creative Expressions Cosmic Shimmer Pearl PVA and the final touch is the pretty zipper rose, again from Creative Expressions.


That's all for now!


Carole X


Sunday, 12 February 2012

Pip n' Cheese - 12th February

Hi there Bloggers,


Remember I made a few twisted easels recently? Well this is the last of them for now...Tatty Button's little friend Pip: cute!


I covered the top and base with paper from stash and followed through with the green theme, edging the card with Shabby Shutters distress ink (very lightly)  and adding green vintage ribbon and sone buttons from my button jar. I stamped and coloured Pip and his parcel with Promarkers and covered the ball of string with bakers twine to make it 'pop'.


The flower was cut with the Spellbinders Flower Creations die and fixed with a brad. I cut it on white card but coloured it with Spun Sugar distress ink, which I also used on the greeting/stopper(cut from labels 4 small). Just out of the photo in the right corner is a little flower with a mini stamped Pip on it.


Carole X


Materials used: Promarkers, distress inks, Spellbinders, Bakers Twine

Friday, 10 February 2012

Anemone - 10th February

Morning,


I made this card a few weeks ago and it was based on an design shared by Sue Wilson on her blog. I liked it so much that I had been itching to try it! Firstly, I typed the greeting on white card and then embossed the card top and botton using the a Creative Expressions mask with my Grand Calibur. I started with a white card blank and matted and layered alternately with white and gold mirror card, finishing with the white embossed card.
I  made gold pearl dots on the embossed card with Cosmic Shimmer Olympic Gold.  made the flower using the Spellbinder Anemone die with paper from stash and layed this on top of a bow tied around the top layer with a pretty edged sheer ribbon.


Hope you like it!
Carole Z


An extra note from me....due to having to do a 'proper' job, I usually schedule my posts a week ahead. I had forgotten this card was being posted today and it is very poignant for me to see it...I made it for my 98 year old aunt's birthday a month ago. There was an error made by the post office (I won't bore you) and in the end my cousin (her grandaughter)had to collect it, so it was late. By then aunty had been taken poorly and was in a nursing home. Sadly she passed away yesterday. It was peaceful and she had told me when we visited Sunday that she was ready to 'leave'. She thanked me for my cards, which she always loved to open. So my oldest aunty, the last surviving connection for me to the past is now reunited with her daughter, husband, my Mum and all their other brothers and sisters...sleep peacefully aunty Mabel X


Thursday, 2 February 2012

Floral Bouquet - 2nd February

Morning!


I don't know what to call today's project...it's not a card, just a collection of little flowers I made last week and decided to make into a picture. There was no real thought behind it, but it is now on a shelf in my craft room and is rather pleasing to look at...it has certainly given me some inspiration in the type of flowers I am making for cards and other projects!


Where to start with the description? The leaves were all cut from my Matchmakers Brights pad and for most of them I used Spellbinders dies from various leaf sets...however...some were cut with the Cricut Storybook cartridge, which was very naughty of me because it is white core. It was hard to cut, because I couldn't get the pressure etc right and it tore the paper..and didn't do the blade any good either. But I needed the  flourishes and at present none of my Spellbinders dies are big enough.


All the flowers were made with Spellbinders dies: the big pink flower is the Peony die ...I just cut several different sized layers, secured them together with a brad and then crumpled it up. An easy flower. If I had wanted to I could have added inks or micas, but for this project I wanted to keep it simple (and I wasn't in a messy mood!).


Two of the felt flowers, the orange flower and the pink flower were all variations of  a rose, made with the Spiral Blossom One die and the white flower is created with a mix of blossoms from Flower Creations.The large red felt flower was a little more complex....
I cut three layers from the lovely Anemone Flower Topper and then added the centre by just rolling a strip of red felt. For all the felt flowers I used Cosmic Shimmer acrylic glue. It grabs the materials for glueing really quickly and dries absolutely clear. This glue and Pinflair are the only glues I use.


When I look at this particular flower now, I think that in yellow, with orange for the bugle, it would make a gorgeous daffodil, so I'm going to give this a try.


I think I will just call this an exercise.. would be a good one for a workshop, I will keep that in mind!
All the best,
Carole X

Friday, 6 January 2012

January 2012

Hello Bloggers! I hope it's not too late to wish you a Happy New Year! Despite all my plans to make lots of cards in the 2 week post Christmas break I have had from work, I only finally got around to making some on Tuesday! That also happens to coincide with the day that my husband Tom went back to work. Even then, it wasn't a chance to play with new Spellbinder dies and some stamps because I had some orders to fulfill. Oh well, it was still card making and I did manage to incorporate some of my new items!


On Wednesday, I managed to make some stock cards - I have been asked for more wedding, plus acceptance and regret so those are what I have been mostly making, so I will share an example with you...


Firstly however, one of a series of different cards I have made using this really cute stamp that was free with Craft Stamper Magazine that I bought before Christmas. You may know that we keep a few hens as pets and I love these funny little creatures, so if I see something with hens on, I want it!


Cock-a-doodle-doo!I stamped the image with Memento Ink and coloured it with Promarkers. I then cut the image out using a Spellbinders Labels Four  Small die and mounted it on a 6x6 card that I had covered with Polkadot paper from stash. I faux stitched around the edge of the card using my Tim Holz ruler and a white Gelly Roll pen. I cut the flower in felt on my Grand Calibur using the Flowe Creations die. This was one of my Christmas presents and it is really useful. I then added a red button, threaded with Bakers Twine. Across the top I took some red vintage ribbon and ruched it.  A really simple card and I hope you like it...it's good for a whole number of occasions really or just to say 'hello'.


Darn these dark days when you have to use flash to take a photo and you still get shadows..so apologies for this photo.


White Wedding For this one I used a Creative Expressions mask and used it to emboss in the Grand Calibur. It's hard to see, but I have added Cosmic Shimmer Pearl PVA dots, using the embossed card to form the pattern. I then simply typed  the greeting and cut it out using the  heart circles die, which I cut in 2 sizes and again added cosmic shimmer pearls at intervals. I used to be really scared to use this effect, but practice makes...you much more confident!


That's all for now, I'll be back soon, 
Carole x


January 14th


I have two pieces of work to add tonight and what a struggle it's been uploading them! For some reason when I try and upload from iPhoto today, blogger isn't recognising my last imported photos...I had to go the long way round through my files and I still haven't found the one I really wanted to upload...oh well...maybe tomorrow!


Lola Rose 18th This is a  fun 18th Birthday created on an 8x8 card blank. I mounted a pink textured card on the front and cut the '18' with my Cricut in the same pink, with a white shadow. Using Spellbinders Grand Scalloped Rectangles, I cut one in pink glitter and one in white and I shaded the white card with Spun Sugar distress ink.


The image is a Pink Petticoat, Lola Rose digital stamp, coloured with Promarkers and finished with Cosmic Shimmer 'Cosmic Twinkles' on the cake icing. I cut out the image and used sticky fixers to secure it to the die cut shape.


I typed the greeting and cut it out with a Spellbinders Lacey Ovals die, which was also distressed on the edges with Spun Sugar. The card was finished off with ribbon tied through the sentiment and around the number.


Vintage Tag
This tag is part of an as yet unfinished card project, but it took so long to make that I wanted to share it with you.


I cut the shape on Chipboard (it's Spellbinders Labels One Small). It was just a little too thick for my Grand Calibur, so I actually drew the shape from the die and cut it out. I then printed some dressmakers dummy backing paper from the My Craft Studio (MCS) Fabulous Fifties programme and covered the shape with it, distressing the edges quite heavily with Tea Dye distress ink. I punched a metallic eyelet through the top centre and threaded off-white vintage ribbon through, tying it in a bow. On top of this I added a button from stash, tied with a little string bow.


The fifties dress is an image printed from the same MCS programme and although it doesn't show in the photo, the skirt is decoupaged to add a little dimension.


I used brown vintage ribbon along the bottom part of the shape,ruching it to add more dimension. Finally the flower.. I was really pleased with the flower!


Now and then, rummaging in secondhand book shops/charity shops I will buy a cheap, old book with thin paper for the pages. After making sure that I am not destroying a priceless first edition (:D), I use the pages to make vintage flowers.  I cut this one using the Spellbinders Flower Creations die and before constructing the flower, I added Tea Dye distress ink unevenly over the petals. I used five layers for this one (and the added bonus is that with thin paper you can die cut quite a few in one go) and put a glittery metallic brad through the centre to hold them together. I used a bone folder to curl the petals, but with paper this thin they almost curl themselves. I finished it off with thin silk ribbon behind the flower and added some little faux pearls.


It's not often that I get the chance to work on a card like this and I haven't made a tag for a long time.. note for 2012..more tags...maybe I'll get a chance to start those ATC cards yet!
That's it for tonight...hope you like them,
Carole xx


Tuesday, 19 July 2011

July 2011

8th Wonder Art - explained!
Hi there! This is my first 'crafty' blog and I have to say I'm a little nervous...but here goes....before the cards, the introductions (skip this bit if you want!):

I'm Carole and I live in South Gloucestershire with my husband, Tom and our 2 hens, Buffy and Cara. I work locally 3 days a week for a small charity which helps people find volunteer roles; I like my job but I would trade it tomorrow for a chance to create cards full time!
I have been crafting - forever! My dad really got me into it I guess...true, Mum taught me how to sew and knit' but they were always just 'functional' things with which, I am ashamed to say, I was easily bored. Dad was a sign-writer by trade and an artist by nature. Everything I know about art, I learned from him. 

Apart from drawing and painting, my first introduction to paper crafting was scrapbooking. Off and on I have spent quite a bit of time visiting the American side of my family in California and this wonderful way to record your memories has always been second nature to them...I am so pleased that it is now popular over here, although I hardly get any time for it nowadays. Believe me, a day at the beach? Boring. Hours spent in Michaels Craft Store (Their equivalent of Hobbycraft, but bigger). Paradise!

Over the years I have dabbled in different crafts including beaded jewellery and some folksy sewn items, but my road always leads me back to cardmaking/paper crafts. I still enjoy a bit of sewing but only items to sell on my craft stall, such as Primitive style snowmen (watch this space nearer Christmas). Currently I am also dabbling in a bit of knitting, but there are rules...it has to be chunky and fast. I decided last week to try and knit jackets to keep battery hens warm...it's taking forever with dk yarn and smaller needles and I don't have that kind of attention span! I hope the hens aren't too fussy!

My card crafting is quite eclectic and although I'm not a very girly person, my cardmaking style of choice is very girly....ribbons are a must and sparkle and buttons.....although I have been lured by Tim Holz and all the grunge stuff, but my grunge so far is still pretty girly. I am intrigued by  Steam Punk too and aim to give it a go! Some of my Twitter crafty pals (you know who you are) are also enticing me into trying ATC's, so that's another thing on my list.


 I suppose if pressed I would say that I love rubber stamping most, although CD crafting is a close second. I am a Promarker ADDICT! I love the things....give me an image to colour and a selection of promarkers and I'll be happy for hours! But I also love gadgets and tools...I have the 'baby bug' Cricut and the Gypsy, both of which I use every day (my gypsy is usually in my bag..who wants computer games!); I also own a Cuttlebug and a Grand Calibur and again, I use them both all the time. In fact, along with stamps and promarkers, Spellbinders dies are another BIG obsession. If I lost any of the aforementioned items I have no idea what I would do!

Who are my crafting idols? I admire quite a few crafters: Joanna Sheen, Barbara Gray (Clarity Stamps), Nikky Hall(Polkadoodles),Tim Holz (who doesn't?)...but my real inspiration is Sue Wilson from Creative Expressions/Particraft. Every card she makes is absolutely beautiful and so...substantial...nothing flat about them and I think you will see her influence in some of my cards.It would be true to say that I am 'in awe' !


Where do I get my stash? Well Create and Craft is a major source, but we also have an excellent local shop in Chipping Sodbury...Out of the Blue...check it out if you're local...ribbons there are beautiful..and papers...and....also love Polkadoodles and a number of other web based craft sites that I'll mention as I go along...


I do go to Hobby Craft, who doesn't? But usually because I'm in the Mall!


Last year we went to the NEC craft event which was superb...photo...me with Nigel and Leonie from Create and Craft!

What do I do with my cards? Well I sell as many as I can, I have to - to help fund this crazy habit! I make personalised cards to order and am quite busy that way. I do a few craft fairs and would like to do more. The cards I post on here will be a mix of cards made for my stash or to give to friends and family on their birthdays.


8th Wonder Art...that's the tag/name under which I sell my cards...why 8th Wonder Art, you may ask? Simple really, ever since Tom & I holidayed in Egypt, a long while ago, before it was trendy,when you had to have vaccinations for everything heaped on you and exploring the pyramids and tombs was a lot of fun, he started calling me by the name 8th Wonder, if he calls me Carole, something is wrong! Apart from a few of his work colleagues who only know me as that, no one else in the world calls me by that name. I will credit Tom with coming up with this name for my cards, it's been so long, I don't remember!

Well enough chat for now (I will use this as a crafting diary so expect some words) and on to some cards..I have quite a backlog to upload over the next few weeks, but here are a few of my latest to get started. I hope you enjoy looking at them....


Tatty's Sunflower
 I adore the Tatty Button stamp range. This first card is an 8x8 made for the forthcoming Birthday of my very dear friend Janet. The card base is covered with card from the Tim Holz & Ranger Coredinations Distress Collection, Rusty Hinge and after some light sanding I added dies from Spellbinders Parisian set, plus the stamped image on an oval die. All dies were both cut and embossed using the Grand Caliber. Tatty was coloured with promarkers and I stamped the sunflower twice to add  a touch of decoupage. I think the Butterfly from the Spellbinders Flights of Fancy set is amazing. I cannot stop using it. I hand stitched around the edge to give it a 'folksy' look and some extra lift.
You will also notice from most of my cards that there has to be ribbon...oh dear, another obsession...and buttons..oh dear!


Butterfly Floral
The above card is another 8x8 (I love working with this size and most people who order cards from me want large). The rose backing is some paper from my stash and I hand-stitched all around the edge again (I do find this strangely therapeutic). The swirls were freehand using inkessentials enamel accents in black and the leaves were cut from my Cricut Storybook Cartridge, which I have to say is the cartridge that gets the most use. I made the flowers using three sizes of the Spellbinders Anemone die using a technique I saw Sue Wilson demonstrate on Create and Craft (another addiction).
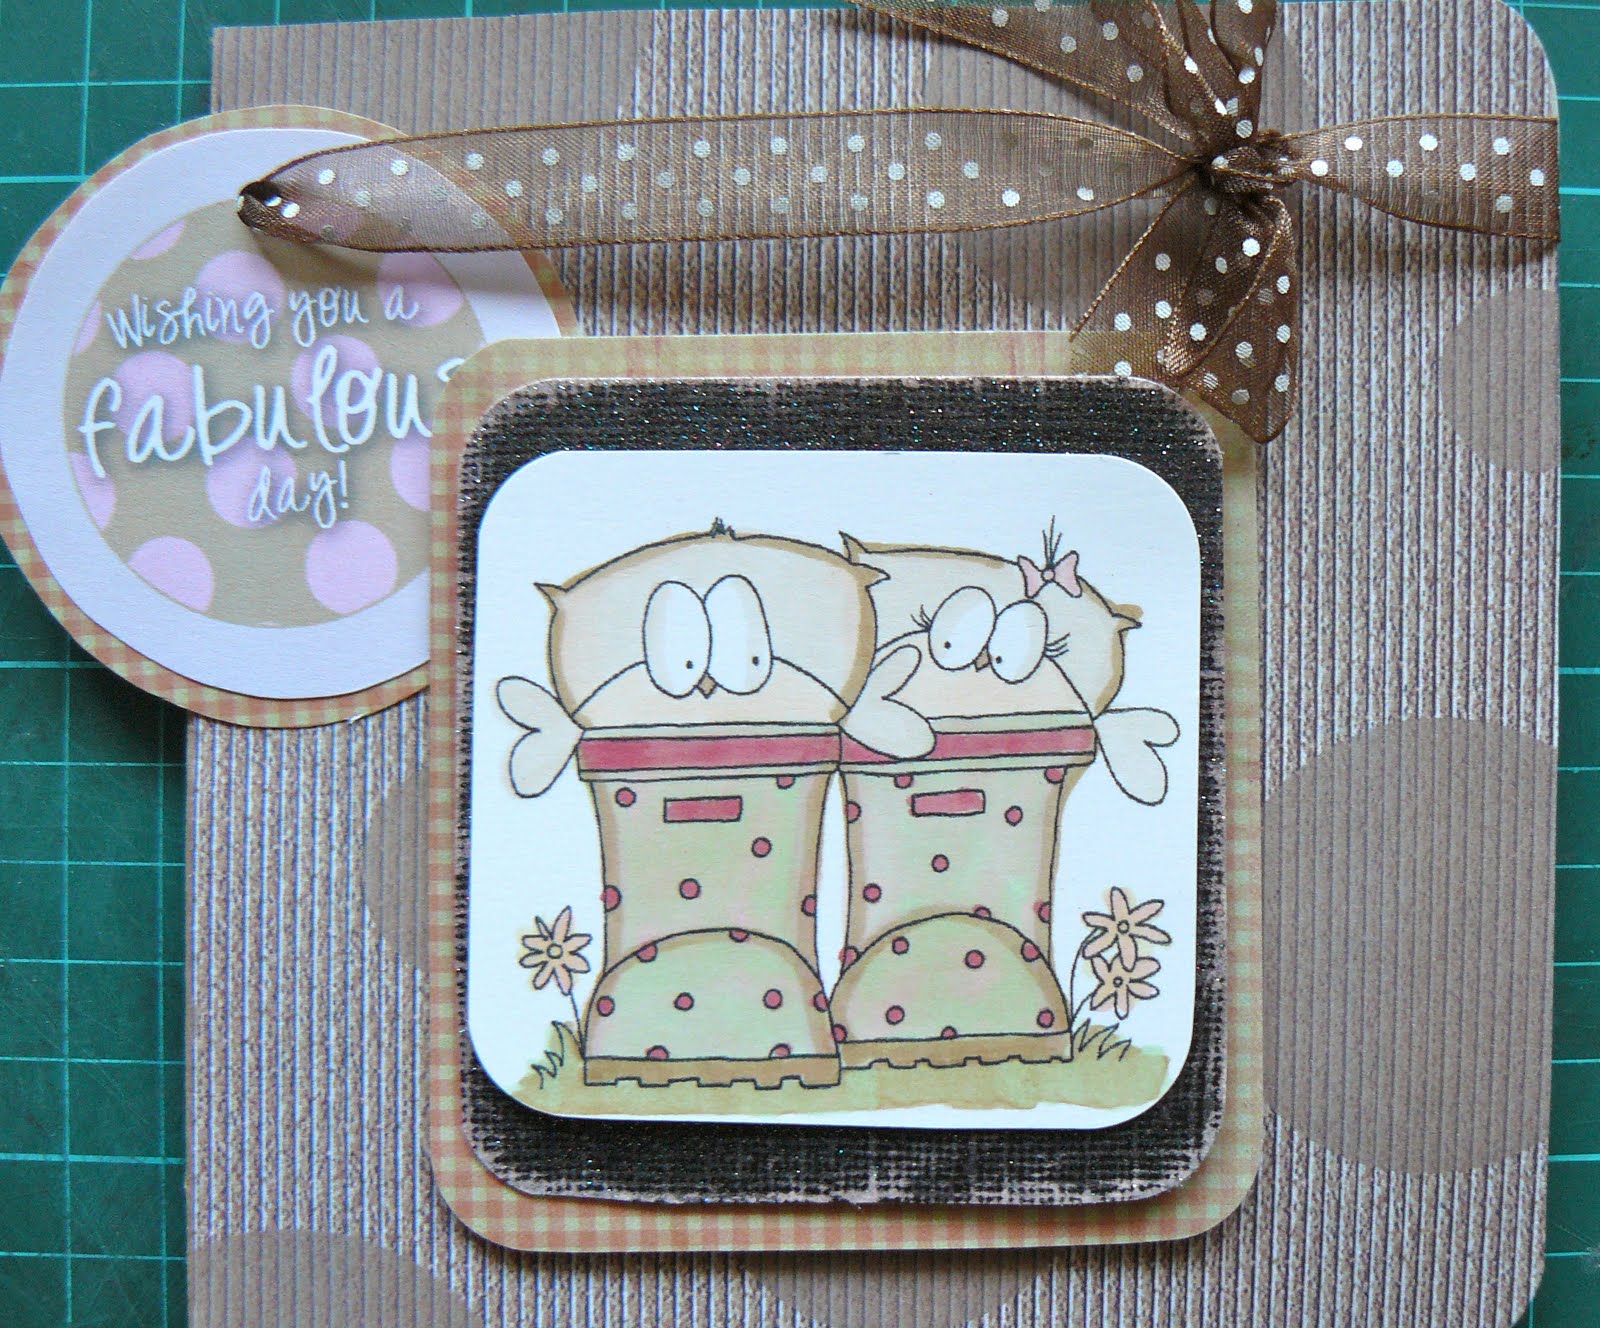


Pink Wellies
I collect Polkadoodles CD's and thanks to Nikky Hall for continually bringing out such amazing artwork. I especially love the digital stamps....because of course...I can colour them with Promarkers!
The above welly boots are from Sharon Armstrong's 'Winnie' digital stamps on the Double Sprinkles of Kraft CD, the polka dot kraft backing paper was printed from the collection on the CD and the flower was again made using some paper from stash, a brad and the anemone die.

Blue Wellies
These wellies make such super cards for anyone who perhaps likes gardening - male or female. They are simple and funky. This time I embossed some card from the Tim Holz/Ranger coredinations range (Blue China) and sprayed it with stick and spray irredescent glitter by Crafters Companion,I coloured the digi stamp with promarkers and tied with a blue ribbon - easy!


'Elegance'
I have had this 'Parisian' shoe stamp several years, it was actually part of a birthday gift from one of my best friends...and I love it! It is so versatile and a good seller at craft fairs. This card is backed with pink card from the coredinations gemstones range and I actually stamped the shoe onto some quite subtle but elegant paper from my stash, which I had die cut with the cricut (same for deckle edge paper that backs it). The shoe was colured very lightly with promarkers (Blush) and then I used extra fine glitter to finish it, plus a few diamantes. The flower was made from Hunky Dory die cut flowers kit and the card was finished off with a big voile bow. The flowers from the Hunky Dory kit are fine, they always deliver good quality, but I prefer to make the flowers myself.


Wedding Cake
This is a 6x6 card and was a bit of experiment! I embossed plain vellum  with polka dots using the cuttlebug and did the same to polar white card, which was die cut from the cricut. The cake was also cut from the cricut using the Paper Doll Dress Up' cartridge, which was then embossed using the cuttlebug. There was a whole lot of embossing and cutting going on with this card! I got a bit carried away! The sentiment was typed onto polar white card and then die cut from a Spellbinders ribbon die. I ruched the silk ribbon at the side and added some faux pearl gems for the finishing touch. I have to say, in real life the dots appear far more subtle, but next time I would probably leave the card on which the cake is mounted, plain.


Gorjuss Girl: My Own Universe
This was a fun card, simple but fun! The image was stamped on to a deckled oval Spellbinders Die, coloured with promarkers and the die was distressed at the sides using a mix of Tim Holz Tattered Rose and Antique Linen distress ink. The card is 6x6 and the front is covered with paper printed from the Polkadoodles 'Wonderland' CD. I simply added a co-ordinating ribbon and sentiment from stash. 

Christmas in July! 
All crafters know that we have to start making cards early, especially if we sell them! The last few years have been really last minute, so I made an early start and already have quite a few made. Below are a few of the designs I'm using this year.


These three cards are all variations on a theme; I can't take total credit for coming up with the original design, it's adapted from a similar idea in a Spellbinders book I own. I have used 6x6 card blanks and on the front I have matted and layered - polar white, berry red, polar white. The centre is a berry red and a white label nestie and the beautiful Spellbinders 2010 snowflake, embossed and with a large bow fixed underneath. I have added different embellishments from stash on the top. The poinsetta above was actually made by a lady who used to do craft fairs and made beaded ornaments. They are gorgeous.


Victorian Bauble

This is the 2010 nestie and  can be used in so many ways. Here I cut and embossed the die on the front of a blank to create a hollow and then did the same with gold card to create a frame. I lined the hollow with red and gold paper from stash. 

The card below was quite simple in comparison:topped with coredinations gemstones card, it's an 8x8 card blank decorated with  a snowflake embossed oval nestie, 2 globe dies and a snowflake die. The greeting is made using one of the dies from the Parisian set. I ruched some ribbon at the side and tied a little through the tops of the ornament.


House Mouse Christmas 


Back to the adorable House Mouse stamps - the first one was stamped on to a deckled nestie and coloured with promarkers. You can't tell from either of the photos, but I have added flowersoft polar white and a touch of glitter to the snow and the image.
 
Usually, I don't work Wednesdays & Fridays, so these are the times I usually devote full days to card making. I have made the following cards today... at the moment I'm trying to make a bundle to give my cousin to sell at a Cancer charity fundraiser she has organised in July, so I'm making an assortment of birthday, baby, wedding and general...
 Baby Girl
The above is a 5x5 baby girl card, it took quite a while to make but I really enjoyed it! The first layer doesn't really show up in the photo, but it's a light brown/white dotty paper printed from the Polkadoodles Wonderland CD, the second layer is a dusky pink coredinations, which I distressed around the edges and the next layer pale yellow coredinations, which I distressed and inked around the edge with a mixture of antique linen and mustard distress inks. The pram is cut from my 'Sampler' cricut cartridge and mounted on label spellbinder dies. Everything else is from stash...the pink ribbon is American Seambinding, which I wetted, scrunched up and dried off with my heat gun.


Baby Girl 2
Having made the first card I made this with all the card I had left over! It's bigger, 6x6 and is made in exactly the same way as the previous card, except I cut out the word 'baby' using the 'Cuttin' Up' cricut cartridge.


That's me up to date, but here are a few more from my archives....

Just Because -  a simple card, which was a bit of a practice when I first got the cricut last Christmas!
 Running Rabbit!
This is from Polkadoodles Wonderland rubber stamp set - I love it and have made quite a few cards from it, but unfortunately most of the photos I took were a bit poor, so it'll have to wait until I've made some more!

 House Mouse Balloon
This is a dear little stamp, I've used it a lot inside a card on an insert, but it's also really cute on a small card or a gift tag
 Gift Bag
This gift bag was made for a friend's daughter's 21st earlier this year and it was a labour of love! The base card is silky and really sumptuous to the touch and apart from the key, I made every element, including the flower
 House Mouse Easel
This was a card made for a customer: the tags, numbers and frames were all made using the cricut and the mice were, of course, coloured with promarkers!
 Dotty House Mouse
Another dear little stamp for a small card - these mice are just so cute!
 Winnie
This is a digi stamp from Polkadoodles 'Double Sprinkes of Kraft' - it's hard to see from this picture but this was a pop up card and this is the inside

 Winnie in the park,Park Bench, Garden Swing, Winnie's Pink Wellies & Winnie's Wellies..
The "Double Sprinkles' CD is made for working with Promarkers and is an absolute delight. These are all 8x8 cards - such fun


 60th Birthday
I was asked to make a 60th card with a gold theme for a lady who likes shoes and fashion...I used the shoe stamp again; this time I didn't colour it at all, just added glitter to the shoe. The gold card was embossed with the cuttlebug and the 60 was cut using the cricut. The base of this easel card has been decorated with another favourite stamp of mine, which I have owned for years: a simple bag and shoe.
 This little piggy...
This was another card made to order for someone who likes piggys. The pig is from the Polkadoodles 'Back to Nature' CD (I think! I have so many & it was a while ago...will check)

That's all for now...hope you like what you see...will update again next week
Carole X
July 20th 2011

Thanks to everyone who has visited so far and sent me such lovely messages via Twitter and Facebook...I'm blushing! Also thanks to those of you who have joined! Please leave a message on the blog...I will be updating with more cards on my August blog starting next week...happy crafting all!