Total Pageviews

Showing posts with label promarkers. Show all posts

Friday, 29 May 2015

Crazy Birds #2 - Friday 29th May 2015

Hello Friends,

Hope you've all had a good week! Thank you for all your comments on the sewing card...my volunteer loved it and was sure her friend would too.

Today I'm sharing another card made with Tim Holz Crazy Bird stamps and I'm going to make this my contribution to this week's Sunday Stamper Challenge (week #357) from Hels Sheridan - deets here

I haven't had a chance to take part for a while because I've been so busy, but this week's theme is 'anything goes' so no excuses.

I have managed to get some crafting done this week...there are a lot of birthdays amongst family and friends coming up, plus one of my American family is about to have a baby (fortunately I know the sex so could get on with the cards!), so I've wanted to get everything made in plenty of time, especially as we have a week's holiday coming up soon.


This is a 7x7 card, I made the splattered background with a mixture of  Dylusions inks and coloured the birds with both Chameleon and Promarker pens. I then cut them out and mounted them on the card with 3d foam tape.

I cut the little word tiles using the tiniest of dies from my Spellbinders Classic Squares set and add the letter by hand. I did the same inside, mounting them inside a Spellbinders Word Bubble die.


 Finally I stamped the birds on the envelope and coloured them, first of all placing some card inside the envelope to prevent the ink bleeding all the way through.


Thank you so much for stopping by and have a lovely weekend y'all!

Love and Hugs,
Carole X

Saturday, 8 December 2012

Emergency Crafters DT card - Saturday 8th December

Hello my blog friends!

Hoping you are all well...aren't we getting scarily close to Christmas? The new challenge from Emergency Crafters is 'Deck the Halls', so we're looking for Christmas cards and projects and this is my Design Team card...


I decided on a design with a bit of sparkle and really like this digital stamp from Mo Manning's Digital Pencil! I coloured the skater with promarkers and added Cosmic Sparkle for the glitter. The background paper is from the House Mouse Christmas project CD and I left it as it printed, choosing to leave the sparkle to the foreground image. I finished off with some gorgeous, shimmery ribbon and a snowflake cut from Spellbinders 2012 Snowflake Pendant, to which I added a beautiful little BoBunny button, from a pack sent to me by one of my lovely blog friends.

Thanks for stopping by and why not hop over to Emergency Crafters and enter the challenge? There's a very nice prize up for grabs!

If any of you do have a mo to pop over to Fantastic Ribbons and leave a comment on my ribbon wreath, I'd be so happy! The folks at this wonderful ribbon site and blog are thinking of starting challenges in the new year too!
Happy Saturday all!
Carole X

Friday, 25 May 2012

Emergency Crafters Challenge -Friday 25th May

Hi Bloggers,

Here is my first DT card for Emergency Crafters new challenge - Dreamland. It was a fun card to make using one of LOTV's oh so cute fairy stamps, coloured with Promakers. I think a fairy splashing into a fairy cake is definitely dreamland.

The challenge runs from 12 noon  (GMT) until on 7th June to enter, Happy Crafting!


Thanks for stopping by,

Carole X

Friday, 18 May 2012

Summer days - Friday 18th May

Good Morning Bloggers!


I was up bright and early this morning trying to create a design for Hels Sheridan's Sunday Stampers Challenge today...but I was having a loss of mojo moment, so thought it a good time to say hello and update!


Today's card was in fact made a few weeks ago, for Christine Emberson's Hope and Chances blog. Christine has started doing a brilliant thing by inviting her followers to submit a project inspired by some photos. It's a lovely idea because there's no competition and we all get to see each other's work.


This was my contribution...


I used this stamp on the bookmark a few days ago..it's really cute and is by Stampavie. I used a 5x5 card and covered the front with kraft card, matted and layered with a sheet from the Spring Jubilee pack that I had free with Cardmaking and Papercraft magazine. I then created a strip for the centre using kraft card and coredinations card, which was sanded to raise the polkadots. 


The image was stamped with memento, coloured with Promarkers and die cut using labels 24. I stamped the greeting using an LOTV stamp, using Latte Adirondack and die cut it using the smallest Heart Circles die. Both die cuts were distressed lightly using Spun Sugar. I cut the butterfly from Fanciful Flight and the flowers from Flower Creations and the Aster Flower Topper. The accents were also free with the magazine and the lace, candy and gems were from stash.


As Christine is the only British Spellbinders Design team member, it seemed fitting to make this a bit of a Spellbinders homage...also you know they are my faces anyway!


I took this card into the garden to photograph.. just to carry through the theme!


I'm not going to get much done today, as Tom has the day off too, so it looks like I'll be returning to Hels' challenge project this evening!


I am excited though..next Thursday Amy and I will be delivering our next workshop, full of my favourite things - Spellbinders, Grand Calibur, Cuttlebug and Promarkers...can't wait!


Thanks for visiting, following and commenting!


Carole X

Tuesday, 15 May 2012

Birthday Girl - Tuesday 15th May

Good Morning Blogger Friends,

Hope you are all well and up to lots of lovely craftyness! I've been 'missing' a few days as we had such a busy time over the weekend...but more of that tomorrow...

You all know that I love LOTV stamps, so I'm back today with one I have made for this week's challenge which is to use your favourite tools. As regular visitors will know mine are Spellbinders, coupled with my Grand Calibur and Promarkers...tools I just couldn't be without in my craft room and at least one of them features on most of my cards.

For today's card I have used them all...


After stamping with black Memento ink,I coloured the image very lightly with pro markers as I wanted to keep a 'sketchy' feel to it. I then die cut using Labels 24 and distressed the edges with Spun Sugar distress ink. Then using wool felt, I die cut from Spiral Blossom One, three times. Two of the roses are made from the whole die cut, but the two smaller ones I made from one cutting.


Finally I decorated the inside of the card to co-ordinate and stamped the greeting with an LOTV sentiment.


Thanks for stopping by!


Carole X


I'd like to enter this in


Lili's Little Fairies Thursday Challenge: Your Favourite Tools


http://liliofthevalleythursdaychallenge.blogspot.co.uk/

Monday, 7 May 2012

Flower Girl - Monday 7th May

Good Morning Friends,


I hope you have been enjoying this Bank Holiday weekend! Where we live, Saturday and Sunday were actually quite pleasant, but the rain has returned with a vengeance today! We've spent quite a bit of time at home and in the garden over the weekend; our old hen Buffy is very poorly and in need of a lot of TLC, so it hasn't been an entirely 'crafty' weekend, needless to say I am all behind again, but never mind, our pets come first.


Now for some good news!!!! A few days ago I entered my first evert blog challenge - the House Mouse Monday Challenge...and guess what? I won a prize!!! I couldn't believe it when I checked this morning.

I don't get a lot of time to sit and 'play' as a crafter...there is always a pile of commissions, I'm now preparing for the workshops I'm teaching with my friend (and I am loving that this chance has happened) and I work three days a week in a job that has left me with a lot of stress of late...so playing with the Sarah Kay stamps recently is the most I've really done. However, when I saw that last week's  challenge was "anything goes', I made myself sit down and make a card...and it paid off. I think House Mouse and LOTV had to be the first challenges I entered because I love the stamps and style of cards you can make with them. The lovely comments from the House Mouse Team on my blog entry have also really encouraged me to keep on finding the time to enter!


I have also been asked to join the Design Team of another site, but more on that when/if it happens!


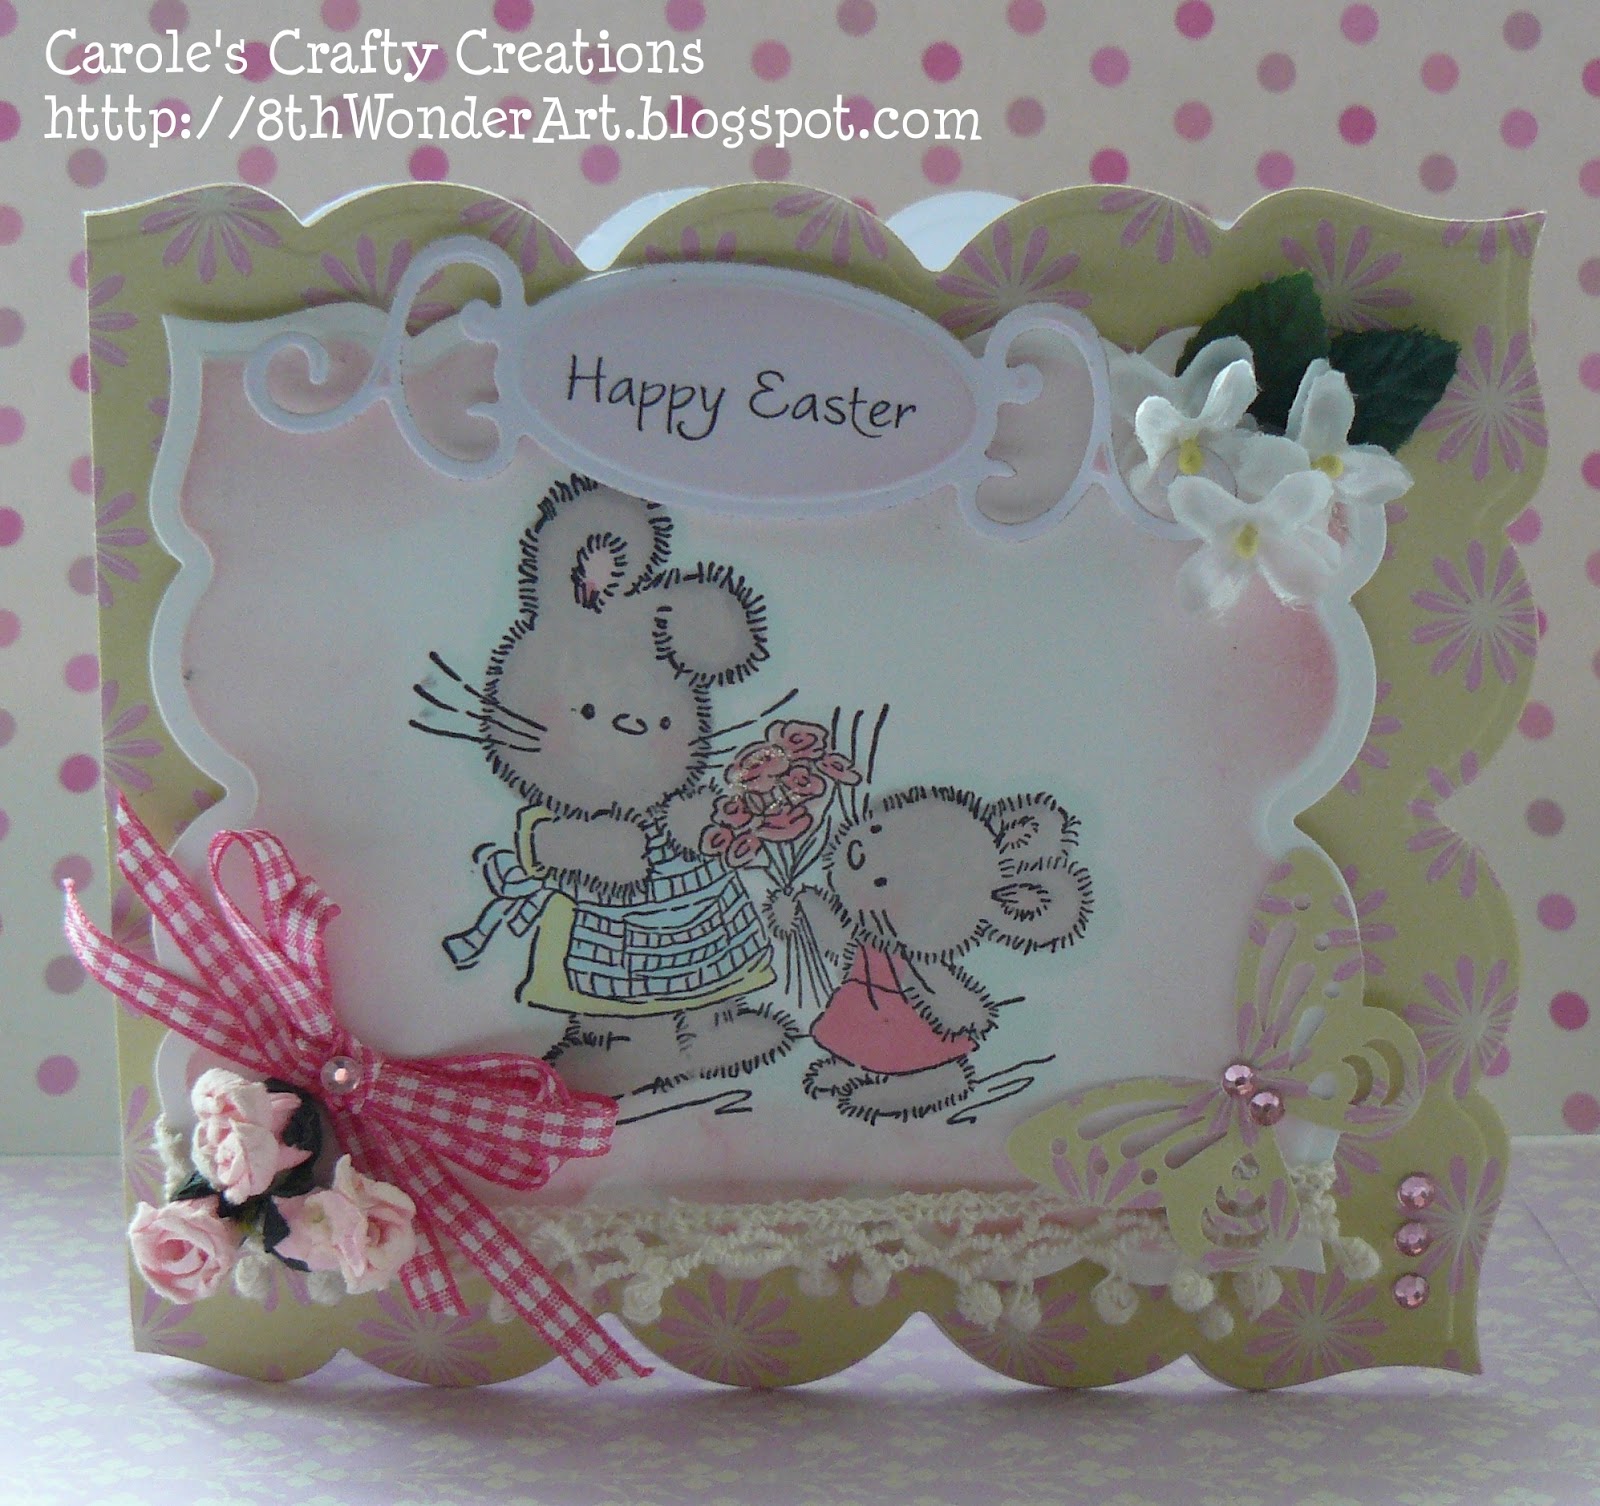
Do you remember when I started posting my designs for the one Sarah Kay stamp in preparation for our workshops? I said at the time that I would definitely buy more of them, so a few weeks ago when I was in Out of the Blue, Chipping Sodbury, I bought another one...

I love this image..she reminds me of the Holly Hobby dolls, bags, cards that were around when I was a kid. In fact as I was colouring her, she reminded me so much of what my bridesmaids looked like at my wedding! They wore blue and the material was Laura Ashley (dresses and pinafores made by my dear auntie Mabel, who sadly passed away just a  few months ago). The only difference is that they wore floral circlets in their hair.

 I didn't actually photograph this one very well and for this I apologise - it was just a very quick twisted easel made to try out the stamp and to make a card to send to a friend for her birthday. I used papers and paper flowers  from stash. The flourishes on the base are  from a Spellbinders Flourishes die set and are actually dark green. I also used Grand Labels 23 to die cut the image (shaded with Milled Lavender distress ink), a little stamped and embossed butterfly I had left over from my preparations for our last workshop and I cut the felt flower from Spellbinders Floral Creations. The button in the centre is a plain wooden button that I coloured with a Promarker.

The little girl is coloured with Promarkers and as I read some blogs this morning, it made me ask a question about other crafters preferred colouring materials....I do watch Create and Craft (too much!), in fact it keeps me company when I am working in the craft room on my days off..of course the premise of this channel is to sell...it's great that they have given us the monthly classroom with Barbabra Gray; I do get a bit annoyed that we never get enough of Sue Wilson's demos because there is always so much on sale and it sells out so quickly and sometimes one of the Companies that sells there seems to be on so much that I'm sure they have shares!

Back to Promarkers....I know there are a lot of different pens etc out there, both alcohol based to water based and the Companies that come on to sell always want to push their product as the best, of course they do - that's business! My dad was an artist and also a cartoonist, he knew about Promarkers long ago and I was dabbling with them before Create and Craft started selling them through the brilliant Nikky Hall from Polkadoodles. Personally I think her demos and tutorials are the best as far as Promarkers and any other pen on the market art are concerned. But the many different types of pen available can get very confusing, especially  for  people who are just starting to craft. I do actually know someone who has bought various pens from all the different makes and types (and spent a fortune in the process) and just doesn't have any idea where to start (she lives the other end of the Country or I'd help!). I can only tell her to decide what really suits her and stick with it. I know that's easier said than done isn't it? 

Through friends I have tried Copics and Whispers and some others, but for my  personal colouring tastes nothing will ever replace the Letraset pens, be it Promarkers or Flexmarkers. Colouring pens are all expensive, especially when you have got all the sets and are buying them individually. I have just found that they give the best finishes and colours. Okay, Copics you can change the ink...but that suggests it will run out...I have been using my Promarkers for years and use them almost daily. I can honestly say that in the past 5 years, I haven't replaced one of them!

Of course I don't only use Promarkers - I like colouring and blending with my distress inks and whilst I haven't used them for a while, watercolour pencils too..it's all about having fun and using the tools you like in the end, isn't it?

Thanks for stopping by and sorry it's such a long post today, enjoy the Bank Holiday, whatever the weather where you are!
Carole X

Saturday, 5 May 2012

Sarah Kay (4) - Saturday 5th May

Hi Friends,


This is the last of my designs with one Sarah Kay stamp for a while (I think!); I've been making these as examples for our next workshop, but will hold back on the final design we are going to work with until after the workshop later this month!
This easel card was made using absolutely beautiful BoBunny papers (from Out of the Blue, Chipping Sodbury), I love these rich colours. I stamped the girl and die-cut the image using Grand Labels 23. The edges were shaded with Spun Sugar distress ink to give some depth. I chose the deep yellows and pinks in the Promarkers to complement the pink and gold in the paper. I also cut a circle from the the Heart Circles set, just the right size to place a sentiment on the middle and I then cut an Aster Flower Topper. The ribbon, roses and button were all from Out of the Blue.


This is probably the closest to my final project for the ladies who come to our workshop...and before I finish today, I want to share with you that our local small town, Chipping Sodbury (we are right on the edge of the beautiful Cotswolds) has been voted Best Market Town in the UK 2012...how brilliant is that!


Thanks for stopping by!
Carole X

Friday, 4 May 2012

L'il Baby Girl - Friday 4th May

Good Morning Friends,

First of all, welcome to my new followers..thank you so much for following my blog and checking in to see my cards..one of my favourite times I try to make every day, even if I don't 'post' myself, is to have a look and see what all you wonderful crafters are sharing.

Also, thank you to those who posted comments on my House Mouse card yesterday, it was the first challenge I had entered and I actually found I was quite a bit nervous doing it, but it's done now and was actually quite a pleasant and fulfilling experience! So much so, today I am going to enter a challenge I have been wanting to enter for a long time..you know that I love making cards with LOTV stamps, so it had to be done!

For today's card, I am back to LOTV and one of the stamps I bought at Ally Pally a few weeks ago..this really cute baby stamp...

 I started with some paper from stash, a polka dot in yellow and pink and some lemon glitter card. Using a die from Spellbinders Grand Labels 23, I die cut and embossed one edge of the polka dot paper and mat and layered over the lemon glitter to form the base of the card.  I stamped the image on coconut white card and coloured with Promarkers, then I die-cut using Labels 24 and shaded the edges with Spun Sugar distress ink. I stamped the sentiment from another LOTV baby stamp set that I own and die-cut this with Heart Circles.

The paper flowers, buttons, pearls, lace and ribbons are all from my stash box.

Thanks for stopping by my blog!

Carole Z X


I'd like to enter this into:

Lili's Little Fairies Challenge: Anything Goes


http://liliofthevalleythursdaychallenge.blogspot.co.uk/

Thursday, 3 May 2012

Jumping for Joy! - Thursday 3rd May

Hello Friends!

Today's card takes me back to my favourite little crafty creatures..those darling little House Mice. I am building quite a collection of these stamps, thanks to Joanna Sheen introducing us to them some time ago now.

This is one of my most recent acquisitions and I think the reason I like this one so much is because I like having a 'play' with the jumping mouse!

For this card I decided on a twisted easel design: I die-cut the shape using polkadot card and Spellinders Grand Labels 23 and I covered the base of the card with a lightly patterned paper from stash. I also cut another Labels 23 in this paper to tidy up the back of the easel.

The image was stamped using Memento ink and coloured with Promarkers. I cut out the images, separating the jumping mouse. I also stamped the sentiment and another 'mouse in a thimble' image from the set and  coloured him with Promarkers and cut it out.

I took a  white Jellyroll pen and drew faux stitching around the base of the card and the die cut. The pincushion element of the stamped image was placed on the die-cut and fixed with 3D foam, leaving a gap in the centre that is sealed off to prevent any sticking. I taped a strip of strong acetate to the back of the jumping mouse and threaded this through the gap...now all you have to do is move him up and down like he's jumping!
A button tied with bakers twine and some stitched ribbon was added to carry through the sewing theme and the little mouse is the card 'stopper'


Thanks for stopping by!
Carole X


I'd like to enter this card in The House Mouse & Friends Monday Challenge:

Monday, 30 April 2012

Sarah Kay (3) - Monday 30th April

Good Morning Friends!


Well for once, I didn't mind that it was an awful day weather-wise yesterday, because in between a few family things (where we never even had to leave home), I got quite a bit of crafting done - including a commission, some more 'playing' in advance of our workshops, making a few personal cards and I even got to play with the brayer I got from Clarity Stamps at Ally Pally!

But today's card was made last week when I was trying out some designs with one stamp, a cute Sarah Kay image from Stampavie.


This time I die cut the card using Spellbinders Grand Labels 23 and also cut the green check paper to match. I then also cut a Spellbinders Heart Square using Coredinations card. I was mostly using up bits of scrap card from my 'bits' box on this one and I also found some lighter green stripey paper and a lighter green piece of Coredinations, which I  cut square and mat and layered for the front panel.

The girl was coloured with Promarkers in violet and pink tones for the clothing and green for the doll and then cut out and placed on the front of the card using 3d dots. To finish off I added some violet blossoms, gems and a few pieces of ribbon,which we actually at the bottom of my ribbon box and I felt had a vintage look to them. I stamped the tag, but didn't want to 'overdo' with another die-cut shape, so cut a simple tag shape, which I mat and layered the same as the front panel and tied with a piece of mauve and white vintage bakers twine.

Thanks for stopping by and have a good Monday, whether working or playing!

Carole X

By the way, thanks to Linda for pointing out I had the word verification on...I didn't know I had and I know that I also find it annoying when visiting blogs. It's turned off now and you should find it easier to leave messages X

Saturday, 28 April 2012

Sarah Kay (2) - Saturday 28th April

Hi Friends,


Thank you for your comments on yesterday's card...I think it's one of my favourites that I have made recently. I did say yesterday, that I would be back with a different card today and I'd spread the Sarah Kay's out a bit -but-  I was in Bath, meeting a good friend all day yesterday - we had a good catch up over lunch and got soaked! So I didn't get a chance to photograph my latest cards, so I will do that today!


For the second card in this 'series' I wanted to use the Spellbinders die I bought at the Ally Pally stamp show a few weeks ago...The Decorative Chateau Gate..which I used as a window...


The first picture is a close up of the view through the window: I stamped a background from a Jayne Nestorenko background stamp and leaves from an Artemio stamp, both with Bundled Sage distress ink; then using a water brush I lightly coloured the images with the bundled sage, just adding a little tea dye for the gate and shabby shutters for the sky. This was then cut out and placed behind the frame.


I shaded the shutters with Shabby Shutters too and in 'reality' the colour looks nothing like as dark as in the hoot!
The paper used to cover the card blank is from  a lovely designer paper pad (Spring Jubilee by pinkpaislee) that was free with Cardmaking and Papercraft Magazine this month. I just thought it gave the card a vintage feel.


The image was coloured with Promarkers and forgive me for not listing the colours today because I have temporarily mislaid my 'list' - I'll add it later...


Then I cut out the little girl this time and placed her in front of the window. Finishing touches were all from stash...buttons, ribbon, flowers and little pearl gems to finish of the window. I really like this dye and eventually will buy the stamps that go with it...got to save first though!


Have a great Saturday and see you tomorrow...we are in Bristol today for most of the day as my brother in law has his car in an Italian Car Show (it's a bright red Alfa Romeo sports car that he restored and is very proud of, but that's as far as my knowledge of cars goes!), so it looks like we'll be getting wet again..so I'll be catching up with those blogs I follow later!
Carole X


Friday, 27 April 2012

Sarah Kay (1) - Friday 27th April

Hello Friends,

Well I promised I'd be back today with a card that is much more 'me', though as I confessed yesterday, I do like manga art/anime quite a lot too!! But, give me a girly, floral project with Spellbinders,Promarkers and ribbons and I'm a very happy gal...in fact the only item missing from this card is ribbon, because for once, I thought it would be that little bit too much.

I have titled this Post Sarah Kay (1) because on various days over the next week or so, I will be uploading a series of different cards using the same stamp! I've been having a play with this Sarah Kay image from Stampavie, just to try out possible designs for our next workshop..and that is all I am saying about the workshop, the final cards and dies chosen to use there won't be uploaded to my blog until after the workshop in May.

I have no idea why, but this is the first time I have used a Stampavie stamp; I have watched Mel Heaton bring them to Create and Craft and really admired her demos and examples, but until our local shop, Out of the Blue, started stocking them, I hadn't seen them in the shops. However, having used this one I can safely say it certainly won't be the last! Apart from the stamp itself being the super high quality that Mel has always professed, I really like the cute Sarah Kay design images. Followers will know that I'm a big fan of LOTV as far as stamping goes and I think these images lend themselves to the same type of cards.

On to my first card...and what fun I had making it, with everything I already had in my stash box!

 I always choose my paper/card before colouring, otherwise it's a lot of time wasted finding colours to match...it's far easier to match the Promarkers. I decided on a twisted easel style card and covered the base and front triangle with some paper I had recently got free in a pad with a magazine. I then used a Grand Oval die to cut from purple pearlescent card. I stamped the image on cocoanut white card and coloured with the Promarkers: Ivory, Blush (skin), Sandstone, Cinnamon, Chestnut, (hair), Satin, Ivory (underclothes), Lavender, Bluebelle, Amethyst (pinafore,bow, doll) Caramel, Sandstone (shoes), Pale Pink, Baby Pink (doll).


After colouring I used the next size down in Grand Ovals to cut the image out and shaded the edges with Milled Lavender distress ink. Then, using cocoanut white again, I die-cut from the Antique Frame and Accents set, the Frame. I cut this in half to make a faux stand for the card.
The frame was adhered to the back of the Grand die and then I cut another die from the same purple card stock to stick to the back and hide the mess within!

To finish off I used mulberry roses in a lavender colour, some craft flowers and gems, all from stash and made a small pink simple ribbon rose. Finally cut the small butterfly from the Spellbinders Fanciful Flight set to balance the roses I had added to the top of the frame.

Hope you like this and thank you for visiting!
Carole X

Thursday, 26 April 2012

Teen Anime Rocker - Thursday 26th April

Hello Friends,


Yesterday, one of the days I don't go to work, so can stay home and craft was an ideal crafting day...way to wet and windy to leave the house!


I've been working on some cards using new stamps and will be sharing them from tomorrow, but today's card is a quick card made for a thirteen year old boy. Teens can be really hard to make cards for, but Kenny K has some super stamps that always seem to hit the right note...


This is a Kenny-K digital stamp,which I coloured with Promarkers...the stamp is 'anime rocker' so I wanted to colour it quite boldly, in manga fashion.


I die- cut the stamped image, using the out of the box method to make it look like the image is bursting out of the background.  I used a Grand Scalloped Rectangles Spellbinder and shaded the edges with faded denim distress ink. I also cut another background from the same die in silver mirror card. I covered a card blank with some paper from stash, added a ribbon and typed greeting using labels 24, which is also shadowed with silver mirror card. I just added a few stars to finish off.


Thanks for dropping by, I'll be back tomorrow with my much favoured 'girly cards' !


Carole X

Friday, 20 April 2012

Mice Day! - Friday 20th April

Hi Friends!


I'm back! Sorry to have been 'away' all week, but it's been a busy one and whilst I've managed to dip into and try to comment on all of the blogs I follow, there has been no time to update my own.


Today's card is a simple one, I just made whilst setting aside a small amount of time to just play with design a few weeks ago...


I first of all stamped this cute little House Mouse on Coconut White card, which I just love for both stamping and die-cutting. It's available through Creative Expressions. After colouring the mouse with Promarkers, I die-cut using Labels 24 (Spellbinders) and shaded the edges with a mix of Worn Lipstick and Spun Sugar distress ink. All the coloured papers I used were from a pad that was free with a magazine recently. I first of all stuck the pink paper to the front of a 6x6 card blank and then using Labels 24 again, cut into the front of the card. This left me with an aperture and a spare die-cut shape.


The die cut shape was used to mat and layer the original die-cut, after first shading with worn lipstick ink. 


I covered the inside of the card blank (the side facing the aperture) with yellow and pink paper from the same pack and mat and layered the other die-cuts on top to fit snugly within the aperture, adding a few gems and a little cosmic twinkles.


Finally I cut some bunting from the yellow paper and attached it to the front of the card with some ribbon and a few tiny brads. I stamped the sentiment on one of the smaller dies from labels 24 and shaded the edges.


Have a good Friday and thanks for stopping by!
Carole X


Thursday, 12 April 2012

Brits & Bikes - Thursday 12th April

Good Morning Friends!


First of all I'd like to say Thank you and welcome to my new followers..I hope you will drop by often and leave comments. I love to read them and if you like what you see please spread the word!


I try to post at least every other day, this week has been a bit busy so I've missed a few. I'm very excited today because I will be teaching my first card-making workshop tonight! I'll be teaching the workshop with my friend Amy, who owns an absolutely wonderful gift and craft shop in nearby Chipping Sodbury and who has also organised the evening. I was thrilled when Amy asked me to join her with the workshop and I think we are both nervous and excited for this evening. We have a full class and we spent all Tuesday evening making the final preparations for it.


Tomorrow, Tom and I are off to London for the weekend and will be going to the Stamp and Scrapbooking Show at Alexandra Palace. I've been to the NEC craft shows several times, but never this one, so that's something else to be excited about - however, if I'm not too tired when I get home tonight, I will post for tomorrow and report on tonight's craft class.


Today's card is one I made today for a commission..my remit was a 30th Birthday card for a male who likes motorbikes. I do use this Lambretta stamp from 'Little Claire' quite a lot, especially as it features a Union Jack - so we'll forget it's an Italian bike!


I coloured the bike with Promarkers and then cut it out using Spellbinders Grand Scalloped Rectangles and shaded the edges with faded denim distress ink, adding a mod button from stash. I cut a larger rectangular using paper from Docrafts British papers set, which is also the background. I then cut a small Labels 24. The letters and numbers were cut using the Cricut. Finally, I stamped "Happy Birthday' along the top and bottom of the card and added red, white and blue gems.


Thanks for stopping by....have a good day!
Carole X

Friday, 6 April 2012

Happy Easter - Good Friday 2012

Good Morning Friends,


Hope you all have a wonderful Good Friday...we are having family over later this morning for our annual brunch, so I am just grabbing a few minutes between preparations to post this Easter card today..there will be a different one for the next two days.


This card is  a Lilli of the Valley stamp, coloured with promarkers...


The stamp could be for birthdays, Mother's Day, to say sorry...but I figured that the bunnies also lend it to Easter! I cut out the card using a recent Spellbinders buy..Grand Labels 23. I decided it was time to increase my collection of Grand Nesties and I am really pleased with this purchase. I cut the card with the die and also backing paper from stash, which I used as the base. Then I cut the stamped image with the same die and shaded the edges with Spun Sugar distress ink. I added a little lace, flowers and a punched out butterfly to finish. The greeting was typed and die cut using Spellbinders Fancy Tags.


Hope you all have a lovely day...I did so much baking after work yesterday that I'm already worn out, but looking forward to the day!


Carole X


Wednesday, 4 April 2012

New Baby Boy - Wednesday 4th April

Morning!


Aah my first favourite day of the week...I get to stay home and craft! Today's card, was made for my American cousin, Bree and her husband Jonny, in celebration of the birth of their first child. It really doesn't seem more than two years ago we were over in California celebrating their wedding!


As I write the card is on it's way to Florida, where they now live as Jon's career as a US Coastguard helicopter pilot, means they have to move wherever he is posted. Bree is a true California girl, but I guess their first move to Florida is pretty good!


I'm safe posting it, as I'm sure they won't be looking here...


This is an 8x8 card, covered with blue polkadot paper I printed from DoCrafts Digital Designer - Me to You. I think I have said before, that I do have a lot of craft CDs and they do come in useful, but I use them a lot for papers...there is usually something suitable.


I also printed the matching plain blue, but a smaller layer and using the Tim Holz ruler made tiny stitching holes..to think I used to do this freehand!


I took some of the Coredinations polkadot paper in yellow and die-cut this with Spellbinders Romantic Rectangles. This was primarily my choice for this card because it seemed to fit perfectly with the stamp. The stamp is another Lilli of the Valley, which I clouded with Promarkers and die-cut with a smaller nestie. I used some lace to make a border around the larger die-cut and added the flowers before attaching it all to the card.


Finally I added three miniature polkadot buttons and a double bow with a larger button tied with some embroidery thread.


I was really pleased with the finished card, hope you like it!


Thanks for stopping by,
Carole X

Tuesday, 3 April 2012

Mouse Celebration - Tuesday 3rd April

Good Morning,


Today's card is another Lill of the Valley stamp and could really be used for any celebration...


I wanted to give it a fresh Spring feel so I kept to light, pastel colours. I really like using yellows at this time of year!


The base card was covered with paper from a 12x12 scrapbook pad in my stash (a Dovecraft pad of pastel colours). Then using my Tim Holz ruler I made tiny stitching holes all around the edge and made faux stitches with a white jelly roll pen. I cut a strip of Coredinations polkadot paper, sanded it and added to the centre front of the card. I then punched 2 strips in white, using a Martha Stewart punch and added this top and bottom.


I die-cut a small die from Teardrop circles on to some of the polkadot card and added a greeting from stash to the front if it.


The image was stamped on coconut white card  and coloured with Promarkers. I do try and keep a list of which ones I use for projects, but last week I was so busy and well, you know how untidy our desks end up, that I just couldn't find the notes!


I die cut using Grand Scalloped Rectangles and lightly shaded around the edge with faded denim distress ink. Polkadot ribbon was added to the centre layer before placing the image at an angle and the final touch was a hint of cosmic sparkle.


Thanks for stopping by and have a good day,
Carole X

Thursday, 29 March 2012

Troublemaker 2 - Thursday 29th March

Morning!


This is a variation on a previous post, in which the same stamp was used (and there is one more to come later in the week).


The stamp is 'Troublemaker'  by Kenny K (from Whimsy Stamps)  and I just love it because it's suitable for any pre-teen/early teen girl. This is an 8x8 card, which I first covered with black card and then matted and layered with bright the green polka dot from stash. The dark green  polka dot is Coredinations 'Tilly Dot' paper, which I sanded to raise the dots. I cut a strip for the centre of the card and added a strip of teal vintage ribbon.

I coloured the girl with Promarkers (colours listed below) and die cut on Spellbinders Romantic Rectangles, shading the edges with Faded Denim distress ink and adding a few flowers from stash.


To finish off I cut another strip from the Coredinations paper and punched the edge with a Martha Stewart Punch.I added a few co-ordinating diamantes. I also cut 2 shapes from Spellbinders Teardrop Circles and added a greeting. Final touches: a bow with a button from stash and a little hint of Cosmic Sparkle.


Promarkers used:


Skin: Ivory, blush, baby pink (lips0
Hair: Cinnamon, Chestnut, Caramel, Ivory
Ice-cream: Cocoa, vanilla, baby pink
Hoodie: Turquoise, Marine, Soft Green, Silver
Jeans: Denim, Sky
Trainers: Ice Grey 2, Ice Grey 4, Silver
Grass: Leaf Green, Grass 


Thanks for stopping by and thanks for leaving comments, I very much appreciate them,
Carole X

Sunday, 25 March 2012

It's My Party! Sunday 25th March

Good afternoon...and another warm and sunny one it is too!


Lilli of the Valley is one of my favourite stamp design companies - apart from producing such cute and endearing images, the stamps are also top quality. Today's card is the stamp entitled 'It's My Party' and I love it! I recently saw a post  on the LOTV blog where this stamp had been made into a 'Keep Out' sign for a child's door - brilliant idea!


I stamped on to Neneh card and used the following to colour:


Promarkers: Ivory, blush - skin
                    Caramel, shale, ivory - hair
Flexmarkers: Wild orchid,  soft mauve, pink pearl - dress, parcel, boots


The 6x6 card was matted and layered with paper and card from stock and I used a Martha Stewart punch to add another layer of mauve glitter card. The image was die cut using a Spellbinders Grand Scalloped Rectangle and the edges were shaded with Milled Lavender distress ink. I added these two layers across a ribbon added to the card and left to hang over the edges. I used some flowers I had in my stash box (having made an attempt to tidy my craft room yesterday, I am making an effort to use some items that have been in the box a long time!) and used little purple diamantes in the centre. I finished of with a bow and typed sentiment cut into a Spellbinders Heart Circles die, with edges shaded in Milled Lavender....and of course, a little dusting of Cosmic Sparkle was needed here!


I think the sentiment was really hard on this one...it would really have to be the right person to send it to I think!


Enjoy your Sunday!
Carole X