Good Morning Friends,
A scheduled post today, I've been organising a big social networking training event at work and today's the day- thankfully, much as I enjoy social media, I don't have to teach it - we have a real expert for that - but, with the help of a colleague and friend from another Volunteer Centre, I have to make sure it all runs smoothly!
Welcome to my new follower and thank you very much for choosing to join my little corner of crafty blog-land!
Welcome to my new follower and thank you very much for choosing to join my little corner of crafty blog-land!
Here is the mini tutorial I promised, showing the technique used to make my stamped bag
This is to create a project with a stamped image, but you can use TAP with your inkjet printer, remembering to print in mirror image mode if your artwork contains words, or freehand drawing.
As well as a hot iron (with steam turned off), these are the basic materials and tools you need:
Your stamp(s) of choice (try to avoid too much writing if stamping, as your image will be reversed); TAP paper; stazon ink, distress inks or your choice of colouring tools - pro markers, watercolours.whatever you like, but don't make your paint medium too wet as the paper can tear; you can transfer on to card, material, canvas..anything that will take an iron.
Stamp your image on to the white side of the TAP. This paper is expensive; it works out at about £2 per A4 sheet, but I have used those cheaper Tee shirt inkjet transfer papers in the past to make Tee shirts and I really can see the quality in this. The images really do look like they have been printed, it's amazing. You just have to remember to use it with care. The bag I made was big but I managed to make the whole project with one sheet. You could of course stamp direct on to some materials, but stamping on to TAP, makes colouring the image much easier, cleaner and vibrant.
Once you have stamped the image, colour as you wish. I used a mix of distress inks blended with a little water for this project.
Using a hot iron place the TAP on your surface with the image face down and iron evenly all over. I only did this small image for about 10 seconds, but if you peel away a corner slowly and it shows the image transferred underneath, you should be fine. If not, put it back and iron some more.
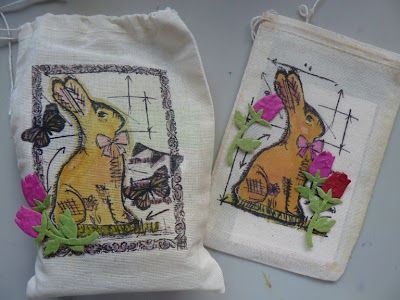
Here is the finished bag, the white line is only showing around because I put a piece of card inside, it's not actually on the bag. This image has a little writing, so I added some colourful tulips over the words. As you can see, I also made one earlier, which I framed and also added a few butterflies. TAP is available from quite a few places, I got mine and the bags from Crafty Individuals.
Thanks for stopping by!
Love,
Carole X


Good Morning Carol,
ReplyDeleteGreat Tutorial so well explained and shown.
I might just have a go at this, I love the concept.
Thank you for sharing this
Have a Great Day
Patricia xx
Hi Carole, thank you for doing this wonderful tutorial. I have some TAP but have been terrified to use it because of the cost (I thought you could only print with it). I will definitely try this out as I have a birthday present to make for a young girl and this has given me a great idea - thank you again. Hope the social networking training event goes well! Hugs, Anne x
ReplyDeleteMorning Carole...thank you for the great tutorial and something I would like to try...
ReplyDeleteAnne
Fantastic tutorial Carole! Also love the stamp you have used.xx
ReplyDeleteDid you know you can shorten your long urls with AdFocus and get money for every visit to your short links.
ReplyDelete